Monday, April 18, 2016

First steps to Spring Boot Cassandra

If you want to start using Cassandra NoSQL database with Spring Boot, the best resource is likely the Cassandra samples available here and the Spring data Cassandra documentation.

Here I will take a little more roundabout way, by actually installing Cassandra locally and running a basic test against it and I aim to develop this sample into a more comprehensive example with the next blog post.

Setting up a local Cassandra instance

Your mileage may vary, but the simplest way to get a local install of Cassandra running is to use the Cassandra cluster manager(ccm) utility, available here.

ccm create test -v 2.2.5 -n 3 -s

Or a more traditional approach may simply be to download it from the Apache site. If you are following along, the version of Cassandra that worked best for me is the 2.2.5 one.

With either of the above, start up Cassandra, using ccm:

ccm start test

or with the download from the Apache site:

bin/cassandra -f

The -f flag will keep the process in the foreground, this way stopping the process will be very easy once you are done with the samples.

Now connect to this Cassandra instance:

bin/cqlsh

and create a sample Cassandra keyspace:

CREATE KEYSPACE IF NOT EXISTS sample WITH replication = {'class':'SimpleStrategy', 'replication_factor':1};

Using Spring Boot Cassandra


Along the lines of anything Spring Boot related, there is a starter available for pulling in all the relevant dependencies of Cassandra, specified as a gradle dependency here:

compile('org.springframework.boot:spring-boot-starter-data-cassandra')

This will pull in the dependencies that trigger the Auto-configuration for Cassandra related instances - a Cassandra session mainly.

For the sample I have defined an entity called the Hotel defined the following way:

package cass.domain;

import org.springframework.data.cassandra.mapping.PrimaryKey;
import org.springframework.data.cassandra.mapping.Table;

import java.io.Serializable;
import java.util.UUID;

@Table("hotels")
public class Hotel implements Serializable {

    private static final long serialVersionUID = 1L;

    @PrimaryKey
    private UUID id;

    private String name;

    private String address;

    private String zip;

    private Integer version;

    public Hotel() {
    }

    public Hotel(String name) {
        this.name = name;
    }

    public UUID getId() {
        return id;
    }

    public String getName() {
        return this.name;
    }

    public String getAddress() {
        return this.address;
    }

    public String getZip() {
        return this.zip;
    }

    public void setId(UUID id) {
        this.id = id;
    }

    public void setName(String name) {
        this.name = name;
    }

    public void setAddress(String address) {
        this.address = address;
    }

    public void setZip(String zip) {
        this.zip = zip;
    }

    public Integer getVersion() {
        return version;
    }

    public void setVersion(Integer version) {
        this.version = version;
    }

}

and the Spring data repository to manage this entity:

import cass.domain.Hotel;
import org.springframework.data.repository.CrudRepository;

import java.util.UUID;

public interface HotelRepository extends CrudRepository<Hotel, UUID>{}


A corresponding cql table is required to hold this entity:

CREATE TABLE IF NOT EXISTS  sample.hotels (
    id UUID,
    name varchar,
    address varchar,
    zip varchar,
    version int,
    primary key((id))
);


That is essentially it, Spring data support for Cassandra would now manage all the CRUD operations of this entity and a test looks like this:

import cass.domain.Hotel;
import cass.repository.HotelRepository;
import org.junit.Test;
import org.junit.runner.RunWith;
import org.springframework.beans.factory.annotation.Autowired;
import org.springframework.boot.test.SpringApplicationConfiguration;
import org.springframework.test.context.junit4.SpringJUnit4ClassRunner;

import java.util.UUID;

import static org.hamcrest.MatcherAssert.assertThat;
import static org.hamcrest.Matchers.equalTo;

@RunWith(SpringJUnit4ClassRunner.class)
@SpringApplicationConfiguration(classes = SampleCassandraApplication.class)
public class SampleCassandraApplicationTest {

 @Autowired
 private HotelRepository hotelRepository;

 @Test
 public void repositoryCrudOperations() {
  Hotel sample = sampleHotel();
  this.hotelRepository.save(sample);

  Hotel savedHotel = this.hotelRepository.findOne(sample.getId());

  assertThat(savedHotel.getName(), equalTo("Sample Hotel"));

  this.hotelRepository.delete(savedHotel);
 }

 private Hotel sampleHotel() {
  Hotel hotel = new Hotel();
  hotel.setId(UUID.randomUUID());
  hotel.setName("Sample Hotel");
  hotel.setAddress("Sample Address");
  hotel.setZip("8764");
  return hotel;
 }

}

Here is the github repo with this sample. There is not much to this sample yet, in the next blog post I will enhance this sample to account for the fact that it is very important to understand the distribution of data across a cluster in a NoSQL system and how the entity like Hotel here can be modeled for efficient CRUD operations.

Saturday, March 26, 2016

Single Page Angularjs application with Spring Boot and Yeoman

I am very thankful for tools like yeoman which provide a very quick way to combine different javascript libraries together into a coherent application. Yeoman provides the UI tier, if you needed to develop the services tier and a web layer for the static assets a good way to package it is to use Spring Boot. I know there are tools like JHipster which make this easy but if you are just looking just a basic template what I am outlining here should just suffice.

So this is what I do, let us start by getting a basic Spring boot web template in place, the following way:


spring init --dependencies=web spring-boot-static-sample

This assumes that you have the command line application for Spring Boot available in your machine, if you don't then just follow the instructions here

There should be a folder called spring-boot-static-sample with all the Spring Boot generated code in there, now to layer in the static content in there, I have used the yeoman gulp angular generator to generate the code, the following way inside the spring-boot-static-sample folder:

npm install -g yo gulp bower
npm install -g generator-gulp-angular
yo gulp-angular

Almost there, just modify one of the gulp configurations - instead of creating the packaged javascript distribution to dist folder, let the folder be src/main/resources/static instead. In gulp/conf.js:


This is the folder that Spring boot uses to serve out static content by default.

And that's it, when you are developing the single page apps this can be done very quickly using the convenient gulp commands

gulp serve

and when you are ready to package the application just run

gulp build

which would get the static content into a location that Spring boot understands and then run the app:

mvn spring-boot:run

and the Single page app UI should show up.


Simple and clean!

Here is a sample project with these steps already executed - https://github.com/bijukunjummen/spring-boot-static-sample


Saturday, March 12, 2016

STEM project programming Language Choice - Scala

My daughter Sara who is in 3rd grade and I recently worked together on a school initiated STEM (Science, Technology, Engineering and Math) project and decided to do a programming challenge. I had recently got the excellent Elements book for her  and we wanted to connect the project to the Chemical Elements in some way. An idea that came to us was to try and combine the symbol of the elements and form words from them. So for eg. if you combine Phosphorus(P), Indium(In), Carbon(C), Hydrogen(H) you get PInCH. On an initial whim this sounded like an interesting and at the same time challenging enough problem for us to attempt.

Now our attention turned to the choice of programming language. I tried all the usual Educational programming environments and somehow programming pictorially or graphically did not appeal to me and I felt that it would be good to expose her to some basic programming skills. We together looked at Javascript as a possible choice, Python, Ruby, finally even Java and Scala. I am not used to programming in Python and Ruby, so that left Javascript, Java and Scala, after a little bit of more deliberation we decided to go with Scala, mainly because of the "Worksheet" support in IntelliJ which allows for small snippets of the program to be tried out without too much ceremony needing to be put in place. I would have been way more comfortable with Java as I use Java professionally, however I felt that it would be easier to explain the concepts with less verbosity to a third grader with Scala.


With the choice of language in place I was able to show her some basics of programming with Scala - declaring variables, simple functions, some basics of data types, basics of collections and simple ways to map collections.

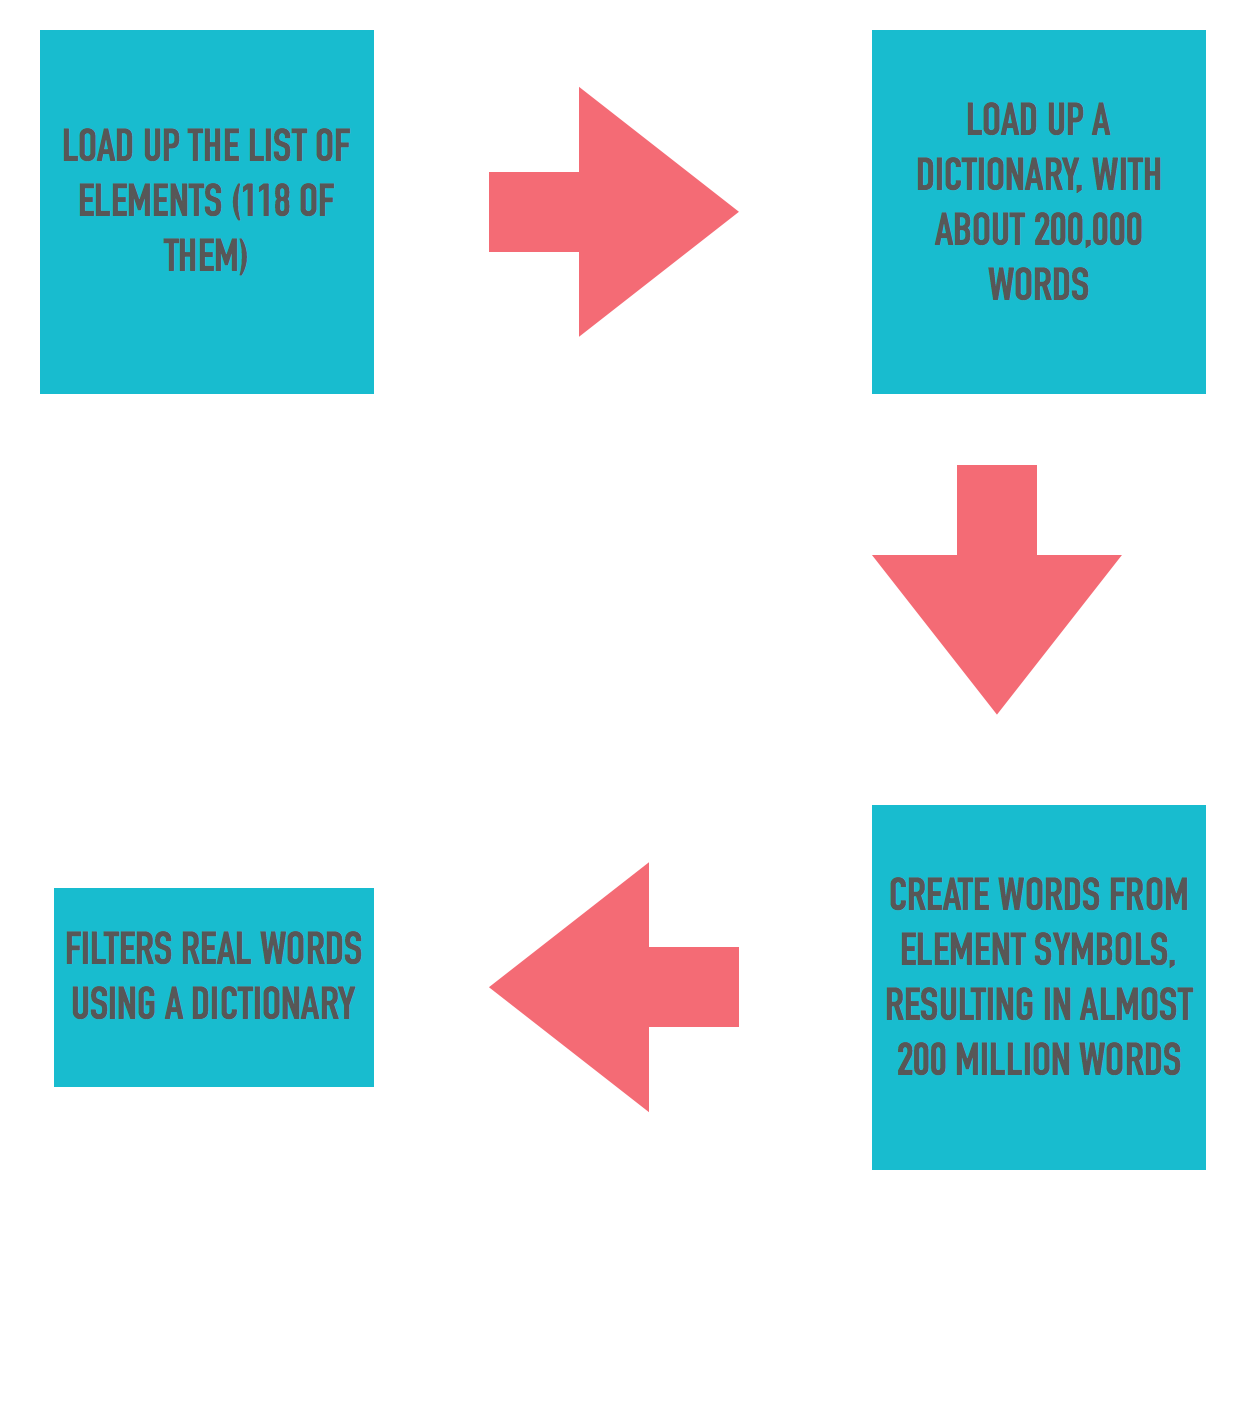
We then jumped into the program itself, the approach we outlined and wrote was simple enough - we needed a dictionary of words, we needed a list of elements and something to generate the words by combining elements and filter them using the dictionary. The final code is fairly easy to navigate. We have avoided concepts like recursion, any complicated data structures to validate words and stuck to simple iteration to generate the words.


We found about 12000 words altogether, these are some that caught our eye:


The revelation for me though has been in how easily my daughter picked up on the Programming language concepts with a seemingly difficult language like Scala. I know there are more difficult concepts along the way once we get past the basics, however my choice of Scala was to ensure that the foundation is strong enough. I will let her explore more esoteric features by herself when she works on her STEM project for next year !

Here is the code that we came up with.


Monday, February 22, 2016

Spring Boot with Scala

A while back I had tried out a small Spring Boot based sample with Scala as the language and found that the combination works out quite nicely - no big surprises there actually as Scala programs ultimately run in the JVM. I have now updated the sample with the latest version of Spring Boot and some of the supporting libraries.

To very quickly revisit the sample, it is a very simple web application with a UI to manage a "Hotel" domain object managed via JPA, represented in scala the following way:

import javax.persistence.Id
import javax.persistence.GeneratedValue
import java.lang.Long
import javax.persistence.Entity
import scala.beans.BeanProperty
import org.hibernate.validator.constraints.NotEmpty

@Entity
class Hotel {

  @Id
  @GeneratedValue
  @BeanProperty
  var id: Long = _

  @BeanProperty
  @NotEmpty
  var name: String = _

  @BeanProperty
  @NotEmpty
  var address: String = _

  @BeanProperty
  @NotEmpty
  var zip: String = _
}

JPA annotations carry over quite well, one wrinkle may be the additional @BeanProperty annotation though, this is required for JPA implementations as this makes the scala compiler generate the normal Java Beans type getters and setters instead of the scala default getters and setters which don't follow the Java Bean conventions.

Spring Data makes it ridiculously simple to manage this domain type, all it requires is a marker interface and it generates a runtime implementation:

import org.springframework.data.repository.CrudRepository
import mvctest.domain.Hotel
import java.lang.Long

trait HotelRepository extends CrudRepository[Hotel, Long]

Now I have a toolkit available for managing the Hotel domain:

//save or update a hotel
hotelRepository.save(hotel)

//find one hotel
hotelRepository.findOne(id)

//find all hotels
val hotels = hotelRepository.findAll()

//delete a hotel
hotelRepository.delete(id)


And finally a controller to manage the UI flow with this repository:

@Controller
@RequestMapping(Array("/hotels"))
class HotelController @Autowired()(private val hotelRepository: HotelRepository) {

  @RequestMapping(method = Array(RequestMethod.GET))
  def list(model: Model) = {
    val hotels = hotelRepository.findAll()
    model.addAttribute("hotels", hotels)
    "hotels/list"
  }

  @RequestMapping(Array("/edit/{id}"))
  def edit(@PathVariable("id") id: Long, model: Model) = {
    model.addAttribute("hotel", hotelRepository.findOne(id))
    "hotels/edit"
  }

  @RequestMapping(method = Array(RequestMethod.GET), params = Array("form"))
  def createForm(model: Model) = {
    model.addAttribute("hotel", new Hotel())
    "hotels/create"
  }

  @RequestMapping(method = Array(RequestMethod.POST))
  def create(@Valid hotel: Hotel, bindingResult: BindingResult) = {
    if (bindingResult.hasErrors()) {
      "hotels/create"
    } else {
      hotelRepository.save(hotel)
      "redirect:/hotels"
    }
  }

  @RequestMapping(value = Array("/update"), method = Array(RequestMethod.POST))
  def update(@Valid hotel: Hotel, bindingResult: BindingResult) = {
    if (bindingResult.hasErrors()) {
      "hotels/edit"
    } else {
      hotelRepository.save(hotel)
      "redirect:/hotels"
    }
  }

  @RequestMapping(value = Array("/delete/{id}"))
  def delete(@PathVariable("id") id: Long) = {
    hotelRepository.delete(id)
    "redirect:/hotels"
  }
}

There are some wrinkles here too but should mostly make sense, the way the repository is autowired is a little non-intuitive and the way an explicit Array type has to be provided for request mapping paths and methods may be confusing.

Beyond these small concerns the code just works, do play with it, I would love any feedback on ways to improve this sample. Here is the git location of this sample - https://github.com/bijukunjummen/spring-boot-scala-web

Saturday, February 6, 2016

Marble Diagrams - Rxjava operators

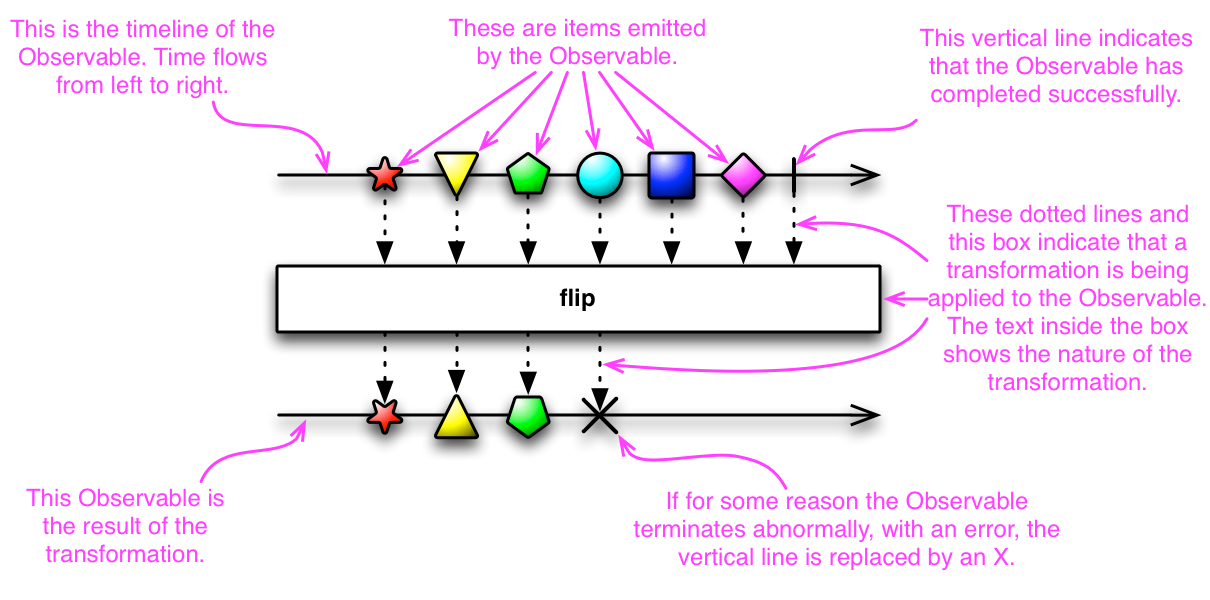
I love the use of Marble Diagrams for representing the different ReactiveX operations. It really clarifies the behavior of some complex operations. RxJava uses these diagrams in its Javadocs and provides the following legend to explain Marble diagrams:


Keeping the marble diagrams in mind, here is a sample test for flatMap operation, written using the Rx-Scala library:

val colors = Observable.just("Red", "Green", "Blue")

val f: String => Observable[String]  = (x: String) => Observable.interval(x.length() seconds).map(_ => x).take(2)

val obs: Observable[String] = colors.flatMap(f)

assert(obs.toBlocking.toList == List("Red", "Blue", "Green", "Red", "Blue", "Green"))

and the marble diagram for the operation:


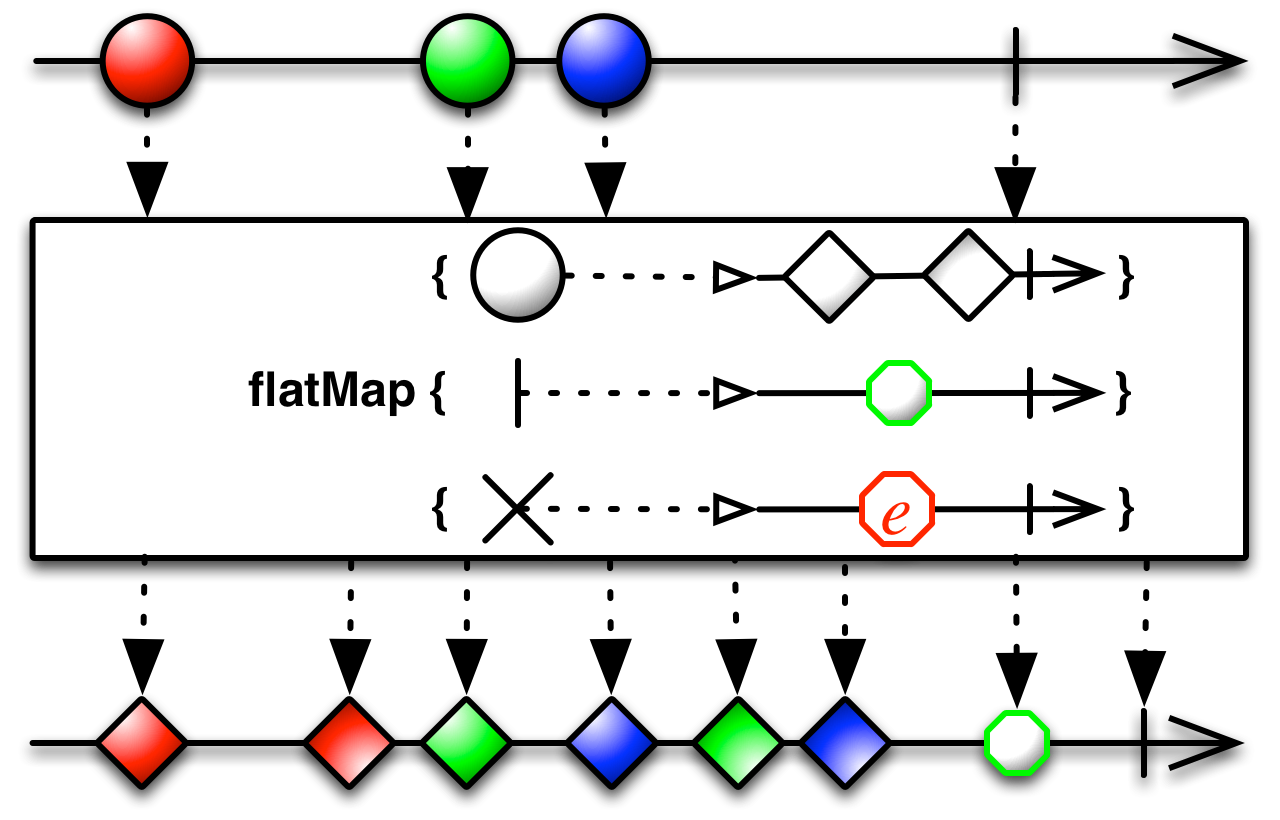
Given this, the flow in the test should become very clear - we start with an Observable which emits three values "Red", "Green", "Blue", the function transforms an element to another Observable, calling the flatMap now makes this mapping and flattens the result to an Observable.

Another a little more complex variation of the flatMap operation has the following signature in scala:

def flatMap[R](onNext: (T) ⇒ Observable[R], onError: (Throwable) ⇒ Observable[R], onCompleted: () ⇒ Observable[R]): Observable[R]

or the following in Java:
public final <R> Observable<R> flatMap(Func1<? super T,? extends Observable<? extends R>> onNext,
                        Func1<? super java.lang.Throwable,? extends Observable<? extends R>> onError,
                        Func0<? extends Observable<? extends R>> onCompleted)


again best explained using its Marble diagram:


Here is a test for this variation of flatMap:

val colors = Observable.just("Red", "Green", "Blue")

val f: String => Observable[String]  = (x: String) => Observable.just(x, x)

val d = () => Observable.just("done")

val e: Throwable => Observable[String] = e => Observable.just(e.getMessage)

val obs: Observable[String] = colors.flatMap(f, e, d)

assert(obs.toBlocking.toList == List("Red", "Red", "Green", "Green", "Blue", "Blue", "done"))


In conclusion, I really appreciate the effort that goes behind creating these marble diagrams by the authors of ReactiveX and feel that they clarify the purpose of the operations neatly.

Friday, January 29, 2016

Spring Cloud Ribbon - Making a secured call

Something simple, but I struggled with this recently - I had to make a Netflix Ribbon based client call to a secured remote service. It turns out there are two ways to do this using Netflix Ribbon, I will demonstrate this through Spring Cloud's excellent support for Ribbon library.

In two previous blog posts I have touched on Spring Cloud Ribbon basics and some advanced customizations, continuing with the same example, assuming that I have a configuration along these lines:

sampleservice:
  ribbon:
    listOfServers: someserver:80
    ReadTimeout: 5000
    MaxAutoRetries: 2


Given this configuration, I can call the service this way:

public class RestTemplateSample {
 
    @Autowired
    private RestTemplate restTemplate;
 
    @Override
    public MessageAcknowledgement sendMessage(Message message) {
        String pongServiceUrl = "http://sampleservice/message";
        HttpEntity<Message> requestEntity = new HttpEntity<>(message);
        ResponseEntity<MessageAcknowledgement> response =  this.restTemplate.exchange(pongServiceUrl, HttpMethod.POST, requestEntity, MessageAcknowledgement.class, Maps.newHashMap());
        return response.getBody();
    }
 
}


So now if the remote service were secured, the first approach and likely the preferred way is actually quite simple, just add an additional configuration to the "named" client to indicate that the remote service is secure, note that the port also has to be appropriately specified.

sampleservice:
  ribbon:
    listOfServers: someserver:443
    ReadTimeout: 5000
    MaxAutoRetries: 2
    IsSecure: true


The second approach that also works is to simply change the url to indicate that you are calling a https endpoint, this time the "IsSecure" configuration is not required:

public class RestTemplateSample {
 
    @Autowired
    private RestTemplate restTemplate;
 
    @Override
    public MessageAcknowledgement sendMessage(Message message) {
        String pongServiceUrl = "https://sampleservice/message";
        HttpEntity<Message> requestEntity = new HttpEntity<>(message);
        ResponseEntity<MessageAcknowledgement> response =  this.restTemplate.exchange(pongServiceUrl, HttpMethod.POST, requestEntity, MessageAcknowledgement.class, Maps.newHashMap());
        return response.getBody();
    }
 
}

Saturday, January 16, 2016

Spring Cloud with Turbine

Netflix Hystrix has a neat feature called the Hystrix stream that provides real-time metrics on the state of the Hystrix commands in an application. This data tends to be very raw though, a very cool interface called the Hystrix Dashboard consumes this raw data and presents a graphical information based on the underlying raw data:


Integrating Hystrix Support and Dashboard

In a Spring-Cloud project it is very trivial to expose the Hystrix stream, all it requires is a starter application for Hystrix to be added in as a dependency and the stream functionality is available to the web application.

Step 1: Add the Spring-Cloud-Starter-hystrix:

<dependency>
    <groupId>org.springframework.cloud</groupId>
    <artifactId>spring-cloud-starter-hystrix</artifactId>
</dependency>

Step 2: Enable Hystrix support for the Application, this will expose the hystrix stream at a "/hystrix.stream" uri:

@SpringBootApplication
@EnableHystrix
public class SpringCloudApp {

    public static void main(String[] args) {
        SpringApplication.run(SpringCloudApp.class, args);
    }
}

Now for the Hystrix Dashboard application to graphically view the Hystrix stream, the following annotation will enable that and the application should be available at "/hystrix" uri:

@SpringBootApplication
@EnableHystrixDashboard
public class AggregateApp {

    public static void main(String[] args) {
        SpringApplication.run(AggregateApp.class, args);
    }
}


Spring Cloud with Turbine

Hystrix stream provides information on a single application, Turbine provides a way to aggregate this information across all installations of an application in a cluster. Integrating turbine into a Spring-Cloud based application is straightforward, all it requires is information on which clusters to expose information on and how to aggregate information about the specific clusters. As before to pull in the dependencies of Turbine:

<dependency>
    <groupId>org.springframework.cloud</groupId>
    <artifactId>spring-cloud-starter-turbine</artifactId>
    <exclusions>
        <exclusion>
            <groupId>javax.servlet</groupId>
            <artifactId>servlet-api</artifactId>
        </exclusion>
    </exclusions>
</dependency>

And to enable Turbine support in a Spring Boot based application:

@SpringBootApplication
@EnableHystrixDashboard
@EnableTurbine
public class MonitorApplication {

    public static void main(String[] args) {
        SpringApplication.run(MonitorApplication.class, args);
    }

}

This application is playing the role of both showing the Hystrix Dashboard and exposing turbine stream. Finally the configuration for turbine:

turbine:
  aggregator:
    clusterConfig: SAMPLE-HYSTRIX-AGGREGATE
  appConfig: SAMPLE-HYSTRIX-AGGREGATE

Given this configuration a turbine stream for SAMPLE-HYSTRIX-AGGREGATE cluster is available at "/turbine.stream?cluster=SAMPLE-HYSTRIX-AGGREGATE" uri, it would figure out the instances of the cluster using Eureka, source the hystrix stream from each instance and aggregate it into the turbine stream. If we were to view the Hystrix dashboard against this stream:


If you look at the counts against the host now, it indicates the 2 hosts for which the stream is being aggregated.

I have brushed over a lot of details here, an easier way to check the details may be to check my github project here