Showing posts with label Spring MVC. Show all posts

Friday, December 1, 2017

Annotated controllers - Spring Web/Webflux and Testing

Spring Webflux and Spring Web are two entirely different web stacks. Spring Webflux, however, continues to support an annotation-based programming model

An endpoint defined using these two stacks may look similar but the way to test such an endpoint is fairly different and a user writing such an endpoint has to be aware of which stack is active and formulate the test accordingly.

Sample Endpoint

Consider a sample annotation based endpoint:


import org.springframework.web.bind.annotation.PostMapping
import org.springframework.web.bind.annotation.RequestBody
import org.springframework.web.bind.annotation.RequestMapping
import org.springframework.web.bind.annotation.RestController


data class Greeting(val message: String)

@RestController
@RequestMapping("/web")
class GreetingController {
    
    @PostMapping("/greet")
    fun handleGreeting(@RequestBody greeting: Greeting): Greeting {
        return Greeting("Thanks: ${greeting.message}")
    }
    
}


Testing with Spring Web

If Spring Boot 2 starters were used to create this application with Spring Web as the starter, specified using a Gradle build file the following way:

compile('org.springframework.boot:spring-boot-starter-web')

then the test of such an endpoint would be using a Mock web runtime, referred to as Mock MVC:

import org.junit.Test
import org.junit.runner.RunWith
import org.springframework.beans.factory.annotation.Autowired
import org.springframework.boot.test.autoconfigure.web.servlet.WebMvcTest
import org.springframework.test.context.junit4.SpringRunner
import org.springframework.test.web.servlet.MockMvc
import org.springframework.test.web.servlet.request.MockMvcRequestBuilders.post
import org.springframework.test.web.servlet.result.MockMvcResultMatchers.content


@RunWith(SpringRunner::class)
@WebMvcTest(GreetingController::class)
class GreetingControllerMockMvcTest {

    @Autowired
    lateinit var mockMvc: MockMvc

    @Test
    fun testHandleGreetings() {
        mockMvc
                .perform(
                        post("/web/greet")
                                .content(""" 
                                |{
                                |"message": "Hello Web"
                                |}
                            """.trimMargin())
                ).andExpect(content().json("""
                    |{
                    |"message": "Thanks: Hello Web"
                    |}
                """.trimMargin()))
    }
}


Testing with Spring Web-Flux

If on the other hand Spring-Webflux starters were pulled in, say with the following Gradle dependency:

compile('org.springframework.boot:spring-boot-starter-webflux')

then the test of this endpoint would be using the excellent WebTestClient class, along these lines:

import org.junit.Test
import org.junit.runner.RunWith
import org.springframework.beans.factory.annotation.Autowired
import org.springframework.boot.test.autoconfigure.web.reactive.WebFluxTest
import org.springframework.http.HttpHeaders
import org.springframework.test.context.junit4.SpringRunner
import org.springframework.test.web.reactive.server.WebTestClient
import org.springframework.web.reactive.function.BodyInserters


@RunWith(SpringRunner::class)
@WebFluxTest(GreetingController::class)
class GreetingControllerTest {

    @Autowired
    lateinit var webTestClient: WebTestClient

    @Test
    fun testHandleGreetings() {
        webTestClient.post()
                .uri("/web/greet")
                .header(HttpHeaders.CONTENT_TYPE, "application/json")
                .body(BodyInserters
                        .fromObject(""" 
                                |{
                                |   "message": "Hello Web"
                                |}
                            """.trimMargin()))
                .exchange()
                .expectStatus().isOk
                .expectBody()
                .json("""
                    |{
                    |   "message": "Thanks: Hello Web"
                    |}
                """.trimMargin())
    }
}


Conclusion

It is easy to assume that since the programming model looks very similar using Spring Web and Spring Webflux stacks, that the tests for such a legacy test using Spring Web would continue over to Spring Webflux, this is however not true, as a developer we have to be mindful of the underlying stack that comes into play and formulate the test accordingly. I hope this post clarifies how such a test should be crafted.

Sunday, June 11, 2017

Spring Boot Web Slice test - Sample

Spring Boot introduced test slicing a while back and it has taken me some time to get my head around it and explore some of its nuances.

Background


The main reason to use this feature is to reduce the boilerplate. Consider a controller that looks like this, just for variety written using Kotlin.

@RestController
@RequestMapping("/users")
class UserController(
        private val userRepository: UserRepository,
        private val userResourceAssembler: UserResourceAssembler) {

    @GetMapping
    fun getUsers(pageable: Pageable, 
                 pagedResourcesAssembler: PagedResourcesAssembler<User>): PagedResources<Resource<User>> {
        val users = userRepository.findAll(pageable)
        return pagedResourcesAssembler.toResource(users, this.userResourceAssembler)
    }

    @GetMapping("/{id}")
    fun getUser(id: Long): Resource<User> {
        return Resource(userRepository.findOne(id))
    }
}


A traditional Spring Mock MVC test to test this controller would be along these lines:

@RunWith(SpringRunner::class)
@WebAppConfiguration
@ContextConfiguration
class UserControllerTests {

    lateinit var mockMvc: MockMvc

    @Autowired
    private val wac: WebApplicationContext? = null

    @Before
    fun setup() {
        this.mockMvc = MockMvcBuilders.webAppContextSetup(this.wac).build()
    }

    @Test
    fun testGetUsers() {
        this.mockMvc.perform(get("/users")
                .accept(MediaType.APPLICATION_JSON))
                .andDo(print())
                .andExpect(status().isOk)
    }

    @EnableSpringDataWebSupport
    @EnableWebMvc
    @Configuration
    class SpringConfig {

        @Bean
        fun userController(): UserController {
            return UserController(userRepository(), UserResourceAssembler())
        }

        @Bean
        fun userRepository(): UserRepository {
            val userRepository = Mockito.mock(UserRepository::class.java)
            given(userRepository.findAll(Matchers.any(Pageable::class.java)))
                    .willAnswer({ invocation ->
                        val pageable = invocation.arguments[0] as Pageable
                        PageImpl(
                                listOf(
                                        User(id = 1, fullName = "one", password = "one", email = "one@one.com"),
                                        User(id = 2, fullName = "two", password = "two", email = "two@two.com"))
                                , pageable, 10)
                    })
            return userRepository
        }
    }
}

There is a lot of ceremony involved in setting up such a test - a web application context which understands a web environment is pulled in, a configuration which sets up the Spring MVC environment needs to be created and MockMvc which is handle to the testing framework needs to be set-up before each test.


Web Slice Test

A web slice test when compared to the previous test is far simpler and focuses on testing the controller and hides a lot of the boilerplate code:

@RunWith(SpringRunner::class)
@WebMvcTest(UserController::class)
class UserControllerSliceTests {

    @Autowired
    lateinit var mockMvc: MockMvc

    @MockBean
    lateinit var userRepository: UserRepository

    @SpyBean
    lateinit var userResourceAssembler: UserResourceAssembler

    @Test
    fun testGetUsers() {

        this.mockMvc.perform(get("/users").param("page", "0").param("size", "1")
                .accept(MediaType.APPLICATION_JSON))
                .andDo(print())
                .andExpect(status().isOk)
    }

    @Before
    fun setUp(): Unit {
        given(userRepository.findAll(Matchers.any(Pageable::class.java)))
                .willAnswer({ invocation ->
                    val pageable = invocation.arguments[0] as Pageable
                    PageImpl(
                            listOf(
                                    User(id = 1, fullName = "one", password = "one", email = "one@one.com"),
                                    User(id = 2, fullName = "two", password = "two", email = "two@two.com"))
                            , pageable, 10)
                })
    }
}

It works by creating a Spring Application context but filtering out anything that is not relevant to the web layer and loading up only the controller which has been passed into the @WebTest annotation. Any dependency that the controller requires can be injected in as a mock.


Coming to some of the nuances, say if I wanted to inject one of the fields myself the way to do it is have the test use a custom Spring Configuration, for a test this is done by using a inner static class annotated with @TestConfiguration the following way:

@RunWith(SpringRunner::class)
@WebMvcTest(UserController::class)
class UserControllerSliceTests {

    @Autowired
    lateinit var mockMvc: MockMvc

    @Autowired
    lateinit var userRepository: UserRepository

    @Autowired
    lateinit var userResourceAssembler: UserResourceAssembler

    @Test
    fun testGetUsers() {

        this.mockMvc.perform(get("/users").param("page", "0").param("size", "1")
                .accept(MediaType.APPLICATION_JSON))
                .andDo(print())
                .andExpect(status().isOk)
    }

    @Before
    fun setUp(): Unit {
        given(userRepository.findAll(Matchers.any(Pageable::class.java)))
                .willAnswer({ invocation ->
                    val pageable = invocation.arguments[0] as Pageable
                    PageImpl(
                            listOf(
                                    User(id = 1, fullName = "one", password = "one", email = "one@one.com"),
                                    User(id = 2, fullName = "two", password = "two", email = "two@two.com"))
                            , pageable, 10)
                })
    }

    @TestConfiguration
    class SpringConfig {

        @Bean
        fun userResourceAssembler(): UserResourceAssembler {
            return UserResourceAssembler()
        }

        @Bean
        fun userRepository(): UserRepository {
            return mock(UserRepository::class.java)
        }
    }

}


The beans from the "TestConfiguration" adds on to the configuration which the Slice tests depend on and don't completely replace it.

On the other hand, if I wanted to override the loading of the main "@SpringBootApplication" annotated class then I can pass in a Spring Configuration class explicitly, but the catch is that I have to now take care of all of loading up the relevant Spring Boot features myself (enabling auto-configuration, appropriate scanning etc), so a way around it to explicitly annotate the configuration as a Spring Boot Application the following way:

@RunWith(SpringRunner::class)
@WebMvcTest(UserController::class)
class UserControllerExplicitConfigTests {

    @Autowired
    lateinit var mockMvc: MockMvc

    @Autowired
    lateinit var userRepository: UserRepository

    @Test
    fun testGetUsers() {

        this.mockMvc.perform(get("/users").param("page", "0").param("size", "1")
                .accept(MediaType.APPLICATION_JSON))
                .andDo(print())
                .andExpect(status().isOk)
    }

    @Before
    fun setUp(): Unit {
        given(userRepository.findAll(Matchers.any(Pageable::class.java)))
                .willAnswer({ invocation ->
                    val pageable = invocation.arguments[0] as Pageable
                    PageImpl(
                            listOf(
                                    User(id = 1, fullName = "one", password = "one", email = "one@one.com"),
                                    User(id = 2, fullName = "two", password = "two", email = "two@two.com"))
                            , pageable, 10)
                })
    }

    @SpringBootApplication(scanBasePackageClasses = arrayOf(UserController::class))
    @EnableSpringDataWebSupport
    class SpringConfig {

        @Bean
        fun userResourceAssembler(): UserResourceAssembler {
            return UserResourceAssembler()
        }

        @Bean
        fun userRepository(): UserRepository {
            return mock(UserRepository::class.java)
        }
    }

}


The catch though is that now other tests may end up finding this inner configuration which is far from ideal!, so my learning has been to depend on bare minimum slice testing, and if needed extend it using @TestConfiguration.


I have a little more detailed code sample available at my github repo which has working examples to play with.

Sunday, March 19, 2017

Spring Web-Flux - First steps

Spring Web-Flux term is used for denoting the Reactive programming support in the web layer of Spring Framework. It provides support for both creating reactive server based web applications and also has client libraries to make remote REST calls.

In this post, I will demonstrate a sample web application which makes use of Spring Web-Flux. As detailed here, the Web-Flux support in Spring 5+ supports two different programming style - the traditional annotation based style and the new functional style. In this post I will be sticking to the traditional annotation style and will follow it up in another blog post(now available here) detailing a similar application but with endpoints defined in a functional style. My focus is going to be purely the programming model.

Data and Services Layer


I have a fairly simple REST interface supporting CRUD operations of a Hotel resource with a structure along these lines:

public class Hotel {

    private UUID id;

    private String name;

    private String address;

    private String state;

    private String zip;
    
    ....

}

I am using Cassandra as a store of this entity and using the reactive support in Spring Data Cassandra allows the data layer to be reactive, supporting an API that looks like this - I have two repositories here, one facilitating the storage of the Hotel entity above, another maintaining a duplicated data which makes searching for Hotel entity by its first letter a little more efficient:

public interface HotelRepository  {
    Mono<Hotel> save(Hotel hotel);
    Mono<Hotel> update(Hotel hotel);
    Mono<Hotel> findOne(UUID hotelId);
    Mono<Boolean> delete(UUID hotelId);
    Flux<Hotel> findByState(String state);
}

public interface HotelByLetterRepository {
    Flux<HotelByLetter> findByFirstLetter(String letter);
    Mono<HotelByLetter> save(HotelByLetter hotelByLetter);
    Mono<Boolean> delete(HotelByLetterKey hotelByLetterKey);
}


The operations which return one instance of an entity now return a Mono type and operations which return more than one element return a Flux type.


Given this let me touch on one quick use of returning the reactive types, when a Hotel is updated I have to delete the duplicated data maintained via HotelByLetter repository and recreate it again, this can be accomplished something like the following, using the excellent operators provided by Flux and Mono types:

public Mono<Hotel> update(Hotel hotel) {
    return this.hotelRepository.findOne(hotel.getId())
            .flatMap(existingHotel ->
                    this.hotelByLetterRepository.delete(new HotelByLetter(existingHotel).getHotelByLetterKey())
                            .then(this.hotelByLetterRepository.save(new HotelByLetter(hotel)))
                            .then(this.hotelRepository.update(hotel))).next();
}


Web Layer

Now to the focus of the article, support for annotation based reactive programming model support in the web layer!

The @Controller and @RestController annotations have been the workhorses of the Spring MVC's REST endpoint support for years now, traditionally they have enabled taking in and returning Java POJO's. These controllers in the reactive model have now been tweaked to take in and return the Reactive types - Mono and Flux in my examples, but additionally also the Rx-Java 1/2 and Reactive Streams types.

Given this, my controller in almost its entirety looks like this:

@RestController
@RequestMapping("/hotels")
public class HotelController {

    ....

    @GetMapping(path = "/{id}")
    public Mono<Hotel> get(@PathVariable("id") UUID uuid) {
        return this.hotelService.findOne(uuid);
    }

    @PostMapping
    public Mono<ResponseEntity<Hotel>> save(@RequestBody Hotel hotel) {
        return this.hotelService.save(hotel)
                .map(savedHotel -> new ResponseEntity<>(savedHotel, HttpStatus.CREATED));
    }

    @PutMapping
    public Mono<ResponseEntity<Hotel>> update(@RequestBody Hotel hotel) {
        return this.hotelService.update(hotel)
                .map(savedHotel -> new ResponseEntity<>(savedHotel, HttpStatus.CREATED))
                .defaultIfEmpty(new ResponseEntity<>(HttpStatus.NOT_FOUND));
    }

    @DeleteMapping(path = "/{id}")
    public Mono<ResponseEntity<String>> delete(
            @PathVariable("id") UUID uuid) {
        return this.hotelService.delete(uuid).map((Boolean status) ->
                new ResponseEntity<>("Deleted", HttpStatus.ACCEPTED));
    }

    @GetMapping(path = "/startingwith/{letter}")
    public Flux<HotelByLetter> findHotelsWithLetter(
            @PathVariable("letter") String letter) {
        return this.hotelService.findHotelsStartingWith(letter);
    }

    @GetMapping(path = "/fromstate/{state}")
    public Flux<Hotel> findHotelsInState(
            @PathVariable("state") String state) {
        return this.hotelService.findHotelsInState(state);
    }
}

The traditional @RequestMapping, @GetMapping, @PostMapping is unchanged, what is different is the return types - for instances where atmost 1 result is expected I am now returning a Mono type and where a list would have been returned before, now a Flux type is returned.

With the use of the reactive support in Spring Data Cassandra the entire web to services and back is reactive and specifically for the focus of the article, eminently readable and intuitive.


It may be easier to simply try out the code behind this post which I have available in my github repo here.

Thursday, September 29, 2016

Spring-Reactive samples - Mono and Single

This is just a little bit of a learning from my previous post where I had tried out the Spring's native support for  reactive programming.

Just to quickly recap, my objective was to develop a reactive service which takes in a request which looks like this:

{
 "id":1,
  "delay_by": 2000,
  "payload": "Hello",
  "throw_exception": false
}

and returns a response along these lines:

{
  "id": "1",
  "received": "Hello",
  "payload": "Response Message"
}

I had demonstrated this in two ways that the upcoming Spring's reactive model supports, using the Reactor-Core Flux type as a return type and using Rx-java Observable type

However the catch with these types is that the response would look something like this:

[{"id":"1","received":"Hello","payload":"From RxJavaService"}]

Essentially an array, and the reason is obvious - Flux and Observable represent zero or more asynchronous emissions and so Spring Reactive Web framework has to represent such a result as an array.

The fix to return the expected json is to essentially return a type which represents 1 value - such a type is the Mono in Reactor-Core OR a Single in Rx-java. Both these types are as capable as their multi-valued counterparts in providing functions which combine, transform their elements.

So with this change the controller signature with Mono looks like this:

@RequestMapping(path = "/handleMessageReactor", method = RequestMethod.POST)
public Mono<MessageAcknowledgement> handleMessage(@RequestBody Message message) {
  return this.aService.handleMessageMono(message);
}


and with Single like this:

@RequestMapping(path = "/handleMessageRxJava", method = RequestMethod.POST)
public Single<MessageAcknowledgement> handleMessage(@RequestBody Message message) {
  return this.aService.handleMessageSingle(message);
}

I have the sample code available in my github repo

Tuesday, June 7, 2016

Spring-Reactive samples

Spring-Reactive aims to bring reactive programming support to Spring based projects and this is expected to be available for the timelines of Spring 5. My intention here is to exercise some of the very basic signatures for REST endpoints with this model.

Before I go ahead let me acknowledge that this entire sample is completely based on the samples which Sébastien Deleuze has put together here - https://github.com/sdeleuze/spring-reactive-playground

I wanted to consider three examples, first a case where existing Java 8 CompletableFuture is returned as a type, second where RxJava's Observable is returned as a type and third with Spring Reactor Core's Flux type.

Expected Protocol

The structure of the request and response message handled by each of the three service is along these lines, all of them will take in a request which looks like this:

{
 "id":1,
  "delay_by": 2000,
  "payload": "Hello",
  "throw_exception": false
}


The delay_by will make the response to be delayed and throw_exception will make the response to error out. A sane response will be the following:

{
  "id": "1",
  "received": "Hello",
  "payload": "Response Message"
}

I will be ignoring the exceptions for this post.

CompletableFuture as a return type


Consider a service which returns a java 8 CompletableFuture as a return type:

public CompletableFuture<MessageAcknowledgement> handleMessage(Message message) {
 return CompletableFuture.supplyAsync(() -> {
  Util.delay(message.getDelayBy());
  return new MessageAcknowledgement(message.getId(), message.getPayload(), "data from CompletableFutureService");
 }, futureExecutor);
}

The method signature of a Controller which calls this service looks like this now:

@RestController
public class CompletableFutureController {

 private final CompletableFutureService aService;

 @Autowired
 public CompletableFutureController(CompletableFutureService aService) {
  this.aService = aService;
 }

 @RequestMapping(path = "/handleMessageFuture", method = RequestMethod.POST)
 public CompletableFuture<MessageAcknowledgement> handleMessage(@RequestBody Message message) {
  return this.aService.handleMessage(message);
 }

}

When the CompletableFuture completes the framework will ensure that the response is marshalled back appropriately.

Rx Java Observable as a return type

Consider a service which returns a Rx Java Observable as a return type:

public Observable<MessageAcknowledgement> handleMessage(Message message) {
 logger.info("About to Acknowledge");
 return Observable.just(message)
   .delay(message.getDelayBy(), TimeUnit.MILLISECONDS)
   .flatMap(msg -> {
    if (msg.isThrowException()) {
     return Observable.error(new IllegalStateException("Throwing a deliberate exception!"));
    }
    return Observable.just(new MessageAcknowledgement(message.getId(), message.getPayload(), "From RxJavaService"));
   });
}

The controller invoking such a service can directly return the Observable as a type now and the framework will ensure that once all the items have been emitted the response is marshalled correctly.
@RestController
public class RxJavaController {

 private final RxJavaService aService;

 @Autowired
 public RxJavaController(RxJavaService aService) {
  this.aService = aService;
 }

 @RequestMapping(path = "/handleMessageRxJava", method = RequestMethod.POST)
 public Observable<MessageAcknowledgement> handleMessage(@RequestBody Message message) {
  System.out.println("Got Message..");
  return this.aService.handleMessage(message);
 }

}

Note that since Observable represents a stream of 0 to many items, this time around the response is a json array.


Spring Reactor Core Flux as a return type


Finally, if the response type is a Flux type, the framework ensures that the response is handled cleanly. The service is along these lines:

public Flux<messageacknowledgement> handleMessage(Message message) {
 return Flux.just(message)
   .delay(Duration.ofMillis(message.getDelayBy()))
   .map(msg -> Tuple.of(msg, msg.isThrowException()))
   .flatMap(tup -> {
    if (tup.getT2()) {
     return Flux.error(new IllegalStateException("Throwing a deliberate Exception!"));
    }
    Message msg = tup.getT1();
    return Flux.just(new MessageAcknowledgement(msg.getId(), msg.getPayload(), "Response from ReactorService"));
   });
}

and a controller making use of such a service:

@RestController
public class ReactorController {

 private final ReactorService aService;

 @Autowired
 public ReactorController(ReactorService aService) {
  this.aService = aService;
 }

 @RequestMapping(path = "/handleMessageReactor", method = RequestMethod.POST)
 public Flux<MessageAcknowledgement> handleMessage(@RequestBody Message message) {
  return this.aService.handleMessage(message);
 }

}

Conclusion

This is just a sampling of the kind of return types that the Spring Reactive project supports, the possible return types is way more than this - here is a far more comprehensive example.

I look forward to when the reactive programming model becomes available in the core Spring framework.

The samples presented in this blog post is available at my github repository

Saturday, March 26, 2016

Single Page Angularjs application with Spring Boot and Yeoman

I am very thankful for tools like yeoman which provide a very quick way to combine different javascript libraries together into a coherent application. Yeoman provides the UI tier, if you needed to develop the services tier and a web layer for the static assets a good way to package it is to use Spring Boot. I know there are tools like JHipster which make this easy but if you are just looking just a basic template what I am outlining here should just suffice.

So this is what I do, let us start by getting a basic Spring boot web template in place, the following way:


spring init --dependencies=web spring-boot-static-sample

This assumes that you have the command line application for Spring Boot available in your machine, if you don't then just follow the instructions here

There should be a folder called spring-boot-static-sample with all the Spring Boot generated code in there, now to layer in the static content in there, I have used the yeoman gulp angular generator to generate the code, the following way inside the spring-boot-static-sample folder:

npm install -g yo gulp bower
npm install -g generator-gulp-angular
yo gulp-angular

Almost there, just modify one of the gulp configurations - instead of creating the packaged javascript distribution to dist folder, let the folder be src/main/resources/static instead. In gulp/conf.js:


This is the folder that Spring boot uses to serve out static content by default.

And that's it, when you are developing the single page apps this can be done very quickly using the convenient gulp commands

gulp serve

and when you are ready to package the application just run

gulp build

which would get the static content into a location that Spring boot understands and then run the app:

mvn spring-boot:run

and the Single page app UI should show up.


Simple and clean!

Here is a sample project with these steps already executed - https://github.com/bijukunjummen/spring-boot-static-sample


Saturday, September 26, 2015

Spring Cloud Sidecar - Initialization of Nodes

In the last blog post I had described how the Sidecar application can be used for registering the Cassandra nodes with Eureka and more generally can be used for registering any non-JVM application with Eureka.

In this post I will cover how an application can go about querying the Sidecar registered nodes.

Discovering Registered Nodes - Post Initialization

If the registered nodes are not required during the bean initialization phase then discovering the nodes is fairly straightforward along these lines:

@Component
public class SampleCommandLineRunner implements CommandLineRunner {

    @Autowired
    private DiscoveryClient discoveryClient;

    @PostConstruct
    public void postConstruct() {
//        System.out.println("Printing from postConstruct");
//        printDiscoveredNodes();
    }

    @Override
    public void run(String... strings) throws Exception {
        System.out.println("Printing from run method");
        printDiscoveredNodes();
    }

    public void printDiscoveredNodes() {
        System.out.println(" Printing Discovered Nodes ");

        for (ServiceInstance instance: discoveryClient.getInstances("samplecassandra.vip")) {
            System.out.println("Host: Port = " + instance.getHost() + ":" + instance.getPort());
        }
    }
}

These would print the nodes registered with a name of "samplecasssandra.vip" VIP.

Note that the nodes are being printed from the run method which gets called past the initialization of Spring container. If however the nodes were attempted to be listed from one of the lifecycle stages say the postConstruct method then very likely an exception will be thrown (this behavior is seen with "Angel.SR3" release of Spring Cloud, but appears to work cleanly with "Brixton.*" versions)

Discovering Registered Nodes - During Initialization

Now if an application needs to discover the nodes during initialization the flow is a little more complicated, for a potential issue look at this ticket.

The DiscoveryClient is initialized very late in the Spring Lifecycle and if DiscoveryClient is used in any post-processing activity of a bean it is likely to give an exception.

As an example, say the Cassandra nodes registered using Sidecar is now used by an application to initialize Cassandra connectivity, a way to do it would be to create a wrapper around Cassandra connectivity this way:

import org.springframework.data.cassandra.core.CassandraTemplate;


public class CassandraTemplateWrapper extends CassandraTemplate {

    @Override
    public void afterPropertiesSet() {
        
    }
}

Here CassandraTemplate is being overridden to prevent the check in afterPropertiesSet method that a Cassandra session exists, as a session will be established much later in the start-up cycle.

A Cassandra session can be injected into this custom CassandraTemplate lazily in a bean that implements SmartLifecyle along these lines:

package mvctest.cassandra;

import com.datastax.driver.core.Cluster;
import com.datastax.driver.core.Session;
import org.slf4j.Logger;
import org.slf4j.LoggerFactory;
import org.springframework.beans.factory.FactoryBean;
import org.springframework.beans.factory.annotation.Autowired;
import org.springframework.context.SmartLifecycle;
import org.springframework.core.Ordered;
import org.springframework.data.cassandra.core.CassandraTemplate;
import org.springframework.stereotype.Component;

@Component("cassandraTemplate")
public class EurekaCassandraTemplateFactoryBean implements SmartLifecycle, FactoryBean<CassandraTemplate>, Ordered {

    ....


    @Override
    public boolean isAutoStartup() {
        return true;
    }

    @Override
    public void start() {
        LOGGER.info("About to start Discovery client lookup of Cassandra Cluster!!!");
        final Cluster cluster = this.eurekaClusterBuilder.build();
        Session session = cluster.connect(this.cassandraProperties.getKeyspace());
        this.cassandraTemplateWrapper.setSession(session);
        LOGGER.info("Completed Discovery client lookup of Cassandra Cluster!!!");
        running = true;
    }

    @Override
    public boolean isRunning() {
        return this.running;
    }

    @Override
    public int getPhase() {
        return Integer.MAX_VALUE;
    }

    @Override
    public int getOrder() {
        return 1;
    }
}

This way the Cassandra session can be created very late in the cycle. Somewhat rough, but the approach works.

If you are interested in exploring this sample further I have this code available in my github repo here.

Wednesday, September 9, 2015

Rest client calls with Spring Cloud

There are a few interesting ways to make REST client calls with the Spring-Cloud project.
Spring-Cloud rest support builds on top of the core Netflix OSS libraries, but abstracts them and in the process simplifies using the libraries.

RestTemplate

As a first step let us consider the traditional way to make Rest calls through Spring based applications, using RestTemplate:

public class RestTemplateIntegrationTest {

    @Autowired
    private RestTemplate restTemplate;

    @Test
    public void testCallPongService() {
        ResponseEntity<MessageAcknowledgement> ack =
                restTemplate.exchange("http://servicehost/message",
                        HttpMethod.POST,
                        new HttpEntity<>(new Message("test", "hello")),
                        MessageAcknowledgement.class,
                        Collections.emptyMap());
        assertThat(ack.getBody().getPayload(), equalTo("Pong From Configuration Server"));
    }
}

In this specific instance, the host part of the url is expected to be completely known to the client, RestTemplate will take care of marshalling the Java object to the appropriate media type, making the REST call, and unmarshalling the response back to a Java Object.

RestTemplate with Ribbon and Eureka

Netflix Ribbon provides a library for making REST based calls, whereas with RestTemplate the host is expected to be completely known to the client, with Ribbon the host is typically resolved through the Centralized Netflix Eureka server and Ribbon takes care of load-balancing the calls if multiple hosts are found for a service. If Spring-cloud libraries and Ribbon related libraries are present in the classpath, then Spring-Cloud enhances RestTemplate to be based on Ribbon instead with no additional configuration required, with Spring-Cloud in place the call would exactly like before, with a few twists.

ResponseEntity&lt;MessageAcknowledgement&gt; ack =
        restTemplate.exchange("http://sample-pong/message",
                HttpMethod.POST,
                new HttpEntity&lt;&gt;(new Message("test", "hello")),
                MessageAcknowledgement.class,
                Collections.emptyMap());

The twist is that the hostname which in this instance is "sample-pong" is significant, it is not the real host name - instead, an attempt is made to find the list of servers with this name as the registration name in Eureka and the resulting host/port is used for making the request.


If customizations are required a named client can be provided with Ribbon specific properties specified for the named client, along these lines:

ResponseEntity&lt;MessageAcknowledgement&gt; ack =
        restTemplate.exchange("http://samplepong/message",
                HttpMethod.POST,
                new HttpEntity&lt;&gt;(new Message("test", "hello")),
                MessageAcknowledgement.class,
                Collections.emptyMap());

The named client above is "samplepong" and the ribbon specific properties for this client is along these lines:

samplepong:
  ribbon:
    DeploymentContextBasedVipAddresses: sample-pong
    NIWSServerListClassName: com.netflix.niws.loadbalancer.DiscoveryEnabledNIWSServerList
    ReadTimeout: 5000
    MaxAutoRetries: 2

If you are interested in more low level configurations for Ribbon, refer here

Ribbon is a fairly complicated low-level way of making a REST call, RestTemplate abstracts the Ribbon implementation and makes it look easy from a clients perspective.

Netflix Feign

Netflix Feign is another simplified way to make calls to REST based services, all it requires is an interface with relevant annotations which is best demonstrated with an example:

import org.bk.consumer.domain.Message;
import org.bk.consumer.domain.MessageAcknowledgement;
import org.springframework.cloud.netflix.feign.FeignClient;
import org.springframework.http.MediaType;
import org.springframework.web.bind.annotation.RequestBody;
import org.springframework.web.bind.annotation.RequestMapping;
import org.springframework.web.bind.annotation.RequestMethod;

@FeignClient("samplepong")
public interface PongClient {

    @RequestMapping(method = RequestMethod.POST, value = "/message",
            produces = MediaType.APPLICATION_JSON_VALUE, consumes = MediaType.APPLICATION_JSON_VALUE)
    MessageAcknowledgement sendMessage(@RequestBody Message message);
}

The annotations are Spring specific though, Spring-Cloud facilitates this by adding in encoders and decoders which support Spring MVC annotations.

@FeignClient annotation on the interface identifies this a FeignClient code. @EnableFeignClients is required in a Spring Configuration to load up all such FeignClient's.

@SpringBootApplication
@EnableEurekaClient
@EnableFeignClients
public class PingApplication {

    public static void main(String[] args) {
        SpringApplication.run(PingApplication.class, args);
    }
}


References


Thursday, April 23, 2015

Spring-session demonstration using docker-compose

I have earlier written about an exciting new project called Spring-session which provides a clean way to externalize user sessions for java based web applications.

I managed to get a good demonstration set-up for spring-session using docker-compose which shows off the strengths of this project and I wanted to write about this here. In short, this is the set-up that running docker-compose will bring up:


Two instances of the application which makes use of Spring-session are started up, these instances use the same redis container for storing the session state and are in turn fronted by an nginx server.

All that needs to be done to bring up this topology is to:

  • clone my repo available here
  • install docker-compose 
  • build the app - "mvn package -DskipTests" - skipping tests as the tests depend on a local redis-server, which may or may not be available
  • run "docker-compose up" in the cloned folder
That is it, if everything has been set-up cleanly nginx should be available at http://docker-ip  url - in my mac, it is typically http://192.168.59.103

Details and Demonstration:
Docker-compose is a tool providing a means to put together a set of docker containers into a coherent stack. The stack can be defined declaratively, and the following is a sample stack used here:

nginx:
  image: nginx
  volumes:
    - nginx:/etc/nginx:ro
  links:
    - shop1
    - shop2
  ports:
   - "80:80"

shop1:
  build: .
  hostname: shop1
  links:
    - redis
  ports:
    - "8081:8080"

shop2:
  build: .
  hostname: shop2
  links:
    - redis
  ports:
    - "8082:8080"

redis:
  image: redis
  hostname: redis
  ports:
    - "6379:6379"


This application itself makes use of the user session to maintain the state of a "shopping cart", since this application is configured to use spring-session the session will be maintained in redis database. There are two instances of the application behind nginx, either one of the servers would end up getting the request, but the externalized session state would continue to work seamlessly irrespective of the application instance handling the request.

The following is the view of the shopping cart:


The session id and the details of the instance handling the request are printed at the bottom of the page.

As can be seen in the following screenshot, even if a different instance handles the request, the session state continues to be cleanly maintained.


Saturday, March 14, 2015

Using rx-java Observable in a Spring MVC flow

Spring MVC has supported asynchronous request processing flow for sometime now and this support internally utilizes the Servlet 3 async support of containers like Tomcat/Jetty.

Spring Web Async support

Consider a service call that takes a little while to process, simulated with a delay:

public CompletableFuture<Message> getAMessageFuture() {
    return CompletableFuture.supplyAsync(() -> {
        logger.info("Start: Executing slow task in Service 1");
        Util.delay(1000);
        logger.info("End: Executing slow task in Service 1");
        return new Message("data 1");
    }, futureExecutor);
}

If I were to call this service in a user request flow, the traditional blocking controller flow would look like this:

@RequestMapping("/getAMessageFutureBlocking")
public Message getAMessageFutureBlocking() throws Exception {
    return service1.getAMessageFuture().get();
}

A better approach is to use the Spring Asynchronous support to return the result back to the user when available from the CompletableFuture, this way not holding up the containers thread:

@RequestMapping("/getAMessageFutureAsync")
public DeferredResult<Message> getAMessageFutureAsync() {
    DeferredResult<Message> deffered = new DeferredResult<>(90000);
    CompletableFuture<Message> f = this.service1.getAMessageFuture();
    f.whenComplete((res, ex) -> {
        if (ex != null) {
            deffered.setErrorResult(ex);
        } else {
            deffered.setResult(res);
        }
    });
    return deffered;
}

Using Observable in a Async Flow


Now to the topic of this article, I have been using Rx-java's excellent Observable type as my service return types lately and wanted to ensure that the web layer also remains asynchronous in processing the Observable type returned from a service call.

Consider the service that was described above now modified to return an Observable:

public Observable<Message> getAMessageObs() {
    return Observable.<Message>create(s -> {
        logger.info("Start: Executing slow task in Service 1");
        Util.delay(1000);
        s.onNext(new Message("data 1"));
        logger.info("End: Executing slow task in Service 1");
        s.onCompleted();
    }).subscribeOn(Schedulers.from(customObservableExecutor));
}

I can nullify all the benefits of returning an Observable by ending up with a blocking call at the web layer, a naive call will be the following:

@RequestMapping("/getAMessageObsBlocking")
public Message getAMessageObsBlocking() {
    return service1.getAMessageObs().toBlocking().first();
}

To make this flow async through the web layer, a better way to handle this call is the following, essentially by transforming Observable to Spring's DeferredResult type:

@RequestMapping("/getAMessageObsAsync")
public DeferredResult<Message> getAMessageAsync() {
    Observable<Message> o = this.service1.getAMessageObs();
    DeferredResult<Message> deffered = new DeferredResult<>(90000);
    o.subscribe(m -> deffered.setResult(m), e -> deffered.setErrorResult(e));
    return deffered;
}

This would ensure that the thread handling the user flow would return as soon as the service call is complete and the user response will be processed reactively once the observable starts emitting values.


If you are interested in exploring this further, here is a github repo with working samples: https://github.com/bijukunjummen/spring-web-observable.

References:

Spring's reference guide on async flows in the web tier: http://docs.spring.io/spring/docs/current/spring-framework-reference/html/mvc.html#mvc-ann-async

More details on Spring DeferredResult by the inimitable Tomasz Nurkiewicz at the NoBlogDefFound blog - http://www.nurkiewicz.com/2013/03/deferredresult-asynchronous-processing.html

Saturday, November 29, 2014

Spring RestTemplate with a linked resource

Spring Data REST is an awesome project that provides mechanisms to expose the resources underlying a Spring Data based repository as REST resources.

Exposing a service with a linked resource


Consider two simple JPA based entities, Course and Teacher:

@Entity
@Table(name = "teachers")
public class Teacher {
 @Id
 @GeneratedValue(strategy = GenerationType.AUTO)
 @Column(name = "id")
 private Long id;

 @Size(min = 2, max = 50)
 @Column(name = "name")
 private String name;

 @Column(name = "department")
 @Size(min = 2, max = 50)
 private String department;    
    ...
}

@Entity
@Table(name = "courses")
public class Course {
 @Id
 @GeneratedValue(strategy = GenerationType.AUTO)
 @Column(name = "id")
 private Long id;

 @Size(min = 1, max = 10)
 @Column(name = "coursecode")
 private String courseCode;

 @Size(min = 1, max = 50)
 @Column(name = "coursename")
 private String courseName;

 @ManyToOne
 @JoinColumn(name = "teacher_id")
 private Teacher teacher;
 
       ....
}

essentially the relation looks like this:

Now, all it takes to expose these entities as REST resources is adding a @RepositoryRestResource annotation on their JPA based Spring Data repositories this way, first for the "Teacher" resource:
import org.springframework.data.jpa.repository.JpaRepository;
import org.springframework.data.rest.core.annotation.RepositoryRestResource;
import univ.domain.Teacher;

@RepositoryRestResource
public interface TeacherRepo extends JpaRepository<Teacher, Long> {
}

and for exposing the Course resource:

@RepositoryRestResource
public interface CourseRepo extends JpaRepository<Course, Long> {
}

With this done and assuming a few teachers and a few courses are already in the datastore, a GET on courses would yield a response of the following type:

{
  "_links" : {
    "self" : {
      "href" : "http://localhost:8080/api/courses{?page,size,sort}",
      "templated" : true
    }
  },
  "_embedded" : {
    "courses" : [ {
      "courseCode" : "Course1",
      "courseName" : "Course Name 1",
      "version" : 0,
      "_links" : {
        "self" : {
          "href" : "http://localhost:8080/api/courses/1"
        },
        "teacher" : {
          "href" : "http://localhost:8080/api/courses/1/teacher"
        }
      }
    }, {
      "courseCode" : "Course2",
      "courseName" : "Course Name 2",
      "version" : 0,
      "_links" : {
        "self" : {
          "href" : "http://localhost:8080/api/courses/2"
        },
        "teacher" : {
          "href" : "http://localhost:8080/api/courses/2/teacher"
        }
      }
    } ]
  },
  "page" : {
    "size" : 20,
    "totalElements" : 2,
    "totalPages" : 1,
    "number" : 0
  }
}

and a specific course looks like this:
{
  "courseCode" : "Course1",
  "courseName" : "Course Name 1",
  "version" : 0,
  "_links" : {
    "self" : {
      "href" : "http://localhost:8080/api/courses/1"
    },
    "teacher" : {
      "href" : "http://localhost:8080/api/courses/1/teacher"
    }
  }
}

If you are wondering what the "_links", "_embedded" are - Spring Data REST uses Hypertext Application Language(or HAL for short) to represent the links, say the one between a course and a teacher.

HAL Based REST service - Using RestTemplate


Given this HAL based REST service, the question that I had in my mind was how to write a client to this service. I am sure there are better ways of doing this, but what follows worked for me and I welcome any cleaner ways of writing the client.

First, I modified the RestTemplate to register a custom Json converter that understands HAL based links:

public RestTemplate getRestTemplateWithHalMessageConverter() {
 RestTemplate restTemplate = new RestTemplate();
 List<HttpMessageConverter<?>> existingConverters = restTemplate.getMessageConverters();
 List<HttpMessageConverter<?>> newConverters = new ArrayList<>();
 newConverters.add(getHalMessageConverter());
 newConverters.addAll(existingConverters);
 restTemplate.setMessageConverters(newConverters);
 return restTemplate;
}

private HttpMessageConverter getHalMessageConverter() {
 ObjectMapper objectMapper = new ObjectMapper();
 objectMapper.registerModule(new Jackson2HalModule());
 MappingJackson2HttpMessageConverter halConverter = new TypeConstrainedMappingJackson2HttpMessageConverter(ResourceSupport.class);
 halConverter.setSupportedMediaTypes(Arrays.asList(HAL_JSON));
 halConverter.setObjectMapper(objectMapper);
 return halConverter;
}

The Jackson2HalModule is provided by the Spring HATEOS project and understands HAL representation.


Given this shiny new RestTemplate, first let us create a Teacher entity:

Teacher teacher1 = new Teacher();
teacher1.setName("Teacher 1");
teacher1.setDepartment("Department 1");
URI teacher1Uri =
  testRestTemplate.postForLocation("http://localhost:8080/api/teachers", teacher1);

Note that when the entity is created, the response is a http status code of 201 with the Location header pointing to the uri of the newly created resource, Spring RestTemplate provides a neat way of posting and getting hold of this Location header through an API. So now we have a teacher1Uri representing the newly created teacher.

Given this teacher URI, let us now retrieve the teacher, the raw json for the teacher resource looks like the following:
{
  "name" : "Teacher 1",
  "department" : "Department 1",
  "version" : 0,
  "_links" : {
    "self" : {
      "href" : "http://localhost:8080/api/teachers/1"
    }
  }
}

and to retrieve this using RestTemplate:
ResponseEntity<Resource<Teacher>> teacherResponseEntity
  = testRestTemplate.exchange("http://localhost:8080/api/teachers/1", HttpMethod.GET, null, new ParameterizedTypeReference<Resource<Teacher>>() {
});

Resource<Teacher> teacherResource = teacherResponseEntity.getBody();

Link teacherLink = teacherResource.getLink("self");
String teacherUri = teacherLink.getHref();

Teacher teacher = teacherResource.getContent();

Jackson2HalModule is the one which helps unpack the links this cleanly and to get hold of the Teacher entity itself. I have previously explained ParameterizedTypeReference here.


Now, to a more tricky part, creating a Course.

Creating a course is tricky as it has a relation to the Teacher and representing this relation using HAL is not that straightforward. A raw POST to create the course would look like this:

 {
      "courseCode" : "Course1",
      "courseName" : "Course Name 1",
      "version" : 0,
      "teacher" : "http://localhost:8080/api/teachers/1"
}

Note how the reference to the teacher is a URI, this is how HAL represents an embedded reference specifically for a POST'ed content, so now to get this form through RestTemplate -

First to create a Course:

Course course1 = new Course();
course1.setCourseCode("Course1");
course1.setCourseName("Course Name 1");

At this point, it will be easier to handle providing the teacher link by dealing with a json tree representation and adding in the teacher link as the teacher uri:

ObjectMapper objectMapper = getObjectMapperWithHalModule();
ObjectNode jsonNodeCourse1 = (ObjectNode) objectMapper.valueToTree(course1);
jsonNodeCourse1.put("teacher", teacher1Uri.getPath());

and posting this should create the course with the linked teacher:

URI course1Uri = testRestTemplate.postForLocation(coursesUri, jsonNodeCourse1);

and to retrieve this newly created Course:

ResponseEntity<Resource<Course>> courseResponseEntity
  = testRestTemplate.exchange(course1Uri, HttpMethod.GET, null, new ParameterizedTypeReference<Resource<Course>>() {
});

Resource<Course> courseResource = courseResponseEntity.getBody();
Link teacherLinkThroughCourse = courseResource.getLink("teacher");

This concludes how to use the RestTemplate to create and retrieve a linked resource, alternate ideas are welcome.

If you are interested in exploring this further, the entire sample is available at this github repo -  and the test is here


References:

Hypertext Application Language(or HAL for short)
HAL Specification
Spring RestTemplate

Wednesday, November 5, 2014

Spring boot based websocket application and capturing http session id

I was involved in a project recently where we needed to capture the http session id for a websocket request - the reason was to determine the number of websocket sessions utilizing the same underlying http session

The way to do this is based on a sample utilizing the new spring-session module and is described here.

The trick to capturing the http session id is in understanding that before a websocket connection is established between the browser and the server, there is a handshake phase negotiated over http and the session id is passed to the server during this handshake phase.

Spring Websocket support provides a nice way to register a HandShakeInterceptor, which can be used to capture the http session id and set this in the sub-protocol(typically STOMP) headers. First, this is the way to capture the session id and set it to a header:

public class HttpSessionIdHandshakeInterceptor implements HandshakeInterceptor {

 @Override
 public boolean beforeHandshake(ServerHttpRequest request, ServerHttpResponse response, WebSocketHandler wsHandler, Map<String, Object> attributes) throws Exception {
  if (request instanceof ServletServerHttpRequest) {
   ServletServerHttpRequest servletRequest = (ServletServerHttpRequest) request;
   HttpSession session = servletRequest.getServletRequest().getSession(false);
   if (session != null) {
    attributes.put("HTTPSESSIONID", session.getId());
   }
  }
  return true;
 }

 public void afterHandshake(ServerHttpRequest request, ServerHttpResponse response, WebSocketHandler wsHandler, Exception ex) {
 }
}

And to register this HandshakeInterceptor with Spring Websocket support:

@Configuration
@EnableWebSocketMessageBroker
public class WebSocketDefaultConfig extends AbstractWebSocketMessageBrokerConfigurer {

 @Override
 public void configureMessageBroker(MessageBrokerRegistry config) {
  config.enableSimpleBroker("/topic/", "/queue/");
  config.setApplicationDestinationPrefixes("/app");
 }

 @Override
 public void registerStompEndpoints(StompEndpointRegistry registry) {
  registry.addEndpoint("/chat").withSockJS().setInterceptors(httpSessionIdHandshakeInterceptor());
 }

 @Bean
 public HttpSessionIdHandshakeInterceptor httpSessionIdHandshakeInterceptor() {
  return new HttpSessionIdHandshakeInterceptor();
 }

}

Now that the session id is a part of the STOMP headers, this can be grabbed as a STOMP header, the following is a sample where it is being grabbed when subscriptions are registered to the server:

@Component
public class StompSubscribeEventListener implements ApplicationListener<SessionSubscribeEvent> {

 private static final Logger logger = LoggerFactory.getLogger(StompSubscribeEventListener.class);

 @Override
 public void onApplicationEvent(SessionSubscribeEvent sessionSubscribeEvent) {
  StompHeaderAccessor headerAccessor = StompHeaderAccessor.wrap(sessionSubscribeEvent.getMessage());
  logger.info(headerAccessor.getSessionAttributes().get("HTTPSESSIONID").toString());
 }
}

or it can be grabbed from a controller method handling websocket messages as a MessageHeaders parameter:

@MessageMapping("/chats/{chatRoomId}")
 public void handleChat(@Payload ChatMessage message, @DestinationVariable("chatRoomId") String chatRoomId, MessageHeaders messageHeaders, Principal user) {
  logger.info(messageHeaders.toString());
  this.simpMessagingTemplate.convertAndSend("/topic/chats." + chatRoomId, "[" + getTimestamp() + "]:" + user.getName() + ":" + message.getMessage());
 }

Here is a complete working sample which implements this pattern.

Sunday, September 14, 2014

Customizing HttpMessageConverters with Spring Boot and Spring MVC

Exposing a REST based endpoint for a Spring Boot application or for that matter a straight Spring MVC application is straightforward, the following is a controller exposing an endpoint to create an entity based on the content POST'ed to it:

@RestController
@RequestMapping("/rest/hotels")
public class RestHotelController {
        ....
 @RequestMapping(method=RequestMethod.POST)
 public Hotel create(@RequestBody @Valid Hotel hotel) {
  return this.hotelRepository.save(hotel);
 }
}

Internally Spring MVC uses a component called a HttpMessageConverter to convert the Http request to an object representation and back.

A set of default converters are automatically registered which supports a whole range of different resource representation formats - json, xml for instance.

Now, if there is a need to customize the message converters in some way, Spring Boot makes it simple. As an example consider if the POST method in the sample above needs to be little more flexible and should ignore properties which are not present in the Hotel entity - typically this can be done by configuring the Jackson ObjectMapper, all that needs to be done with Spring Boot is to create a new HttpMessageConverter bean and that would end up overriding all the default message converters, this way:

@Bean
 public MappingJackson2HttpMessageConverter mappingJackson2HttpMessageConverter() {
  MappingJackson2HttpMessageConverter jsonConverter = new MappingJackson2HttpMessageConverter();
  ObjectMapper objectMapper = new ObjectMapper();
  objectMapper.configure(DeserializationFeature.FAIL_ON_UNKNOWN_PROPERTIES, false);
  jsonConverter.setObjectMapper(objectMapper);
  return jsonConverter;
 }

This works well for a Spring-Boot application, however for straight Spring MVC applications which do not make use of Spring-Boot, configuring a custom converter is a little more complicated - the default converters are not registered by default and an end user has to be explicit about registering the defaults - the following is the relevant code for Spring 4 based applications:

@Configuration
public class WebConfig extends WebMvcConfigurationSupport {

 @Bean
 public MappingJackson2HttpMessageConverter customJackson2HttpMessageConverter() {
  MappingJackson2HttpMessageConverter jsonConverter = new MappingJackson2HttpMessageConverter();
  ObjectMapper objectMapper = new ObjectMapper();
  objectMapper.configure(DeserializationFeature.FAIL_ON_UNKNOWN_PROPERTIES, false);
  jsonConverter.setObjectMapper(objectMapper);
  return jsonConverter;
 }
 
 @Override
 public void configureMessageConverters(List<HttpMessageConverter<?>> converters) {
  converters.add(customJackson2HttpMessageConverter());
  super.addDefaultHttpMessageConverters();
 }
}

Here WebMvcConfigurationSupport provides a way to more finely tune the MVC tier configuration of a Spring based application. In the configureMessageConverters method, the custom converter is being registered and then an explicit call is being made to ensure that the defaults are registered also. A little more work than for a Spring-Boot based application.

Thursday, August 28, 2014

Spring MVC endpoint documentation with Spring Boot

A long time ago I had posted about a way to document all the uri mappings exposed by a typical Spring MVC based application. The steps to do this however are very verbose and requires a fairly deep knowledge of some of the underlying Spring MVC components.

Spring Boot makes this kind of documentation way simpler. All you need to do for a Spring-boot based application is to activate the Spring-boot actuator. Adding in the actuator brings in a lot more production ready features to a Spring-boot application, my focus however is specifically on the endpoint mappings.

So, first to add in the actuator as a dependency to a Spring-boot application:

<dependency>
 <groupId>org.springframework.boot</groupId>
 <artifactId>spring-boot-starter-actuator</artifactId>
</dependency>

and if the Spring-Boot app is started up now, a REST endpoint at this http://machinename:8080/mappings url should be available which lists out all the uri's exposed by the application, a snippet of this information looks like the following in a sample application I have:

{
  "/**/favicon.ico" : {
    "bean" : "faviconHandlerMapping"
  },
  "/hotels/partialsEdit" : {
    "bean" : "viewControllerHandlerMapping"
  },
  "/hotels/partialsCreate" : {
    "bean" : "viewControllerHandlerMapping"
  },
  "/hotels/partialsList" : {
    "bean" : "viewControllerHandlerMapping"
  },
  "/**" : {
    "bean" : "resourceHandlerMapping"
  },
  "/webjars/**" : {
    "bean" : "resourceHandlerMapping"
  },
  "{[/hotels],methods=[GET],params=[],headers=[],consumes=[],produces=[],custom=[]}" : {
    "bean" : "requestMappingHandlerMapping",
    "method" : "public java.lang.String mvctest.web.HotelController.list(org.springframework.ui.Model)"
  },
  "{[/rest/hotels/{id}],methods=[GET],params=[],headers=[],consumes=[],produces=[],custom=[]}" : {
    "bean" : "requestMappingHandlerMapping",
    "method" : "public mvctest.domain.Hotel mvctest.web.RestHotelController.get(long)"
  },
  "{[/rest/hotels],methods=[GET],params=[],headers=[],consumes=[],produces=[],custom=[]}" : {
    "bean" : "requestMappingHandlerMapping",
    "method" : "public java.util.List<mvctest.domain.Hotel> mvctest.web.RestHotelController.list()"
  },
  "{[/rest/hotels/{id}],methods=[DELETE],params=[],headers=[],consumes=[],produces=[],custom=[]}" : {
    "bean" : "requestMappingHandlerMapping",
    "method" : "public org.springframework.http.ResponseEntity<java.lang.Boolean> mvctest.web.RestHotelController.delete(long)"
  },
  "{[/rest/hotels],methods=[POST],params=[],headers=[],consumes=[],produces=[],custom=[]}" : {
    "bean" : "requestMappingHandlerMapping",
    "method" : "public mvctest.domain.Hotel mvctest.web.RestHotelController.create(mvctest.domain.Hotel)"
  },
  "{[/rest/hotels/{id}],methods=[PUT],params=[],headers=[],consumes=[],produces=[],custom=[]}" : {
    "bean" : "requestMappingHandlerMapping",
    "method" : "public mvctest.domain.Hotel mvctest.web.RestHotelController.update(long,mvctest.domain.Hotel)"
  },
  "{[/],methods=[],params=[],headers=[],consumes=[],produces=[],custom=[]}" : {
    "bean" : "requestMappingHandlerMapping",
    "method" : "public java.lang.String mvctest.web.RootController.onRootAccess()"
  },
  "{[/error],methods=[],params=[],headers=[],consumes=[],produces=[],custom=[]}" : {
    "bean" : "requestMappingHandlerMapping",
    "method" : "public org.springframework.http.ResponseEntity<java.util.Map<java.lang.String, java.lang.Object>> org.springframework.boot.autoconfigure.web.BasicErrorController.error(javax.servlet.http.HttpServletRequest)"
  },
  
  ....

Note that by default the json is not formatted, to get a formatted json just ensure that you have the following entry in your application.properties file:

http.mappers.json-pretty-print=true

This listing is much more comprehensive than the listing that I originally had.

The same information can of course be presented in a better way by rendering it to html and I have opted to use angularjs to present this information, the following is the angularjs service factory to retrieve the mappings and the controller which makes use of this factory to populate a mappings model:

app.factory("mappingsFactory", function($http) {
    var factory = {};
    factory.getMappings = function() {
        return $http.get(URLS.mappingsUrl);
    }
    return factory;
});

app.controller("MappingsCtrl", function($scope, $state, mappingsFactory) {
    function init() {
        mappingsFactory.getMappings().success(function(data) {
           $scope.mappings = data;
        });
    }

    init();
});

The returned mappings model is essentially a map of a map, the key of the map being the uri path exposed by Spring-Boot application and the values being the name of the bean handling the endpoint and if available the details of the controller handling the call, this can be rendered using a template of the following form:

<table class="table table-bordered table-striped">
    <thead>
    <tr>
        <th width="50%">Path</th>
        <th width="10%">Bean</th>
        <th width="40%">Method</th>
    </tr>
    </thead>
    <tbody>
    <tr ng-repeat="(k, v) in mappings">
        <td>{{k}}</td>
        <td>{{v.bean}}</td>
        <td>{{v.method}}</td>
    </tr>
    </tbody>
</table>

the final rendered view of the endpoint mappings is displayed in the following way:

Here is a sample github project with the rendering implemented: https://github.com/bijukunjummen/spring-boot-mvc-test

Saturday, July 19, 2014

Tailing a file - Spring Websocket sample

This is a sample that I have wanted to try for sometime - A Websocket application to tail the contents of a file.


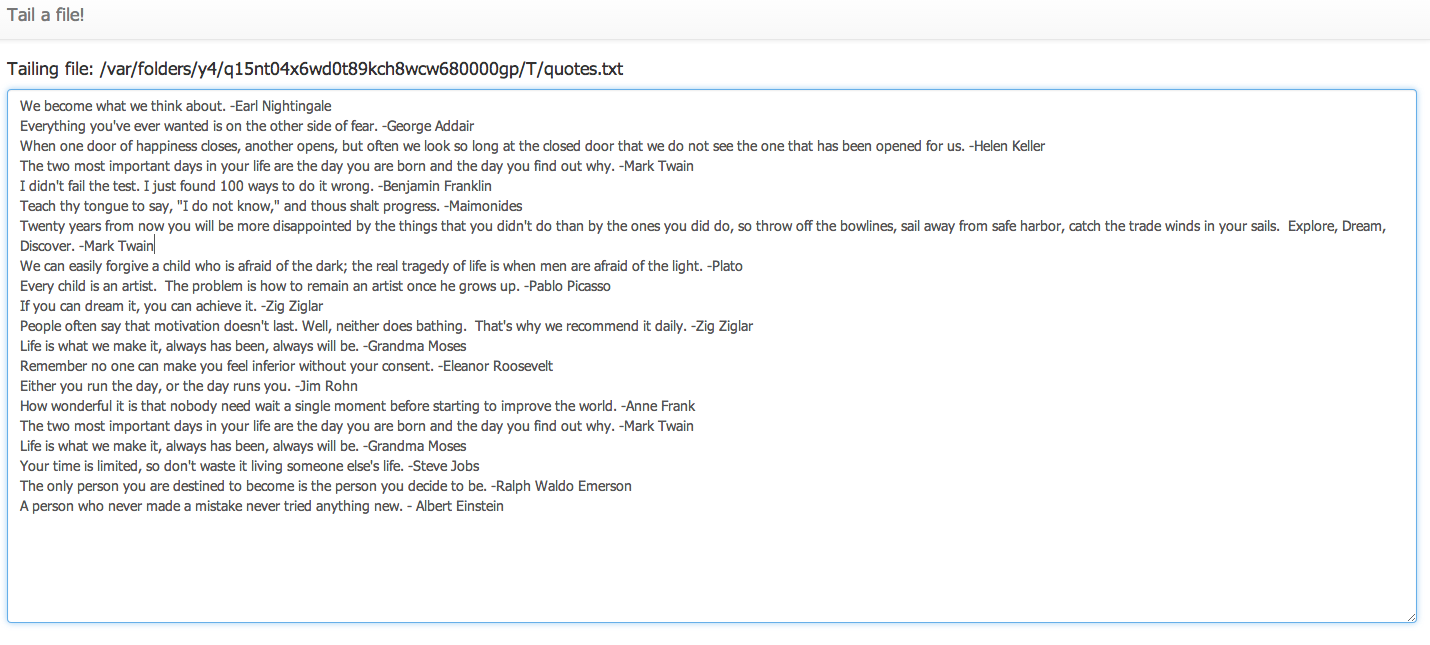
The following is the final view of the web-application:


There are a few parts to this application:

Generating a File to tail:


I chose to use a set of 100 random quotes as a source of the file content, every few seconds the application generates a quote and writes this quote to the temporary file. Spring Integration is used for wiring this flow for writing the contents to the file:

<int:channel id="toFileChannel"/>

<int:inbound-channel-adapter ref="randomQuoteGenerator" method="generateQuote" channel="toFileChannel">
	<int:poller fixed-delay="2000"/>
</int:inbound-channel-adapter>

<int:chain input-channel="toFileChannel">
	<int:header-enricher>
		<int:header name="file_name" value="quotes.txt"/>
	</int:header-enricher>
	<int-file:outbound-channel-adapter directory="#{systemProperties['java.io.tmpdir']}" mode="APPEND" />
</int:chain>

Just a quick note, Spring Integration flows can now also be written using a Java Based DSL, and this flow using Java is available here

Tailing the file and sending the content to a broker


The actual tailing of the file itself can be accomplished by OS specific tail command or by using a library like Apache Commons IO. Again in my case I decided to use Spring Integration which provides Inbound channel adapters to tail a file purely using configuration, this flow looks like this:
<int:channel id="toTopicChannel"/>

<int-file:tail-inbound-channel-adapter id="fileInboundChannelAdapter"
				channel="toTopicChannel"
				file="#{systemProperties['java.io.tmpdir']}/quotes.txt"
				delay="2000"
				file-delay="10000"/>

<int:outbound-channel-adapter ref="fileContentRecordingService" method="sendLinesToTopic" channel="toTopicChannel"/>
and its working Java equivalent

There is a reference to a "fileContentRecordingService" above, this is the component which will direct the lines of the file to a place where the Websocket client will subscribe to.

Websocket server configuration

Spring Websocket support makes it super simple to write a Websocket based application, in this instance the entire working configuration is the following:
@Configuration
@EnableWebSocketMessageBroker
public class WebSocketDefaultConfig extends AbstractWebSocketMessageBrokerConfigurer {

	@Override
	public void configureMessageBroker(MessageBrokerRegistry config) {
		//config.enableStompBrokerRelay("/topic/", "/queue/");
		config.enableSimpleBroker("/topic/", "/queue/");
		config.setApplicationDestinationPrefixes("/app");
	}

	@Override
	public void registerStompEndpoints(StompEndpointRegistry registry) {
		registry.addEndpoint("/tailfilesep").withSockJS();
	}
}

This may seem a little over the top, but what these few lines of configuration does is very powerful and the configuration can be better understood by going through the reference here. In brief, it sets up a websocket endpoint at '/tailfileep' uri, this endpoint is enhanced with SockJS support, Stomp is used as a sub-protocol, endpoints `/topic` and `/queue` is configured to a real broker like RabbitMQ or ActiveMQ but in this specific to an in-memory one.

Going back to the "fileContentRecordingService" once more, this component essentially takes the line of the file and sends it this in-memory broker, SimpMessagingTemplate facilitates this wiring:

public class FileContentRecordingService {
	@Autowired
	private SimpMessagingTemplate simpMessagingTemplate;

	public void sendLinesToTopic(String line) {
		this.simpMessagingTemplate.convertAndSend("/topic/tailfiles", line);
	}
}


Websocket UI configuration

The UI is angularjs based, the client controller is set up this way and internally uses the javascript libraries for sockjs and stomp support:

var tailFilesApp = angular.module("tailFilesApp",[]);

tailFilesApp.controller("TailFilesCtrl", function ($scope) {
    function init() {
        $scope.buffer = new CircularBuffer(20);
    }

    $scope.initSockets = function() {
        $scope.socket={};
        $scope.socket.client = new SockJS("/tailfilesep);
        $scope.socket.stomp = Stomp.over($scope.socket.client);
        $scope.socket.stomp.connect({}, function() {
            $scope.socket.stomp.subscribe("/topic/tailfiles", $scope.notify);
        });
        $scope.socket.client.onclose = $scope.reconnect;
    };

    $scope.notify = function(message) {
        $scope.$apply(function() {
            $scope.buffer.add(angular.fromJson(message.body));
        });
    };

    $scope.reconnect = function() {
        setTimeout($scope.initSockets, 10000);
    };

    init();
    $scope.initSockets();
});

The meat of this code is the "notify" function which the callback acting on the messages from the server, in this instance the new lines coming into the file and showing it in a textarea.


This wraps up the entire application to tail a file. A complete working sample without any external dependencies is available at this github location, instructions to start it up is also available at that location.

Conclusion

Spring Websockets provides a concise way to create Websocket based applications, this sample provides a good demonstration of this support. I had presented on this topic recently at my local JUG (IndyJUG) and a deck with the presentation is available here

Sunday, June 15, 2014

Thymeleaf - fragments and angularjs router partial views

One more of the many cool features of thymeleaf is the ability to render fragments of templates - I have found this to be an especially useful feature to use with AngularJs.

AngularJS $routeProvider or AngularUI router can be configured to return partial views for different "paths", using thymeleaf to return these partial views works really well.

Consider a simple CRUD flow, with the AngularUI router views defined this way:

app.config(function ($stateProvider, $urlRouterProvider) {
    $urlRouterProvider.otherwise("list");

    $stateProvider
        .state('list', {
            url:'/list',
            templateUrl: URLS.partialsList,
            controller: 'HotelCtrl'
        })
        .state('edit', {
            url:'/edit/:hotelId',
            templateUrl: URLS.partialsEdit,
            controller: 'HotelEditCtrl'
        })
        .state('create', {
            url:'/create',
            templateUrl: URLS.partialsCreate,
            controller: 'HotelCtrl'
        });
});

The templateUrl above is the partial view rendered when the appropriate state is activated, here these are defined using javascript variables and set using thymeleaf templates this way(to cleanly resolve the context path of the deployed application as the root path):

<script th:inline="javascript">
    /*<![CDATA[*/
    var URLS = {};
    URLS.partialsList = /*[[@{/hotels/partialsList}]]*/ '/hotels/partialsList';
    URLS.partialsEdit = /*[[@{/hotels/partialsEdit}]]*/ '/hotels/partialsEdit';
    URLS.partialsCreate = /*[[@{/hotels/partialsCreate}]]*/ '/hotels/partialsCreate';
    /*]]>*/
</script>

Now, consider one of the fragment definitions, say the one handling the list:

file: templates/hotels/partialList.html

<!DOCTYPE html>
<html xmlns:th="http://www.thymeleaf.org" layout:decorator="layout/sitelayout">
<head>
    <title th:text="#{app.name}">List of Hotels</title>
    <link rel="stylesheet" th:href="@{/webjars/bootstrap/3.1.1/css/bootstrap.min.css}"
          href="http://netdna.bootstrapcdn.com/bootstrap/3.1.1/css/bootstrap.min.css"/>
    <link rel="stylesheet" th:href="@{/webjars/bootstrap/3.1.1/css/bootstrap-theme.css}"
          href="http://netdna.bootstrapcdn.com/bootstrap/3.1.1/css/bootstrap-theme.css"/>
    <link rel="stylesheet" th:href="@{/css/application.css}" href="../../static/css/application.css"/>
</head>
<body>
<div class="container">
    <div class="row">
        <div class="col-xs-12">
            <h1 class="well well-small">Hotels</h1>
        </div>
    </div>
    <div th:fragment="content">
        <div class="row">
            <div class="col-xs-12">
                <table class="table table-bordered table-striped">
                    <thead>
                    <tr>
                        <th>ID</th>
                        <th>Name</th>
                        <th>Address</th>
                        <th>Zip</th>
                        <th>Action</th>
                    </tr>
                    </thead>
                    <tbody>
                    <tr ng-repeat="hotel in hotels">
                        <td>{{hotel.id}}</td>
                        <td>{{hotel.name}}</td>
                        <td>{{hotel.address}}</td>
                        <td>{{hotel.zip}}</td>
                        <td><a ui-sref="edit({ hotelId: hotel.id })">Edit</a> | <a
                                ng-click="deleteHotel(hotel)">Delete</a></td>
                    </tr>
                    </tbody>
                </table>
            </div>
        </div>
        <div class="row">
            <div class="col-xs-12">
                <a ui-sref="create" class="btn btn-default">New Hotel</a>
            </div>
        </div>
    </div>
</div>
</body>
</html>

The great thing about thymeleaf here is that this view can be opened up in a browser and previewed. To return the part of the view, which in this case is the section which starts with "th:fragment="content"", all I have to do is to return the name of the view as "hotels/partialList::content"!

The same approach can be followed for the update and the create views.

One part which I have left open is about how the uri in the UI which is "/hotels/partialsList" maps to "hotels/partialList::content", with Spring MVC this can be easily done through a View Controller, which is essentially a way to return a view name without needing to go through a Controller and can be configured this way:

@Configuration
public class WebConfig extends WebMvcConfigurerAdapter {

 @Override
 public void addViewControllers(ViewControllerRegistry registry) {
  registry.addViewController("/hotels/partialsList").setViewName("hotels/partialsList::content");
  registry.addViewController("/hotels/partialsCreate").setViewName("hotels/partialsCreate::content");
  registry.addViewController("/hotels/partialsEdit").setViewName("hotels/partialsEdit::content");
 }

}

So to summarize, you create a full html view using thymeleaf templates which can be previewed and any rendering issues fixed by opening the view in a browser during development time and then return the fragment of the view at runtime purely by referring to the relevant section of the html page.

A sample which follows this pattern is available at this github location - https://github.com/bijukunjummen/spring-boot-mvc-test


Thursday, May 22, 2014

Spring Rest Controller with angularjs $resource

Angularjs ngResource is an angularjs module for interacting with REST based services. I used it recently for a small project with Spring MVC and wanted to document a configuration that worked well for me.

The controller is run of the mill, it supports CRUD operations on a Hotel entity and supports the following methods:

POST /rest/hotels - creates a Hotel entity
GET /rest/hotels - gets the list of Hotel entities
GET /rest/hotels/:id - retrieves an entity with specified Id
PUT /rest/hotels/:id - updates an entity
DELETE /rest/hotels/:id - deletes an entity with the specified id

This can implemented in the following way using Spring MVC:

@RestController
@RequestMapping("/rest/hotels")
public class RestHotelController {
 private HotelRepository hotelRepository;
 
 @Autowired
 public RestHotelController(HotelRepository hotelRepository) {
  this.hotelRepository = hotelRepository;
 }

 @RequestMapping(method=RequestMethod.POST)
 public Hotel create(@RequestBody @Valid Hotel hotel) {
  return this.hotelRepository.save(hotel);
 }

 @RequestMapping(method=RequestMethod.GET)
 public List<Hotel> list() {
  return this.hotelRepository.findAll();
 }

 @RequestMapping(value="/{id}", method=RequestMethod.GET)
 public Hotel get(@PathVariable("id") long id) {
  return this.hotelRepository.findOne(id);
 }
 
 @RequestMapping(value="/{id}", method=RequestMethod.PUT)
 public Hotel update(@PathVariable("id") long id, @RequestBody @Valid Hotel hotel) {
  return hotelRepository.save(hotel);
 }
 
 @RequestMapping(value="/{id}", method=RequestMethod.DELETE)
 public ResponseEntity<Boolean> delete(@PathVariable("id") long id) {
  this.hotelRepository.delete(id);
  return new ResponseEntity<Boolean>(Boolean.TRUE, HttpStatus.OK);
 }
}

Note the @RestController annotation, this is a new annotation introduced with Spring Framework 4.0, with this annotation specified on the controller, the @ResponseBody annotation on each of the methods can be avoided.

On the angularjs side, the ngResource module can be configured in a factory the following way, to consume this service:

app.factory("Hotel", function ($resource) {
    return $resource("/rest/hotels", {id: "@id"}, {
        update: {
            method: 'PUT'
        }
    });
});

The only change to the default configuration is in specifying the additional "update" action with the Http method of PUT instead of POST. With this change, the REST API can be accessed the following way:

POST /rest/hotels translates to:

var hotel = new Hotel({name:"test",address:"test address", zip:"0001"});
hotel.$save();

Or another variation of this:
Hotel.save({}, {name:"test",address:"test address", zip:"0001"});

GET /rest/hotels translates to :
Hotel.query();

GET /rest/hotels/:id translates to :
Hotel.get({id:1})

PUT /rest/hotels/:id translates to :
var hotel = new Hotel({id:1, name:"test",address:"test address", zip:"0001"});
hotel.$update();

DELETE /rest/hotels/:id translates to:
var hotel = new Hotel({id:1});
hotel.$delete();
OR
Hotel.delete({id:1});

To handle successful and failure outcomes just pass in additional callback handlers:

for eg. with create:
var hotel = new Hotel({name:"test",address:"test address", zip:"0001"});
hotel.$save({},function(response){
  //on success
}, function(failedResponse){
  //on failure
});

A complete CRUD working sample with angularjs and Spring MVC is available at this github location: https://github.com/bijukunjummen/spring-boot-mvc-test/tree/withangular