Showing posts with label Google Cloud. Show all posts

Saturday, April 29, 2023

EventArc with CloudRun

 Google Cloud EventArc provides a simple way to act on events generated by a variety of Google Cloud Services.


Consider an example.

When a Cloud Build trigger is run, I want to be notified of this event -


Eventarc makes this integration simple


The internals of how it does this is documented well. Based on the source, the event is either received by EventArc directly or via Cloud Audit Logs. EventArc then dispatches the event to the destination via another pub/sub topic that it maintains. 

These underlying details are well hidden though, so as a developer concerned only about consuming the Build Events, I can focus on the payload of the event and ignore the mechanics of how EventArc gets the message from the source to my service.

Sample EventArc listener

Since I am interested in just the events and its payload, all I have to do from an application perspective is to expose an HTTP endpoint responding to a POST message with the content being the event that I am concerned about. Here is such an endpoint in Java using Spring Boot as the framework:

@RestController
public class EventArcMessageController {
    ...
    
    @RequestMapping(value = "/", method = RequestMethod.POST)
    public Mono<ResponseEntity<JsonNode>> receiveMessage(
            @RequestBody JsonNode body, @RequestHeader Map<String, String> headers) {
        LOGGER.info("Received message: {}, headers: {}", JsonUtils.writeValueAsString(body, objectMapper), headers);
        return Mono.just(ResponseEntity.ok(body));
    }
}


The full sample is available here

In this specific instance all the endpoint is doing is to log the message and the headers accompanying the message. As long as the response code is 200, EventArc would consider the handling to be successful. 

EventArc supports over 130 Google Cloud Services, so consuming myriad events from a bunch of services is easy.

EventArc Trigger

Once I have the EventArc deployed as a Cloud Run service, to integrate this with the Cloud Build Events in EventArc, all I have to do is to create an EventArc trigger. This can be done using the UI:
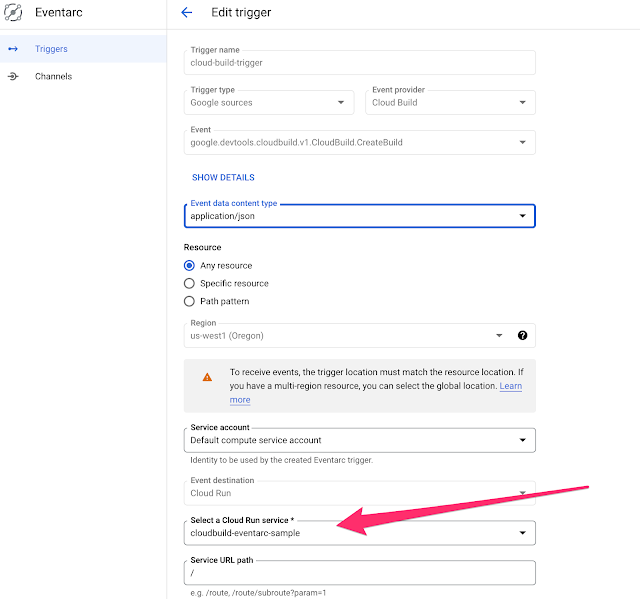


or using command line:

gcloud eventarc triggers update cloud-build-trigger \
--location=us-west1 \
--destination-run-service=cloudbuild-eventarc-sample \
--destination-run-region=us-west1 \
--destination-run-path="/" \
--event-filters="type=google.cloud.audit.log.v1.written" \
--event-filters="serviceName=cloudbuild.googleapis.com" \
--event-filters="methodName=google.devtools.cloudbuild.v1.CloudBuild.CreateBuild"

and that is it, EventArc handles all the underlying details of the integration.


Conclusion

I have the full java code available here which shows what a full code would look like. EventArc makes it very simple to integrate events from Google Cloud Services with custom applications.


Thursday, December 29, 2022

Bigtable Pagination in Java

 Consider a set of rows stored in Bigtable table called “people”:


My objective is to be able to paginate a few records at a time, say with each page containing 4 records:


Page 1:


Page 2:


Page 3:


High-Level Approach

A high level approach to doing this is to introduce two parameters:

  • Offset — the point from which to retrieve the records.
  • Limit — the number of records to retrieve per page
Limit in all cases is 4 in my example. Offset provides some way to indicate where to retrieve the next set of records from. Bigtable orders the record lexicographically using the key of each row, so one way to indicate offset is by using the key of the last record on a page. Given this, and using a marker offset of empty string for the first page, offset and record for each page looks like this:

Page 1 — offset: “”, limit: 4


Page 2 — offset: “person#id-004”, limit: 4

Page 3 — offset: “person#id-008”, limit: 4


The challenge now is in figuring out how to retrieve a set of records given a prefix, an offset, and a limit.

Retrieving records given a prefix, offset, limit

Bigtable java client provides a “readRows” api, that takes in a Query and returns a list of rows.

import com.google.cloud.bigtable.data.v2.BigtableDataClient
import com.google.cloud.bigtable.data.v2.models.Query
import com.google.cloud.bigtable.data.v2.models.Row

val rows: List<Row> = bigtableDataClient.readRows(query).toList()

Now, Query has a variant that takes in a prefix and returns rows matching the prefix:

import com.google.cloud.bigtable.data.v2.BigtableDataClient
import com.google.cloud.bigtable.data.v2.models.Query
import com.google.cloud.bigtable.data.v2.models.Row

val query: Query = Query.create("people").limit(limit).prefix(keyPrefix)
val rows: List<Row> = bigtableDataClient.readRows(query).toList()        

This works for the first page, however, for subsequent pages, the offset needs to be accounted for.

A way to get this to work is to use a Query that takes in a range:

import com.google.cloud.bigtable.data.v2.BigtableDataClient
import com.google.cloud.bigtable.data.v2.models.Query
import com.google.cloud.bigtable.data.v2.models.Row
import com.google.cloud.bigtable.data.v2.models.Range

val range: Range.ByteStringRange = 
    Range.ByteStringRange
        .unbounded()
        .startOpen(offset)
        .endOpen(end)

val query: Query = Query.create("people")
                    .limit(limit)
                    .range(range)

The problem with this is to figure out what the end of the range should be. This is where a neat utility that the Bigtable Java library provides comes in. This utility given a prefix of “abc”, calculates the end of the range to be “abd”

import com.google.cloud.bigtable.data.v2.models.Range

val range = Range.ByteStringRange.prefix("abc")
Putting this all together, a query that fetches paginated rows at an offset looks like this:

val query: Query =
    Query.create("people")
        .limit(limit)
        .range(Range.ByteStringRange
            .prefix(keyPrefix)
            .startOpen(offset))

val rows: List<Row> = bigtableDataClient.readRows(query).toList()

When returning the result, the final key needs to be returned so that it can be used as the offset for the next page, this can be done in Kotlin by having the following type:

data class Page<T>(val data: List<T>, val nextOffset: String)

Conclusion

I have a full example available here — this pulls in the right library dependencies and has all the mechanics of pagination wrapped into a working sample.

Cloud Run Health Checks — Spring Boot App

 Cloud Run services now can configure startup and liveness probes for a running container.


The startup probe is for determining when a container has cleanly started up and is ready to take traffic. A Liveness probe kicks off once a container has started up, to ensure that the container remains functional — Cloud Run would restart a container if the liveness probe fails.


Implementing Health Check Probes

A Cloud Run service can be described using a manifest file and a sample manifest looks like this:


apiVersion: serving.knative.dev/v1
kind: Service
metadata:
  annotations:
    run.googleapis.com/ingress: all
  name: health-cloudrun-sample
spec:
  template:
    metadata:
      annotations:
        autoscaling.knative.dev/maxScale: '5'
        autoscaling.knative.dev/minScale: '1'
    spec:
      containers:
        image: us-west1-docker.pkg.dev/sample-proj/sample-repo/health-app-image:latest

        startupProbe:
          httpGet:
            httpHeaders:
            - name: HOST
              value: localhost:8080
            path: /actuator/health/readiness
          initialDelaySeconds: 15
          timeoutSeconds: 1
          failureThreshold: 5
          periodSeconds: 10

        livenessProbe:
          httpGet:
            httpHeaders:
            - name: HOST
              value: localhost:8080
            path: /actuator/health/liveness
          timeoutSeconds: 1
          periodSeconds: 10
          failureThreshold: 5

        ports:
        - containerPort: 8080
          name: http1
        resources:
          limits:
            cpu: 1000m
            memory: 512Mi


This manifest can then be used for deployment to Cloud Run the following way:

gcloud run services replace sample-manifest.yaml --region=us-west1

Now, coming back to the manifest, the startup probe is defined this way:

startupProbe:
  httpGet:
    httpHeaders:
    - name: HOST
      value: localhost:8080
    path: /actuator/health/readiness
  initialDelaySeconds: 15
  timeoutSeconds: 1
  failureThreshold: 5
  periodSeconds: 10

It is set to make an http request to a /actuator/health/readiness path. There is an explicit HOST header also provided, this is temporary though as Cloud Run health checks currently have a bug where this header is missing from the health check requests.

The rest of the properties indicate the following:

  • initialDelaySeconds — delay for performing the first probe
  • timeoutSeconds — timeout for the health check request
  • failureThreshold — number of tries before the container is marked as not ready
  • periodSeconds — the delay between probes

Once the startup probe succeeds, Cloud Run would mark the container as being available to handle the traffic.

A livenessProbe follows a similar pattern:

livenessProbe:
  httpGet:
    httpHeaders:
    - name: HOST
      value: localhost:8080
    path: /actuator/health/liveness
  timeoutSeconds: 1
  periodSeconds: 10
  failureThreshold: 5

From a Spring Boot application perspective, all that needs to be done is to enable the Health check endpoints as described here


Conclusion

Start-Up probe ensures that a container receives traffic only when ready and a Liveness probe ensures that the container remains healthy during its operation, else gets restarted by the infrastructure. These health probes are a welcome addition to the already excellent feature set of Cloud Run.


Wednesday, December 28, 2022

Skaffold for Cloud Run and Local Environments

In one of my previous posts, I had explored using Cloud Deploy to deploy to a Cloud Run environment. Cloud Deploy uses a Skaffold file to internally orchestrate the steps required to build an image, adding the coordinates of the image to the manifest files and deploying it to a runtime. This works out great, not so much for local development and testing though. The reason is a lack of local Cloud Run runtime.

A good alternative is to simply use a local distribution of Kubernetes — say a minikube or kind. This will allow Skaffold to be used to its full power — with an ability to provide a quick development loop, debug, etc. I have documented some of the features here. The catch however is that there will now need to be two different sets of details of the environments maintained along with their corresponding sets of manifests — ones targeting Cloud Run, targeting minikube.


Skaffold patching is a way to do this and this post will go into the high-level details of the approach.

Skaffold Profiles and Patches

My original Skaffold configuration looks like this, targeting a Cloud Run environment:

apiVersion: skaffold/v3alpha1
kind: Config
metadata:
  name: clouddeploy-cloudrun-skaffold
manifests:
  kustomize:
    paths:
      - manifests/base
build:
  artifacts:
    - image: clouddeploy-cloudrun-app-image
      jib: { }
profiles:
  - name: dev
    manifests:
      kustomize:
        paths:
          - manifests/overlays/dev
  - name: prod
    manifests:
      kustomize:
        paths:
          - manifests/overlays/prod
deploy:
  cloudrun:
    region: us-west1-a

The “deploy.cloudrun” part indicates that it is targeting a Cloud Run environment.

So now, I want a different behavior in “local” environment, the way to do this in skaffold is to create a Skaffold profile that specifies what is different about this environment:

apiVersion: skaffold/v3alpha1
kind: Config
metadata:
  name: clouddeploy-cloudrun-skaffold
manifests:
  kustomize:
    paths:
      - manifests/base
build:
  artifacts:
    - image: clouddeploy-cloudrun-app-image
      jib: { }
profiles:
  - name: local
    # Something different on local
  - name: dev
    manifests:
      kustomize:
        paths:
          - manifests/overlays/dev
  - name: prod
    manifests:
      kustomize:
        paths:
          - manifests/overlays/prod
deploy:
  cloudrun:
    region: us-west1-a

I have two things different on local,

the deploy environment will be a minikube-based Kubernetes environment
the manifests file will be for this Kubernetes environment.
For the first requirement:

apiVersion: skaffold/v3alpha1
kind: Config
metadata:
  name: clouddeploy-cloudrun-skaffold
manifests:
  kustomize:
    paths:
      - manifests/base
build:
  artifacts:
    - image: clouddeploy-cloudrun-app-image
      jib: { }
profiles:
  - name: local
    patches:
      - op: remove
        path: /deploy/cloudrun
    deploy:
      kubectl: { }
  - name: dev
    manifests:
      kustomize:
        paths:
          - manifests/overlays/dev
  - name: prod
    manifests:
      kustomize:
        paths:
          - manifests/overlays/prod
deploy:
  cloudrun:
    region: us-west1-a

To specify the deploy environment where patches come, here the patch indicates that I want to remove Cloudrun as a deployment environment and add in Kubernetes.

And for the second requirement of generating a Kubernetes manifest, a rawYaml tag is introduced:

apiVersion: skaffold/v3alpha1
kind: Config
metadata:
  name: clouddeploy-cloudrun-skaffold
manifests:
  kustomize:
    paths:
      - manifests/base
build:
  artifacts:
    - image: clouddeploy-cloudrun-app-image
      jib: { }
profiles:
  - name: local
    manifests:
      kustomize: { }
      rawYaml:
        - kube/app.yaml
    patches:
      - op: remove
        path: /deploy/cloudrun
    deploy:
      kubectl: { }
  - name: dev
    manifests:
      kustomize:
        paths:
          - manifests/overlays/dev
  - name: prod
    manifests:
      kustomize:
        paths:
          - manifests/overlays/prod
deploy:
  cloudrun:
    region: us-west1-a

In this way a combination of Skaffold profiles and patches are used for tweaking the local deployment for Minikube.

Activating Profiles

When testing on local the “local” profile can be activated this way with Skaffold — with a -p flag:

skaffold dev -p local

One of the most useful command that I got to use is the “diagnose” command in skaffold which clearly showed what skaffold configuration is active for specific profiles:

skaffold diagnose -p local

which generated this resolved configuration for me:

apiVersion: skaffold/v3
kind: Config
metadata:
  name: clouddeploy-cloudrun-skaffold
build:
  artifacts:
  - image: clouddeploy-cloudrun-app-image
    context: .
    jib: {}
  tagPolicy:
    gitCommit: {}
  local:
    concurrency: 1
manifests:
  rawYaml:
  - /Users/biju/learn/clouddeploy-cloudrun-sample/kube/app.yaml
  kustomize: {}
deploy:
  kubectl: {}
  logs:
    prefix: container

Conclusion

There will likely be better support for Cloud Run on a local environment, for now, a minikube based Kubernetes is a good stand-in. Skaffold with profiles and patches can target this environment on a local box. This allows Skaffold features like quick development loop, debugging, etc to be activated while an application is in the process of being developed.

Wednesday, July 6, 2022

Google Cloud Function Gradle Plugin

 It is easy to develop a Google Cloud Function using Java with Gradle as the build tool. It is however not so simple to test it locally.

The current recommended approach to testing especially with gradle is very complicated. It requires pulling in Invoker libraries and adding a custom task to run the invoker function.

I have now authored a gradle plugin which makes local testing way more easier!


Problem

The way the Invoker is added in for a Cloud Function Gradle project looks like this today:

This has a lot of opaque details, for eg, what does the configurations of invoker even mean, what is the magical task that is being registered?

Fix

Now contrast it with the approach with the plugin:


All the boiler plate is now gone, configuration around the function class, which port to start it up on much more simplified. Adding this new plugin contributes a task that can be invoked the following way:

./gradlew cloudFunctionRun
It would start up an endpoint using which the function can be tested locally.

Conclusion

It may be far easier to see fully working samples incorporating this plugin. These samples are available here —


Thursday, June 23, 2022

Google Cloud Functions (2nd Gen) Java Sample

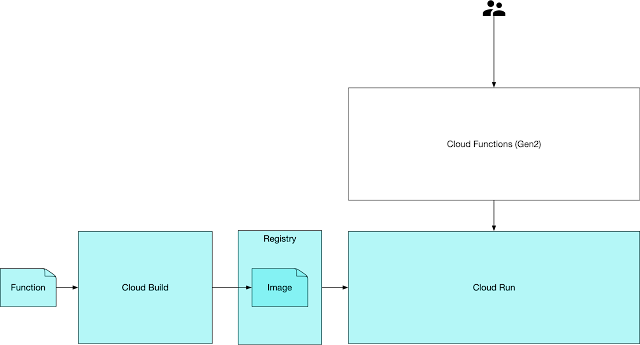
Cloud Functions (2nd Gen) is Google’s Serverless Functions as a Service Platform. 2nd Generation is now built on top of the excellent Google Cloud Run as a base. Think of Google Cloud Run as a Serverless environment for running containers which respond to events(http being the most basic, all sorts of other events via eventarc).


The blue area above shows the flow of code, the Google Cloud cli for Cloud Function, orchestrates the flow where the source code is placed in Google Cloud Storage bucket, a Cloud Build is triggered to build this code, package it into a container and finally this container is run using Cloud Run which the user can access via Cloud Functions console. Cloud Functions essentially becomes a pass through to Cloud Run.

The rest of this post will go into the details of how such a function can be written using Java.

tl;dr — sample code is available herehttps://github.com/bijukunjummen/http-cloudfunction-java-gradle, and has all the relevant pieces hooked up.

Method Signature

To expose a function to respond to http events is fairly straightforward, it just needs to conform to the functions framework interface, for java it is available herehttps://github.com/GoogleCloudPlatform/functions-framework-java

To pull in this dependency using gradle as the build tool looks like this:
  
  compileOnly("com.google.cloud.functions:functions-framework-api:1.0.4")

The dependency is required purely for compilation, at runtime the dependency is provided through a base image that Functions build time uses.

The function signature looks like this:

Testing the Function

This function can be tested locally using an Invoker that is provided by the functions-framework-api, my code https://github.com/bijukunjummen/http-cloudfunction-java-gradle shows how it can be hooked up with gradle, suffice to say that invoker allows an endpoint to brought up and tested with utilities like curl.

Deploying the Function

Now comes the easy part about deploying the function. Since a lot of Google Cloud Services need to be orchestrated to get a function deployed — GCS, Cloud Build, Cloud Run and Cloud Function, the command line to deploy the function does a great job of indicating which services need to be activated, the command to run looks like this:

gcloud beta functions deploy java-http-function \
--gen2 \
--runtime java17 \
--trigger-http \
--entry-point functions.HelloHttp \
--source ./build/libs/ \
--allow-unauthenticated    
    

Note that atleast for Java, it is sufficient to build the code locally and provide the built uber jar(jar with all dependencies packaged in) as the source.

Once deployed, the endpoint can be found using the following command:

gcloud beta functions describe java-http-function --gen2
and the resulting endpoint accessed via a curl command!

curl https://java-http-function-abc-uw.a.run.app
Hello World

What is Deployed

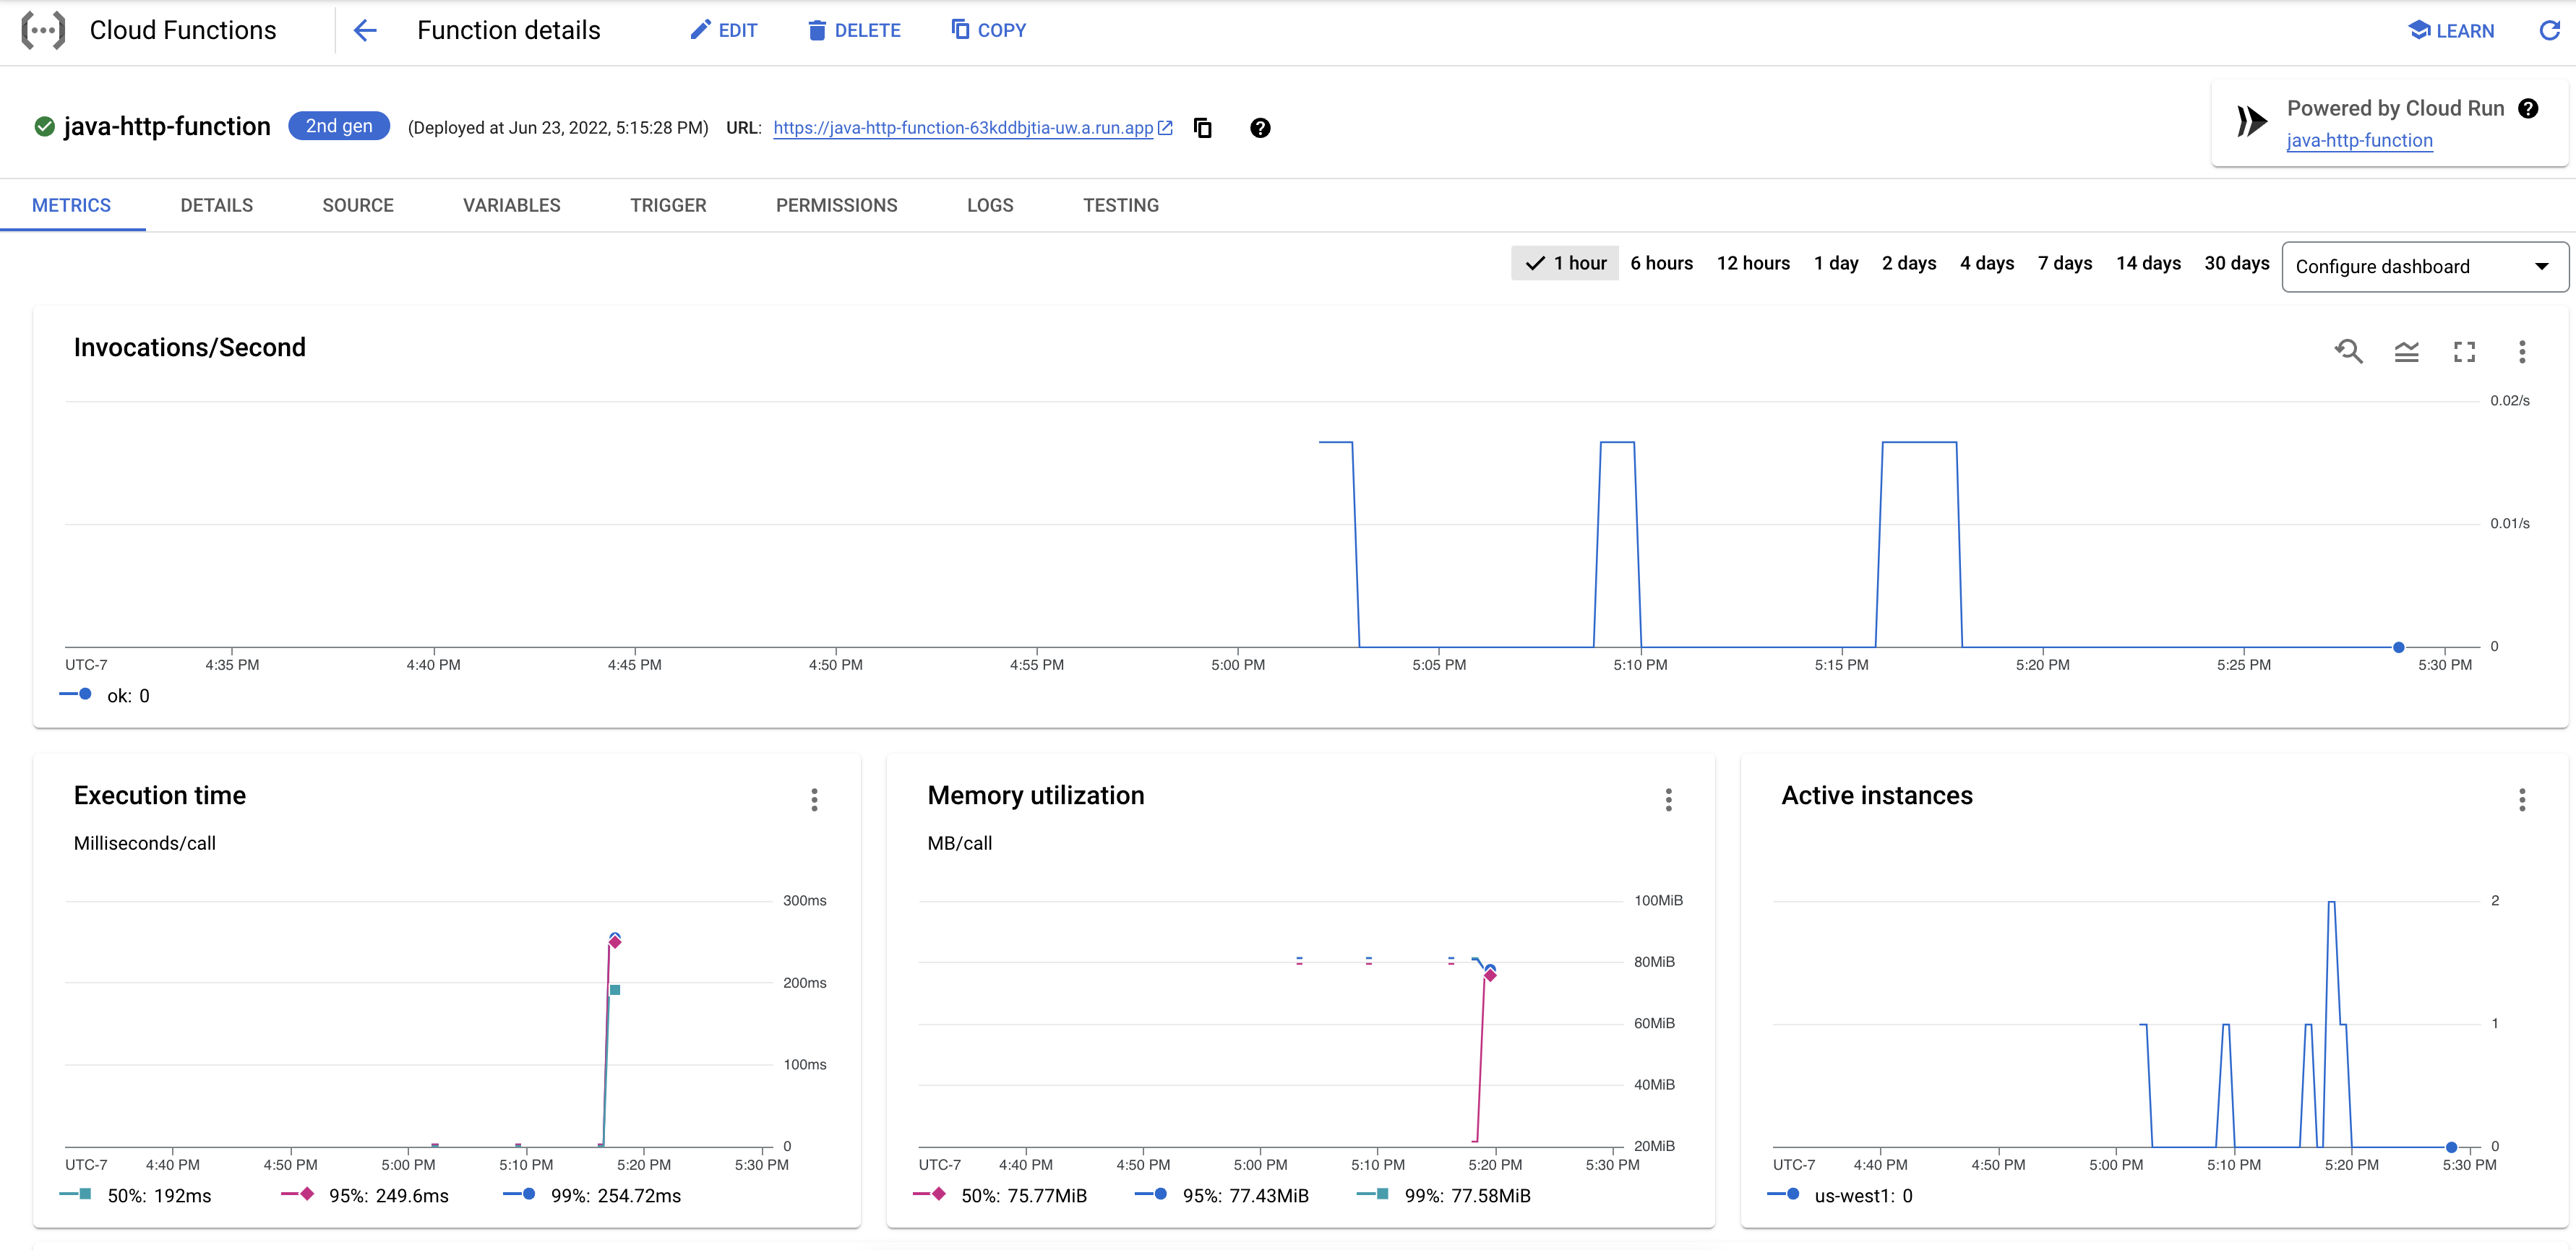
This is a bit of an exploration of what gets deployed into a GCP project, let’s start with the Cloud Function itself.


See how for a Gen2 function, a “Powered by Cloud Run” shows up which links to the actual cloud run deployment that powers this cloud function, clicking through leads to:


Conclusion

This concludes the steps to deploy a simple Java based Gen2 Cloud Function that responds to http calls. The post shows how the Gen 2 Cloud Function is more or less a pass through to Cloud Run. The sample is available in my github repository — https://github.com/bijukunjummen/http-cloudfunction-java-gradle