Showing posts with label Spring. Show all posts

Tuesday, March 23, 2021

Coroutine based Spring boot webflux application

I have worked with Spring Framework for ages and it still manages to surprise me with how cutting edge it continues to be but at the same time enabling a developer to put together a fairly sane app.

The most recent surprise was with how it enables programming a web application with Kotlin coroutines. Coroutines is a fairly complicated concept to get my head around, but it is starting to click now and while trying out some samples I thought it may be a good idea to put an end to end web application in place. 

Thanks to the excellent Spring Boot starters it was not difficult at all. Along the way I also decided to experiment with r2dbc which is another involved technology to interact with a database using reactive streams. Combining reactive streams for interacting with the database but using coroutines in the rest of the layers was not difficult at all. In this post I will not be covering the nuances of what I had to do to get the sample to work, but will cover one thin slice of what it looks like. The sample is here in my github repo and should be fairly self explanatory. 


I have to acknowledge that Nicolas Frankel's blog post provided me a lot of pointers in getting the working code just right


A Slice of functionality

The slice of functionality that I will consider in this post is to return a list of entities and an entity from an embedded database that I have used for the application. 

Let's start from bottom up. So at the lowest level I have to query the database and return a list of entities, this is made dirt simple using the Spring Data based repositories. This is the entirety of the repository code that returns coroutine types.


import org.springframework.data.repository.kotlin.CoroutineCrudRepository
import samples.geo.domain.City

interface CityRepo : CoroutineCrudRepository<City, Long>
Just by doing this the CRUD operations now become suspendable functions. So to return a list of an entity or a specific entity, the signature looks something like this:


fun getCities(): Flow<City> {
    return cityRepo.findAll()
}

suspend fun getCity(id: Long): City? {
    return cityRepo.findById(id)
}
Any list operations now return the Coroutine Flow type and getting an entity is a suspendable function.


Moving to the web layer(I have a service layer, but it is just a passthrough to the repo in this instance), I like to have an handler for handling the Webflux ServerRequest and ServerResponse types the following way:
suspend fun getCities(request: ServerRequest): ServerResponse {
    val cities = cityService.getCities()
        .toList()
    return ServerResponse.ok().bodyValueAndAwait(cities)
}

suspend fun getCity(request: ServerRequest): ServerResponse {
    val id = request.pathVariable("id").toLong()
    val city = cityService.getCity(id)

    return city
        ?.let { ServerResponse.ok().bodyValueAndAwait(it) }
        ?: ServerResponse.notFound().buildAndAwait()
}
which is then composed at the web layer the following way:
object AppRoutes {
    fun routes(cityHandler: CityHandler): RouterFunction<*> = coRouter {
        accept(MediaType.APPLICATION_JSON).nest {
            GET("/cities", cityHandler::getCities)
            GET("/cities/{id}", cityHandler::getCity)
            ...
        }
    }
}
The "coRouter" dsl above provides the functionality to convert the Kotlin coroutine types to the Spring WebFlux RouterFunction type This is essentially it. The code and tests for all this fairly sophisticated set of technology(r2dbc, coroutines, webflux, reactive streams etc) that this encompasses is fairly small as can be seen from the github repository

Conclusion

Getting a working end to end web application with Coroutines and Spring Webflux is just a "Spring" board to further exploration of Coroutines for me and I hope to gain deeper insights into this fascinating technology over time. Having been involved in the Spring community for so long, it is fascinating to note that it continues to remain one of the best frameworks to develop applications in, mainly because of the constant innovation and its focus on developer happiness.

Sunday, July 26, 2020

Backpressure in Project Reactor

Project Reactor implements the Reactive Streams specification, which is a standard for asynchronously processing a stream of data while respecting the processing capabilities of a consumer. 

At a very broad level, there are two entities involved, a Producer that produces the stream of data and a Consumer that consumes data. If the rate at which a Consumer consumes data is less than the rate at which a Producer produces data (referred to as a Fast Producer/Slow Consumer), then signals from the consumer can constrain the rate of production, this is referred to as Backpressure and in this post, I will be demonstrating a few backpressure examples using Project Reactor. 

Before I go ahead, I have to acknowledge that these examples are loosely based on what I learned from the "Reactive Programming with RxJava" book.

Producer

Flux in Project Reactor represents an asynchronous stream of 0..N data, where N can potentially be infinite. 

Consider a simple example, generating a sequence of numbers. There are built-in ways in Flux to do this, but for the example, I will be using an operator called Flux.generate. Sample code looks like this:
fun produce(targetRate: Int, upto: Long): Flux<Long> {
    val delayBetweenEmits: Long = 1000L / targetRate

    return Flux.generate(
        { 1L },
        { state: Long, sink: SynchronousSink<Long> ->
            sleep(delayBetweenEmits)
            val nextState: Long = state + 1
            if (state > upto) {
                sink.complete()
                nextState
            } else {
                LOGGER.info("Emitted {}", state)
                sink.next(state)
                nextState
            }
        }
    )
}

Here "targetRate" is the rate per second at which the Producer is expected to produce a sequence of numbers and "upto" represents the range for which the sequence is to be generated. "Thread.sleep" is used for introducing the delay between emissions.


Consumer

A consumer for this stream of data just consumes the sequence of numbers and to simulate processing while consuming the data, delays are again introduced just before reading the information, along these lines:
val delayBetweenConsumes: Long = 1000L / consumerRate
producer.produce(producerRate, count)
    .subscribe { value: Long ->
        sleep(delayBetweenConsumes)
        logger.info("Consumed {}", value)
    }

Just like with rate at the Producer side, there is a rate of consuming on the consumer side which drives the delay before consuming the data.


Scenario 1: Fast Producer, Slow Consumer without Threading

Now that I have a stream of data for which I can control the rate of production and rate of consumption, the first test that I ran was with the producer and the consumer chained together. 

The Producer produces at the rate of 100 requests a second and the consumer consuming it at 3 per second. 

If there were no backpressure mechanisms in place you would expect that Producer would merrily go along and produce all the records at its own pace of 100 per second and Consumer would slowly catch up at the rate of 3 per second.  This is NOT what happens though. 

The reason is not that intuitive I feel, it is not really backpressure coming into play either. The Producer is constrained to 3 requests per second merely because the entire flow from the Producer to the Consumer is synchronous by default and since the production and the consumption are happening on the same thread, the behavior is automatically constrained to what the Consumer is comfortable in consuming. 

Here is a graph which simply plots the rate of production and consumption over time and captures clearly the exact same rate of Production and Consumption throughout:


This behavior is borne out from the logs also, which show that the consumer and producer remain in sync:
2020-07-26 17:51:58.712  INFO 1 --- [pool-1-thread-1] sample.meter.Producer                    : Emitted 84
2020-07-26 17:51:59.048  INFO 1 --- [pool-1-thread-1] sample.meter.Consumer                    : Consumed 84
2020-07-26 17:51:59.059  INFO 1 --- [pool-1-thread-1] sample.meter.Producer                    : Emitted 85
2020-07-26 17:51:59.393  INFO 1 --- [pool-1-thread-1] sample.meter.Consumer                    : Consumed 85
2020-07-26 17:51:59.404  INFO 1 --- [pool-1-thread-1] sample.meter.Producer                    : Emitted 86
2020-07-26 17:51:59.740  INFO 1 --- [pool-1-thread-1] sample.meter.Consumer                    : Consumed 86
2020-07-26 17:51:59.751  INFO 1 --- [pool-1-thread-1] sample.meter.Producer                    : Emitted 87
2020-07-26 17:52:00.084  INFO 1 --- [pool-1-thread-1] sample.meter.Consumer                    : Consumed 87
2020-07-26 17:52:00.095  INFO 1 --- [pool-1-thread-1] sample.meter.Producer                    : Emitted 88
2020-07-26 17:52:00.430  INFO 1 --- [pool-1-thread-1] sample.meter.Consumer                    : Consumed 88
2020-07-26 17:52:00.441  INFO 1 --- [pool-1-thread-1] sample.meter.Producer                    : Emitted 89
2020-07-26 17:52:00.777  INFO 1 --- [pool-1-thread-1] sample.meter.Consumer                    : Consumed 89
2020-07-26 17:52:00.788  INFO 1 --- [pool-1-thread-1] sample.meter.Producer                    : Emitted 90
2020-07-26 17:52:01.087  INFO 1 --- [pool-1-thread-1] sample.meter.Consumer                    : Consumed 90
2020-07-26 17:52:01.097  INFO 1 --- [pool-1-thread-1] sample.meter.Producer                    : Emitted 91
2020-07-26 17:52:01.432  INFO 1 --- [pool-1-thread-1] sample.meter.Consumer                    : Consumed 91
2020-07-26 17:52:01.442  INFO 1 --- [pool-1-thread-1] sample.meter.Producer                    : Emitted 92
2020-07-26 17:52:01.777  INFO 1 --- [pool-1-thread-1] sample.meter.Consumer                    : Consumed 92
2020-07-26 17:52:01.788  INFO 1 --- [pool-1-thread-1] sample.meter.Producer                    : Emitted 93
2020-07-26 17:52:02.123  INFO 1 --- [pool-1-thread-1] sample.meter.Consumer                    : Consumed 93
2020-07-26 17:52:02.133  INFO 1 --- [pool-1-thread-1] sample.meter.Producer                    : Emitted 94
2020-07-26 17:52:02.467  INFO 1 --- [pool-1-thread-1] sample.meter.Consumer                    : Consumed 94
2020-07-26 17:52:02.478  INFO 1 --- [pool-1-thread-1] sample.meter.Producer                    : Emitted 95
2020-07-26 17:52:02.813  INFO 1 --- [pool-1-thread-1] sample.meter.Consumer                    : Consumed 95
2020-07-26 17:52:02.824  INFO 1 --- [pool-1-thread-1] sample.meter.Producer                    : Emitted 96
2020-07-26 17:52:03.157  INFO 1 --- [pool-1-thread-1] sample.meter.Consumer                    : Consumed 96
2020-07-26 17:52:03.168  INFO 1 --- [pool-1-thread-1] sample.meter.Producer                    : Emitted 97


Scenario 2: Fast Producer, Slow Consumer with Threading

The second scenario that I considered was with the Producer and the Consumer being produced independently in different threads. 

Project reactor makes this possible through two operators subscribeOn() which changes the thread where in my case the Producer produces the sequence and a publishOn() which shifts the consumption to a different thread. 

With these in place, the code looks like this:
producer.produce(producerRate, count)
    .subscribeOn(subscribeOnScheduler)
    .publishOn(publishOnScheduler)
    .subscribe { value: Long ->
        sleep(delayBetweenConsumes)
        logger.info("Consumed {}", value)
    }
The results were a little surprising, this is what I saw in the logs:
...
2020-07-26 18:42:41.774  INFO 1 --- [    subscribe-3] sample.meter.Producer                    : Emitted 252
2020-07-26 18:42:41.786  INFO 1 --- [    subscribe-3] sample.meter.Producer                    : Emitted 253
2020-07-26 18:42:41.797  INFO 1 --- [    subscribe-3] sample.meter.Producer                    : Emitted 254
2020-07-26 18:42:41.809  INFO 1 --- [    subscribe-3] sample.meter.Producer                    : Emitted 255
2020-07-26 18:42:41.819  INFO 1 --- [    subscribe-3] sample.meter.Producer                    : Emitted 256
2020-07-26 18:42:42.019  INFO 1 --- [      publish-2] sample.meter.Consumer                    : Consumed 9
2020-07-26 18:42:42.354  INFO 1 --- [      publish-2] sample.meter.Consumer                    : Consumed 10
2020-07-26 18:42:42.689  INFO 1 --- [      publish-2] sample.meter.Consumer                    : Consumed 11
2020-07-26 18:42:43.024  INFO 1 --- [      publish-2] sample.meter.Consumer                    : Consumed 12
2020-07-26 18:42:43.358  INFO 1 --- [      publish-2] sample.meter.Consumer                    : Consumed 13
2020-07-26 18:42:43.691  INFO 1 --- [      publish-2] sample.meter.Consumer                    : Consumed 14
2020-07-26 18:42:44.027  INFO 1 --- [      publish-2] sample.meter.Consumer                    : Consumed 15
2020-07-26 18:42:44.363  INFO 1 --- [      publish-2] sample.meter.Consumer                    : Consumed 16
.....
2020-07-26 18:43:43.724  INFO 1 --- [    subscribe-3] sample.meter.Producer                    : Emitted 299
2020-07-26 18:43:43.735  INFO 1 --- [    subscribe-3] sample.meter.Producer                    : Emitted 300
2020-07-26 18:43:43.913  INFO 1 --- [      publish-2] sample.meter.Consumer                    : Consumed 194
2020-07-26 18:43:44.248  INFO 1 --- [      publish-2] sample.meter.Consumer                    : Consumed 195
2020-07-26 18:43:44.581  INFO 1 --- [      publish-2] sample.meter.Consumer                    : Consumed 196
...
A sequence of numbers upto 256 was produced immediately and then the Producer waited for the Consumer to catch up, once the consumer caught up, the remaining emissions happened. This is how the graph for this looks: 


Clearly, backpressure is acting on this stream of data. The surprising aspect for me was the backpressure appeared to be triggering at a large value of 256 records from upstream.

Analyzing this is a little, the reason I realized is that an intermediate operation is buffering the requests. The intermediate operation in this instance happens to be the "publishOn()" operator that I am using, a variant of "publishOn()" which additionally takes in a prefetch parameter fixes the size of the buffer. 

In my case setting it to 10 felt reasonable, the code looks like this now:
producer.produce(producerRate, count)
    .subscribeOn(subscribeOnScheduler)
    .publishOn(publishOnScheduler, 10)
    .subscribe { value: Long ->
        sleep(delayBetweenConsumes)
        logger.info("Consumed {}", value)
    }
and the graph with the Producer and Consumer remains closely in sync:

Producer In Green, Consumer in Red


Scenario 3: Fast Producer, Multi-threaded Consumer

If you look closely at the name of the threads in logs from the first two scenarios then you would notice that the names of the thread at the point of production and at the point of consumption are always the same. The operators "publishOn()" and "subscribeOn()" don't parallelize the operation, they only switch the execution context of the operations. To really parallelize the operations, two approaches can be taken: 

  1. Using the parallel operator 
  2. Using flatMap flavors with their own "subscribeOn" operators 

For the 3rd scenario, I went for the second option of using flatMap and it looks something like this:
producer.produce(producerRate, count)
    .subscribeOn(subscribeOnScheduler)
    .publishOn(publishOnScheduler, 10)
    .flatMap({ value: Long ->
        Mono.fromSupplier {
            sleep(delayBetweenConsumes)
            logger.info("Consumed {}", value)
            null
        }.subscribeOn(flatMapScheduler)
    }, concurrency)
    .subscribe()
The work of consuming the produced sequence of numbers is being done inside the flatMap operation, the number of concurrent consumption is set to 5 by default. Running this scenario produces the following logs, the consumers are now running 5 at a time on multiple threads:
2020-07-26 23:26:27.212  INFO 1 --- [    subscribe-3] sample.meter.Producer                    : Emitted 1
2020-07-26 23:26:27.321  INFO 1 --- [    subscribe-3] sample.meter.Producer                    : Emitted 2
2020-07-26 23:26:27.423  INFO 1 --- [    subscribe-3] sample.meter.Producer                    : Emitted 3
...
2020-07-26 23:26:28.040  INFO 1 --- [    subscribe-3] sample.meter.Producer                    : Emitted 9
2020-07-26 23:26:28.143  INFO 1 --- [    subscribe-3] sample.meter.Producer                    : Emitted 10
2020-07-26 23:26:28.222  INFO 1 --- [      flatMap-4] sample.meter.Consumer                    : Consumed 1
2020-07-26 23:26:28.328  INFO 1 --- [      flatMap-5] sample.meter.Consumer                    : Consumed 2
2020-07-26 23:26:28.428  INFO 1 --- [      flatMap-6] sample.meter.Consumer                    : Consumed 3
2020-07-26 23:26:28.527  INFO 1 --- [      flatMap-7] sample.meter.Consumer                    : Consumed 4
...
The rate of production lines up with the rate of consumption

Producer In Green/Consumer in Red


Conclusion

These are different experiments that I was able to run to simulate backpressure scenarios with Project Reactor and the behavior should be true for most Reactive Streams based libraries. 

Project Reactor has sane defaults in managing the backpressure needs of a Consumer and provides ways to override the defaults. 

In all scenarios that I have run in this post, the Producer throttled the production to a rate that the Consumer was comfortable in consuming. 

 If you are interested in exploring the scenarios further, my codebase along with the grafana/prometheus set up for graphing the output is available in my github repository here - https://github.com/bijukunjummen/backpressure-demo

Monday, May 25, 2020

AWS DynamoDB version field using AWS SDK for Java 2

It is useful to have a version attribute on any entity saved to an AWS DynamoDB database which is simply a numeric indication of the number of times the entity has been modified. When the entity is first created it can be set to 1 and then incremented on every update. 

The benefit is immediate - an indicator of the number of times an entity has been modified which can be used for auditing the entity. Also, an additional use is for optimistic locking where an entity is allowed to be updated only if the holder updating it has the right version of the entity.


This post will go into details of how to introduce such a field with the DynamoDB related libraries of AWS SDK 2

Model

Consider a model called Hotel which is being persisted into a dynamo database. In Kotlin, it can be represented using the following data class:

data class Hotel(
    val id: String = UUID.randomUUID().toString(),
    val name: String,
    val address: String? = null,
    val state: String? = null,
    val zip: String? = null,
    val version: Long = 1L
)
A version field has been introduced in this model with an initial value of 1. The aim will be to save this field as-is and then let dynamo atomically manage the increment of this field at the point of saving this entity.

As the fields in this model gets changed, I would like the version to be updated along these lines:


Local version of DynamoDB

It is useful to have DynamoDB running on the local machine, this way not having to create real DynamoDB tables in AWS.

There are multiple ways of doing this. One is to use a docker version of DynamoDB Local, which can be started up the following way to listen on port 4569:


docker run -p 4569:8000 amazon/dynamodb-local:1.13
My personal preference is to use localstack and the instructions at the site have different ways to start it up. I normally use docker-compose to bring it up. One of the reasons to use localstack over DynamoDB Local is that localstack provides a comprehensive set of AWS services for local testing and not just DynamoDB.


Quick Demo

I have the entire code available in my github repo here - https://github.com/bijukunjummen/boot-with-dynamodb

Once the application is brought up using the local version of dynamoDB, an entity can be created using the following httpie request:


http :9080/hotels id=4 name=name address=address zip=zip state=OR
With a response, where the version field is set to 1:
{
    "address": "address",
    "id": "4",
    "name": "name",
    "state": "OR",
    "version": 1,
    "zip": "zip"
}
Then if the name is updated for the entity:
http PUT :9080/hotels/4 name=name1 address=address zip=zip state=OR version=1
the version field gets updated to 2 and so on:
{
    "address": "address",
    "id": "4",
    "name": "name1",
    "state": "OR",
    "version": 2,
    "zip": "zip"
}
Also note that if during an update a wrong version number is provided, the call would fail as there is an optimistic locking in place using this version field.

Implementing the version field

Implementing the version field depends on the powerful UpdateItem API provided by DynamoDB. One of the features of UpdateItem API is that it takes in a "UpdateExpression" which is a dsl which shows how different Dynamo attributes should be updated.

The raw request to AWS DynamoDB looks like this:

 
{
  "TableName": "hotels",
  "Key": {
    "id": {
      "S": "1"
    }
  },
  "UpdateExpression": "\nSET #name=:name,\n #state=:state,\naddress=:address,\nzip=:zip\nADD version :inc\n ",
  "ExpressionAttributeNames": {
    "#state": "state",
    "#name": "name"
  },
  "ExpressionAttributeValues": {
    ":name": {
      "S": "testhotel"
    },
    ":address": {
      "S": "testaddress"
    },
    ":state": {
      "S": "OR"
    },
    ":zip": {
      "S": "zip"
    },
    ":inc": {
      "N": "1"
    }
  }
}               
From the articles perspective, specifically focus on "ADD version :inc", which is an expression that tells AWS DynamoDB to increment the value of version by ":inc" value, which is provided separately using "ExpressionAttributeValues" with "1". Dealing with raw API in its json form is daunting, that is where the Software Development Kit(SDK) that AWS provides comes in, AWS SDK for Java 2 is a rewrite of AWS SDK's with a focus on using the latest Java features and Non-Blocking IO over the wire. Using AWS SDK for Java 2, an "UpdateItem" looks like this(using Kotlin code):
val updateItemRequest = UpdateItemRequest.builder()
    .tableName(TABLE_NAME)
    .key(
        mapOf(
            ID to AttributeValue.builder().s(hotel.id).build()
        )
    )
    .updateExpression(
    """
        SET #name=:name,
        #state=:state,
        address=:address,
        zip=:zip 
        ADD version :inc
    """
    )
    .conditionExpression("version = :version")
    .expressionAttributeValues(
        mapOf(
            ":${NAME}" to AttributeValue.builder().s(hotel.name).build(),
            ":${ZIP}" to AttributeValue.builder().s(hotel.zip).build(),
            ":${STATE}" to AttributeValue.builder().s(hotel.state).build(),
            ":${ADDRESS}" to AttributeValue.builder().s(hotel.address).build(),
            ":${VERSION}" to AttributeValue.builder().n(hotel.version.toString()).build(),
            ":inc" to AttributeValue.builder().n("1").build()
        )
    )
    .expressionAttributeNames(
        mapOf(
            "#name" to "name",
            "#state" to "state"
        )
    )
    .build()

val updateItem: CompletableFuture<UpdateItemResponse> = dynamoClient.updateItem(updateItemRequest)

return Mono.fromCompletionStage(updateItem)
    .flatMap {
        getHotel(hotel.id)
    }
The highlighted line has the "Update Expression" with all the existing fields set to a new value and the version attribute incremented by 1. Another thing to note about this call is the "conditionExpression", which is essentially a way to tell DynamoDB to update the attributes if a condition matches up, in this specific instance if the existing value of version matches up. This provides a neat way to support optimistic locking on the record.

Conclusion

A lot of details here - the easiest way to get a feel for it is by trying out the code which is available in my github repository here - https://github.com/bijukunjummen/boot-with-dynamodb. The readme has good details on how to run it in a local environment. 

AWS DynamoDB provides a neat way to manage a version field on entities, ensuring that they are atomically updated and provides a way for them to used for optimistic locking

Thursday, April 9, 2020

Processing SQS Messages using Spring Boot and Project Reactor - Part 2

This is a follow up to my blog post about processing SQS messages efficiently using Spring Boot and Project Reactor

There are a few gaps in the approach that I have listed in the first part.

1. Handling failures in SQS Client calls
2. The approach would process only 1 message from SQS at a time, how can it be parallelized
3. It does not handle errors, any error in the pipeline would break the entire process and stop reading newer messages from the queue.


Recap

Just to recap, the previous post demonstrates creating a pipeline to process messages from an AWS SQS Queue using the excellent Project Reactor


The end result of that exercise was a pipeline which looks like this:


Given this pipeline, let me now go over how to bridge the gaps:

Handling SQS Client Failures


This is the function that generates the stream of messages read from SQS.

Flux.generate { sink: SynchronousSink<List<Message>> ->
    val receiveMessageRequest: ReceiveMessageRequest = ReceiveMessageRequest.builder()
        .queueUrl(queueUrl)
        .maxNumberOfMessages(5)
        .waitTimeSeconds(10)
        .build()

    val messages: List<Message> = sqsClient.receiveMessage(receiveMessageRequest).messages()
    sink.next(messages)
}
    .flatMapIterable(Function.identity())

Now consider a case where the "sqsClient" above has a connectivity issue, the behavior with Flux is that in case of an error the stream is terminated. This, of course, will not do for a service whose job is to process messages as long the service is running.

The fix is to simply retry the processing flow in case of errors.

Flux.generate { sink: SynchronousSink<List<Message>> ->
    val receiveMessageRequest: ReceiveMessageRequest = ReceiveMessageRequest.builder()
        .queueUrl(queueUrl)
        .maxNumberOfMessages(5)
        .waitTimeSeconds(10)
        .build()

    val messages: List<Message> = sqsClient.receiveMessage(receiveMessageRequest).messages()
    sink.next(messages)
}
    .flatMapIterable(Function.identity())
    .retry()

This would result in Flux re-establishing the stream of messages in case of any errors up to this point.

Processing Messages in Parallel

Project Reactor provides a few ways of parallelizing a processing pipeline. My first attempt at processing in parallel was to add a "subscribeOn" method to the processing chain.

Flux.generate { sink: SynchronousSink<List<Message>> ->
    val receiveMessageRequest: ReceiveMessageRequest = ReceiveMessageRequest.builder()
        .queueUrl(queueUrl)
        .maxNumberOfMessages(5)
        .waitTimeSeconds(10)
        .build()

    val messages: List<Message> = sqsClient.receiveMessage(receiveMessageRequest).messages()
    sink.next(messages)
}
    .flatMapIterable(Function.identity())
    .retry()
    .subscribeOn(Schedulers.newElastic("sub"))

However, this is not quite how "subscribeOn" works. An output when I send a few messages to this pipeline is the following:

2020-04-07 20:52:53.241  INFO 1137 --- [          sub-3] sample.msg.MessageListenerRunner         : Processed Message hello
2020-04-07 20:52:53.434  INFO 1137 --- [          sub-3] sample.msg.MessageListenerRunner         : Processed Message hello
2020-04-07 20:52:53.493  INFO 1137 --- [          sub-3] sample.msg.MessageListenerRunner         : Processed Message hello
2020-04-07 20:52:53.538  INFO 1137 --- [          sub-3] sample.msg.MessageListenerRunner         : Processed Message hello
2020-04-07 20:52:53.609  INFO 1137 --- [          sub-3] sample.msg.MessageListenerRunner         : Processed Message hello
2020-04-07 20:52:53.700  INFO 1137 --- [          sub-3] sample.msg.MessageListenerRunner         : Processed Message hello

The "sub-3" above is the name of the thread processing the message, and it looks like all the messages are getting processed on the "sub-3" thread and on no other threads!

subscribeOn simply changes the execution context by borrowing "a thread" from this scheduler pool and does not use all the threads in the pool itself.

So how can the processing be parallelized? This StackOverflow answer provides a very good approach that I am using here, essentially to use a flatMap operator and adding the "subscribeOn" operator inside the "flatMap" operator.

This operator eagerly subscribes to its inner publishers and then flattens the result, the trick is that the inner subscribers can be provided their own schedulers and for each subscription will end up using a thread from the scheduler pool. The number of these concurrent subscribers can be controlled using a "concurrency" parameter passed to the flatMap operator.


Flux.generate { sink: SynchronousSink<List<Message>> ->
    val receiveMessageRequest: ReceiveMessageRequest = ReceiveMessageRequest.builder()
        .queueUrl(queueUrl)
        .maxNumberOfMessages(5)
        .waitTimeSeconds(10)
        .build()

    val messages: List<Message> = sqsClient.receiveMessage(receiveMessageRequest).messages()
    sink.next(messages)
}
    .flatMapIterable(Function.identity())
    .retry()
    .flatMap({ (message: String, deleteHandle: () -> Unit) ->
        task(message)
            .then(Mono.fromSupplier { Try.of { deleteHandle() } })
            .then()
            .subscribeOn(taskScheduler)
    }, concurrency)

and an output when processing multiple messages looks like this -

2020-04-08 21:03:24.582  INFO 17541 --- [  taskHandler-4] sample.msg.MessageListenerRunner         : Processed Message hello
2020-04-08 21:03:24.815  INFO 17541 --- [  taskHandler-4] sample.msg.MessageListenerRunner         : Processed Message hello
2020-04-08 21:03:24.816  INFO 17541 --- [  taskHandler-5] sample.msg.MessageListenerRunner         : Processed Message hello
2020-04-08 21:03:24.816  INFO 17541 --- [  taskHandler-6] sample.msg.MessageListenerRunner         : Processed Message hello
2020-04-08 21:03:24.816  INFO 17541 --- [  taskHandler-7] sample.msg.MessageListenerRunner         : Processed Message hello
2020-04-08 21:03:24.817  INFO 17541 --- [  taskHandler-8] sample.msg.MessageListenerRunner         : Processed Message hello
see how there are more than thread name (taskHandler-*) in the logs now!


Handling downstream errors

One of my previous fixes with "retry" operator was about handling upstream errors with sqsClient connectivity. However, it is possible that as messages are being processed in the pipeline and any of the steps throw an error then the entire pipeline would fail. So it is important to guard EVERY step against failure. A neat way that I have been ensuring that errors don't propagate out is to use the excellent vavr library and its "Try" type. Try type holds two outcomes - a successful one(Success) or an Exception(Failure). This allows the rest of the pipeline to act on the outcome of the previous step in a measured way:

.flatMap({ (message: String, deleteHandle: () -> Unit) ->
    task(message)
        .then(Mono.fromSupplier { Try.of { deleteHandle() } })
        .doOnNext { t ->
            t.onFailure { e -> LOGGER.error(e.message, e) }
        }
        .then()
        .subscribeOn(taskScheduler)
}, concurrency)

The above snippet demonstrates an approach where I know that "deleteHandle" which is responsible for deleting a message can throw an exception, Try captures this and if there is an error logs it and this way the exception does not short circuit the flow of messages.


Conclusion

My initial thinking was that just because I have taken a reactive approach to process messages I would get huge boost in my sqs message processing pipeline, however, my learning has been that just like everything else it requires careful understanding and tuning for a Project reactor based stream to process messages efficiently. I am sure there a few more lessons for me to learn and I will be documenting those as I do.

This entire sample is available in my github repository here - https://github.com/bijukunjummen/boot-with-sns-sqs

Thursday, December 26, 2019

Project reactor - de-structuring a Tuple

Tuples are simple data structures that hold a fixed set of items, each of a different data type.

Project Reactor provides a Tuple data structure that can hold about 8 different types.

Tuples are very useful, however one of the issues in using a Tuple is that it is difficult to make out what they hold without de-structuring them at every place they get used.

Problem

Consider a simple operator, which zips together a String and an integer this way:

Mono<Tuple2<String,  Integer>> tup = Mono.zip(Mono.just("a"), Mono.just(2))

The output is a Tuple holding 2 elements.

Now, the problem that I have is this. I prefer the tuple to be dereferenced into its component elements before doing anything with it.

Say with the previous tuple, I want to generate as many of the strings(first element of the tuple) as the count(the second element of the tuple), expressed the following way:

Mono.zip(Mono.just("a"), Mono.just(2))
    .flatMapMany(tup -> {
        return Flux.range(1, tup.getT2()).map(i -> tup.getT1() + i);
    })

The problem here is when referring to "tup.getT1()" and "tup.getT2()", it is not entirely clear what the tuple holds. Though more verbose I would prefer doing something like this:

Mono.zip(Mono.just("a"), Mono.just(2))
    .flatMapMany(tup -> {
        String s = tup.getT1();
        int count = tup.getT2();

        return Flux.range(1, count).map(i -> s + i);
    });

Solution

The approach of de-structuring into explicit variables with meaningful name works, but it is a little verbose. A far better approach is provided using a utility set of functions that Project reactor comes with called TupleUtils

I feel it is best explained using a sample, with TupleUtils the previous de-structuring looks like this:

Mono.zip(Mono.just("a"), Mono.just(2))
    .flatMapMany(TupleUtils.function((s, count) ->
            Flux.range(1, count).map(i -> s + i)))

This looks far more concise than explicit de-structuring. There is a bit of cleverness that needs some getting used to though:

The signature of flatMapMany is -

public final <R> Flux<R> flatMapMany(Function<? super T,? extends Publisher<? extends R>> mapper)

TupleUtils provides another indirection which returns the Function required above, through another function:

public static <T1, T2, R> Function<Tuple2<T1, T2>, R> function(BiFunction<T1, T2, R> function) {
    return tuple -> function.apply(tuple.getT1(), tuple.getT2());
}

If you are using Kotlin, there is a simpler approach possible. This is based on the concept of "Destructuring Declarations". Project reactor provides a set of Kotlin helper utilities using an additional gradle dependency:

implementation("io.projectreactor.kotlin:reactor-kotlin-extensions")

With this dependency in place, an equivalent Kotlin code looks like this:

Mono.zip(Mono.just("a"), Mono.just(2))
    .flatMapMany { (s: String, count: Int) ->
        Flux.range(1, count).map { i: Int -> s + i }
    }

See how a tuple has been de-structured directly into variables. This looks like this in isolation:

val (s: String, count: Int) = tup

Conclusion

It is important to de-structure a tuple into more meaningful variables to improve readability of the code and the useful functions provided by the TupleUtils as well as the Kotlin extensions helps keep the code concise but readable.

The Java samples are here and Kotlin samples here

Sunday, September 15, 2019

Unit test for Spring's WebClient

WebClient to quote its Java documentation is Spring Framework's
Non-blocking, reactive client to perform HTTP requests, exposing a fluent, reactive API over underlying HTTP client libraries such as Reactor Netty
.

In my current project I have been using WebClient extensively in making service to service calls and have found it to be an awesome API and I love its use of fluent interface.

Consider a remote service which returns a list of "Cities". A code using WebClient looks like this:

...
import org.springframework.http.MediaType
import org.springframework.web.reactive.function.client.WebClient
import org.springframework.web.reactive.function.client.bodyToFlux
import org.springframework.web.util.UriComponentsBuilder
import reactor.core.publisher.Flux
import java.net.URI

class CitiesClient(
        private val webClientBuilder: WebClient.Builder,
        private val citiesBaseUrl: String
) {

    fun getCities(): Flux<City> {
        val buildUri: URI = UriComponentsBuilder
                .fromUriString(citiesBaseUrl)
                .path("/cities")
                .build()
                .encode()
                .toUri()

        val webClient: WebClient = this.webClientBuilder.build()

        return webClient.get()
                .uri(buildUri)
                .accept(MediaType.APPLICATION_JSON)
                .exchange()
                .flatMapMany { clientResponse ->
                    clientResponse.bodyToFlux<City>()
                }
    }
}

It is difficult to test a client making use of WebClient though. In this post, I will go over the challenges in testing a client using WebClient and a clean solution.

Challenges in mocking WebClient

An effective unit test of the "CitiesClient" class would require mocking of WebClient and every method call in the fluent interface chain along these lines:

val mockWebClientBuilder: WebClient.Builder = mock()
val mockWebClient: WebClient = mock()
whenever(mockWebClientBuilder.build()).thenReturn(mockWebClient)

val mockRequestSpec: WebClient.RequestBodyUriSpec = mock()
whenever(mockWebClient.get()).thenReturn(mockRequestSpec)
val mockRequestBodySpec: WebClient.RequestBodySpec = mock()

whenever(mockRequestSpec.uri(any<URI>())).thenReturn(mockRequestBodySpec)

whenever(mockRequestBodySpec.accept(any())).thenReturn(mockRequestBodySpec)

val citiesJson: String = this.javaClass.getResource("/sample-cities.json").readText()

val clientResponse: ClientResponse = ClientResponse
        .create(HttpStatus.OK)
        .header("Content-Type","application/json")
        .body(citiesJson).build()

whenever(mockRequestBodySpec.exchange()).thenReturn(Mono.just(clientResponse))

val citiesClient = CitiesClient(mockWebClientBuilder, "http://somebaseurl")

val cities: Flux<City> = citiesClient.getCities()

This makes for an extremely flaky test as any change in the order of calls would result in new mocks that will need to be recorded.

Testing using real endpoints


An approach that works well is to bring up a real server that behaves like the target of a client. Two mock servers that work really well are mockwebserver in okhttp library and WireMock. An example with Wiremock looks like this:

import com.github.tomakehurst.wiremock.WireMockServer
import com.github.tomakehurst.wiremock.client.WireMock
import com.github.tomakehurst.wiremock.core.WireMockConfiguration
import org.bk.samples.model.City
import org.junit.jupiter.api.AfterAll
import org.junit.jupiter.api.BeforeAll
import org.junit.jupiter.api.Test
import org.springframework.http.HttpStatus
import org.springframework.web.reactive.function.client.WebClient
import reactor.core.publisher.Flux
import reactor.test.StepVerifier

class WiremockWebClientTest {

    @Test
    fun testARemoteCall() {
        val citiesJson = this.javaClass.getResource("/sample-cities.json").readText()
        WIREMOCK_SERVER.stubFor(WireMock.get(WireMock.urlMatching("/cities"))
                .withHeader("Accept", WireMock.equalTo("application/json"))
                .willReturn(WireMock.aResponse()
                        .withStatus(HttpStatus.OK.value())
                        .withHeader("Content-Type", "application/json")
                        .withBody(citiesJson)))

        val citiesClient = CitiesClient(WebClient.builder(), "http://localhost:${WIREMOCK_SERVER.port()}")

        val cities: Flux<City> = citiesClient.getCities()
        
        StepVerifier
                .create(cities)
                .expectNext(City(1L, "Portland", "USA", 1_600_000L))
                .expectNext(City(2L, "Seattle", "USA", 3_200_000L))
                .expectNext(City(3L, "SFO", "USA", 6_400_000L))
                .expectComplete()
                .verify()
    }

    companion object {
        private val WIREMOCK_SERVER = WireMockServer(WireMockConfiguration.wireMockConfig().dynamicPort())

        @BeforeAll
        @JvmStatic
        fun beforeAll() {
            WIREMOCK_SERVER.start()
        }

        @AfterAll
        @JvmStatic
        fun afterAll() {
            WIREMOCK_SERVER.stop()
        }
    }
}

Here a server is being brought up at a random port, it is then injected with a behavior and then the client is tested against this server and validated. This approach works and there is no muddling with the internals of WebClient in mocking this behavior, but technically this is an integration test and it will be slower to execute than a pure unit test.


Unit testing by short-circuiting the remote call

An approach that I have been using recently is to short circuit the remote call using an ExchangeFunction. An ExchangeFunction represents the actual mechanisms in making the remote call and can be replaced with one that responds with what the test expects the following way:

import org.junit.jupiter.api.Test
import org.springframework.http.HttpStatus
import org.springframework.web.reactive.function.client.ClientResponse
import org.springframework.web.reactive.function.client.ExchangeFunction
import org.springframework.web.reactive.function.client.WebClient
import reactor.core.publisher.Flux
import reactor.core.publisher.Mono
import reactor.test.StepVerifier

class CitiesWebClientTest {

    @Test
    fun testCleanResponse() {
        val citiesJson: String = this.javaClass.getResource("/sample-cities.json").readText()

        val clientResponse: ClientResponse = ClientResponse
                .create(HttpStatus.OK)
                .header("Content-Type","application/json")
                .body(citiesJson).build()
        val shortCircuitingExchangeFunction = ExchangeFunction {
            Mono.just(clientResponse)
        }

        val webClientBuilder: WebClient.Builder = WebClient.builder().exchangeFunction(shortCircuitingExchangeFunction)
        val citiesClient = CitiesClient(webClientBuilder, "http://somebaseurl")

        val cities: Flux<City> = citiesClient.getCities()

        StepVerifier
                .create(cities)
                .expectNext(City(1L, "Portland", "USA", 1_600_000L))
                .expectNext(City(2L, "Seattle", "USA", 3_200_000L))
                .expectNext(City(3L, "SFO", "USA", 6_400_000L))
                .expectComplete()
                .verify()
    }
}

The WebClient is injected with a ExchangeFunction which simply returns a response with the expected behavior of the remote server. This has short circuited the entire remote call and allows the client to be tested comprehensively. This approach depends on a little knowledge of the internals of the WebClient. This is a decent compromise though as it would run far faster than a test using WireMock.

This approach is not original though, I have based this test on some of the tests used for testing WebClient itself, for eg, the one here


Conclusion

I personally prefer the last approach, it has enabled me to write fairly comprehensive unit tests for a Client making use of WebClient for remote calls. My project with fully working samples is here.

Tuesday, August 6, 2019

Chicken and egg - resolving Spring properties ahead of a test

Consider a service class responsible for making a remote call and retrieving a detail:


...
public class CitiesService {
    private final WebClient.Builder webClientBuilder;
    private final String baseUrl;

    public CitiesService(
            WebClient.Builder webClientBuilder,
            @Value("${cityservice.url}") String baseUrl) {
        this.webClientBuilder = webClientBuilder;
        this.baseUrl = baseUrl;
    }


    public Flux<City> getCities() {
        return this.webClientBuilder.build()
                .get()
....

This is a Spring Bean and resolves the url to call through a property called "cityservice.url".

If I wanted to test this class, an approach that I have been using when using WebClient is to start a mock server using the excellent Wiremock and using it to test this class. A Wiremock mock looks like this:

    private static final WireMockServer WIREMOCK_SERVER =
            new WireMockServer(wireMockConfig().dynamicPort());


    .....

    WIREMOCK_SERVER.stubFor(get(urlEqualTo("/cities"))
                .withHeader("Accept", equalTo("application/json"))
                .willReturn(aResponse()
                        .withStatus(200)
                        .withHeader("Content-Type", "application/json")
                        .withBody(resultJson)));

The Wiremock server is being started up at a random port and it is set to respond to an endpoint called "/cities". Here is where the chicken and egg problem comes up:

1. The CitiesService class requires a property called "cityservice.url" to be set before starting the test.
2. Wiremock is started at a random port and the url that it is responding to is "http://localhost:randomport" and is available only once the test is kicked off.


There are three potential solutions that I can think of to break this circular dependency:

Approach 1: To use a hardcoded port

This approach depends on starting up Wiremock on a fixed port instead of a dynamic port, this way the property can be set when starting the test up, something like this:

@ExtendWith(SpringExtension.class)
@SpringBootTest(classes = CitiesServiceHardcodedPortTest.SpringConfig.class,
        properties = "cityservice.url=http://localhost:9876")
public class CitiesServiceHardcodedPortTest {
    private static final WireMockServer WIREMOCK_SERVER =
            new WireMockServer(wireMockConfig().port(9876));


Here Wiremock is being started at port 9876 and the property at startup is being set to "http://localhost:9876/".

This solves the problem, however, this is not CI server friendly, it is possible for the ports to collide at runtime and this makes for a flaky test.


Approach 2: Not use Spring for test

A better approach is to not use the property, along these lines:

public class CitiesServiceDirectTest {
    private static final WireMockServer WIREMOCK_SERVER =
            new WireMockServer(wireMockConfig().dynamicPort());

    private CitiesService citiesService;

    @BeforeEach
    public void beforeEachTest() {
        final WebClient.Builder webClientBuilder = WebClient.builder();

        this.citiesService = new CitiesService(webClientBuilder, WIREMOCK_SERVER.baseUrl());
    }


Here the service is being created by explicitly setting the baseUrl in the constructor, thus avoiding the need to set a property ahead of the test.


Approach 3: Application Context Initializer


ApplicationContextInitializer is used for programmatically initializing a Spring Application Context and it can be used with a test to inject in the property before the actual test is executed. Along these lines:

@ExtendWith(SpringExtension.class)
@SpringBootTest(classes = CitiesServiceSpringTest.SpringConfig.class)
@ContextConfiguration(initializers = {CitiesServiceSpringTest.PropertiesInitializer.class})
public class CitiesServiceSpringTest {
    private static final WireMockServer WIREMOCK_SERVER =
            new WireMockServer(wireMockConfig().dynamicPort());

    @Autowired
    private CitiesService citiesService;

    @Test
    public void testGetCitiesCleanFlow() throws Exception {
        ...
    }


    static class PropertiesInitializer implements ApplicationContextInitializer<ConfigurableApplicationContext> {

        @Override
        public void initialize(ConfigurableApplicationContext applicationContext) {
            TestPropertyValues.of(
                    "cityservice.url=" + "http://localhost:" + WIREMOCK_SERVER.port()
            ).applyTo(applicationContext.getEnvironment());
        }
    }

}

Wiremock is started up first, then Spring context is initialized using the initializer which injects in the "cityservice.url" property using the Wiremocks dynamic port, this way the property is available for wiring into CityService.


Conclusion

I personally prefer Approach 2, however it is good to have Spring's wiring and the dependent beans created ahead of the test and if the class utilizes these then I prefer Approach 3. Application Context initializer provides a good way to break the chicken and egg problem with properties like these which need to be available ahead of Spring's context getting engaged.

All the code samples are available here:

Approach 1: https://github.com/bijukunjummen/reactive-cities-demo/blob/master/src/test/java/samples/geo/service/CitiesServiceHardcodedPortTest.java
Approach 2: https://github.com/bijukunjummen/reactive-cities-demo/blob/master/src/test/java/samples/geo/service/CitiesServiceDirectTest.java
Approach 3: https://github.com/bijukunjummen/reactive-cities-demo/blob/master/src/test/java/samples/geo/service/CitiesServiceSpringTest.java

Sunday, June 9, 2019

Callback hell and Reactive patterns

One of the ways that I have better understood the usefulness of a Reactive Streams based approach is how it simplifies a Non-blocking IO call.

This post will be a quick walkthrough of the kind of code involved in making a synchronous remote call, then show how layering in Non-blocking IO though highly efficient in the use of resources(especially threads) introduces complications referred to as a callback hell and how a reactive streams based approach simplifies the programming model.


Target Service


Since I will be writing a client call, my target service representing the details of a City has two endpoints. One returning a list of city id's when called with a uri of type - "/cityids" and a sample result looks like this:

[
    1,
    2,
    3,
    4,
    5,
    6,
    7
]

and an endpoint returning the details of a city given its id, for example when called using an id of 1 - "/cities/1":

{
    "country": "USA",
    "id": 1,
    "name": "Portland",
    "pop": 1600000
}

The client's responsibility is to get the list of city id's and then for each city id get the detail of the city and put it together into a list of cities.

Synchronous call


I am using Spring Framework's RestTemplate to make the remote call. A Kotlin function to get the list of cityids looks like this:

private fun getCityIds(): List<String> {
    val cityIdsEntity: ResponseEntity<List<String>> = restTemplate
            .exchange("http://localhost:$localServerPort/cityids",
                    HttpMethod.GET,
                    null,
                    object : ParameterizedTypeReference<List<String>>() {})
    return cityIdsEntity.body!!
}

and to get the details of a city:

private fun getCityForId(id: String): City {
    return restTemplate.getForObject("http://localhost:$localServerPort/cities/$id", City::class.java)!!
}

Given these two functions it is easy to compose them such that a list of cities is returned:

val cityIds: List<String> = getCityIds()
val cities: List<City> = cityIds
        .stream()
        .map<City> { cityId -> getCityForId(cityId) }
        .collect(Collectors.toList())

cities.forEach { city -> LOGGER.info(city.toString()) }

The code is very easy to understand, however, there are 8 blocking calls involved -
1. to get the list of 7 city ids and then to get the details for each
2. To get the details of each of the 7 cities

Each of these calls would have been on a different thread.

Using Non-Blocking IO with callback

I will be using a library called AsyncHttpClient to make a non-blocking IO call.

AyncHttpClient returns a ListenableFuture type when a remote call is made.

val responseListenableFuture: ListenableFuture<Response> = asyncHttpClient
                .prepareGet("http://localhost:$localServerPort/cityids")
                .execute()

A callback can be attached to a Listenable future to act on the response when available.

responseListenableFuture.addListener(Runnable {
    val response: Response = responseListenableFuture.get()
    val responseBody: String = response.responseBody
    val cityIds: List<Long> = objectMapper.readValue<List<Long>>(responseBody,
            object : TypeReference<List<Long>>() {})
    ....
}        

Given the list of cityids I want to get the details of the city, so from the response I need to make more remote calls and attach a callback for each of the calls to get the details of the city along these lines:

val responseListenableFuture: ListenableFuture<Response> = asyncHttpClient
        .prepareGet("http://localhost:$localServerPort/cityids")
        .execute()

responseListenableFuture.addListener(Runnable {
    val response: Response = responseListenableFuture.get()
    val responseBody: String = response.responseBody
    val cityIds: List<Long> = objectMapper.readValue<List<Long>>(responseBody,
            object : TypeReference<List<Long>>() {})

    cityIds.stream().map { cityId ->
        val cityListenableFuture = asyncHttpClient
                .prepareGet("http://localhost:$localServerPort/cities/$cityId")
                .execute()

        cityListenableFuture.addListener(Runnable {
            val cityDescResp = cityListenableFuture.get()
            val cityDesc = cityDescResp.responseBody
            val city = objectMapper.readValue(cityDesc, City::class.java)
            LOGGER.info("Got city: $city")
        }, executor)
    }.collect(Collectors.toList())
}, executor)

This is a gnarly piece of code, there is set of callbacks within a callback which is very difficult to reason about and make sense of and hence referred to as the callback hell.


Using Non-Blocking IO with Java CompletableFuture


This code can be improved a little by returning a Java's CompletableFuture as the return type instead of the ListenableFuture. CompletableFuture provides operators that allow the return type to modified and returned.

As an example, consider the function to get the list of city ids:

private fun getCityIds(): CompletableFuture<List<Long>> {
    return asyncHttpClient
            .prepareGet("http://localhost:$localServerPort/cityids")
            .execute()
            .toCompletableFuture()
            .thenApply { response ->
                val s = response.responseBody
                val l: List<Long> = objectMapper.readValue(s, object : TypeReference<List<Long>>() {})
                l
            }
}

Here I am using the "thenApply" operator to transform "CompletableFuture<Response>" to "CompletableFuture<List<Long>>

And similarly to get the detail a city:

private fun getCityDetail(cityId: Long): CompletableFuture<City> {
    return asyncHttpClient.prepareGet("http://localhost:$localServerPort/cities/$cityId")
            .execute()
            .toCompletableFuture()
            .thenApply { response ->
                val s = response.responseBody
                LOGGER.info("Got {}", s)
                val city = objectMapper.readValue(s, City::class.java)
                city
            }
}

This is an improvement from the Callback based approach, however, CompletableFuture lacks sufficient operators, say in this specific instance where all the city details need to be put together:

val cityIdsFuture: CompletableFuture<List<Long>> = getCityIds()
val citiesCompletableFuture: CompletableFuture<List<City>> =
        cityIdsFuture
                .thenCompose { l ->
                    val citiesCompletable: List<CompletableFuture<City>> =
                            l.stream()
                                    .map { cityId ->
                                        getCityDetail(cityId)
                                    }.collect(toList())

                    val citiesCompletableFutureOfList: CompletableFuture<List<City>> =
                            CompletableFuture.allOf(*citiesCompletable.toTypedArray())
                                    .thenApply { _: Void? ->
                                        citiesCompletable
                                                .stream()
                                                .map { it.join() }
                                                .collect(toList())
                                    }
                    citiesCompletableFutureOfList
                }

I have used an operator called CompletableFuture.allOf which returns a "Void" type and has to be coerced to return the desired type of ""CompletableFuture<List<City>>.


Using Project Reactor

Project Reactor is an implementation of the Reactive Streams specification. It has two specialized types to return a stream of 0/1 item and a stream of 0/n items - the former is a Mono, the latter a Flux.

Project Reactor provides a very rich set of operators that allow the stream of data to be transformed in a variety of ways. Consider first the function to return a list of City ids:

private fun getCityIds(): Flux<Long> {
    return webClient.get()
            .uri("/cityids")
            .exchange()
            .flatMapMany { response ->
                LOGGER.info("Received cities..")
                response.bodyToFlux<Long>()
            }
}

I am using Spring's excellent WebClient library to make the remote call and get a Project reactor "Mono<ClientResponse>" type of response, which can be modified to a "Flux<Long>" type using the "flatMapMany" operator.

Along the same lines to get the detail of the city, given a city id:

private fun getCityDetail(cityId: Long?): Mono<City> {
    return webClient.get()
            .uri("/cities/{id}", cityId!!)
            .exchange()
            .flatMap { response ->
                val city: Mono<City> = response.bodyToMono()
                LOGGER.info("Received city..")
                city
            }
}

Here a Project reactor "Mono<ClientResponse>" type is being transformed to "Mono<City>" type using the "flatMap" operator.

and the code to get the cityids and then the City's from it:

val cityIdsFlux: Flux<Long> = getCityIds()
val citiesFlux: Flux<City> = cityIdsFlux
        .flatMap { this.getCityDetail(it) }

return citiesFlux


This is very expressive - contrast the mess of a callback based approach and the simplicity of the reactive streams based approach.


Conclusion

In my mind, this is one of the biggest reasons to use a Reactive Streams based approach and in particular Project Reactor for scenarios that involve crossing asynchronous boundaries like in this instance to make remote calls. It cleans up the mess of callbacks and callback hells and provides a natural approach of modifying/transforming types using a rich set of operators.


My repository with a working version of all the samples that I have used here is available at https://github.com/bijukunjummen/reactive-cities-demo/tree/master/src/test/kotlin/samples/geo/kotlin

Sunday, July 29, 2018

"Knative Serving" for Spring Boot Applications

I got a chance to try Knative's Serving feature to deploy a Spring Boot application and this post is simply documenting a sample and the approach I took.

I don't understand the internals of Knative enough yet to have an opinion on whether this approach is better than the deployment + services + ingress based approach.

One feature that is awesome is the auto-scaling feature in Knative Serving, which based on the load, increases/decreases the number of pods as part of a "Deployment" handling the request.

Details of the Sample


My entire sample is available here and it is mostly developed based on the java sample available with Knative Serving documentation. I used Knative with a minikube environment to try the sample.


Deploying to Kubernetes/Knative

Assuming that a Kubernetes environment with Istio and Knative has been set-up, the way to run the application is to deploy a Kubernetes manifest this way:

apiVersion: serving.knative.dev/v1alpha1
kind: Service
metadata:
  name: sample-boot-knative-service
  namespace: default
spec:
  runLatest:
    configuration:
      revisionTemplate:
        spec:
          container:
            image: bijukunjummen/sample-boot-knative-app:0.0.1-SNAPSHOT

The image "bijukunjummen/sample-boot-knative-app:0.0.1-SNAPSHOT" is publicly available via Dockerhub, so this sample should work out of the box.

Applying this manifest:

kubectl apply -f service.yml

should register a Knative Serving Service resource with Kubernetes, the Knative serving services resource manages the lifecycle of other Knative resources (configuration, revision, route) the details of which can be viewed using the following commands, if anything goes wrong, the details should show up in the output:

kubectl get services.serving.knative.dev sample-boot-knative-service -o yaml

Testing

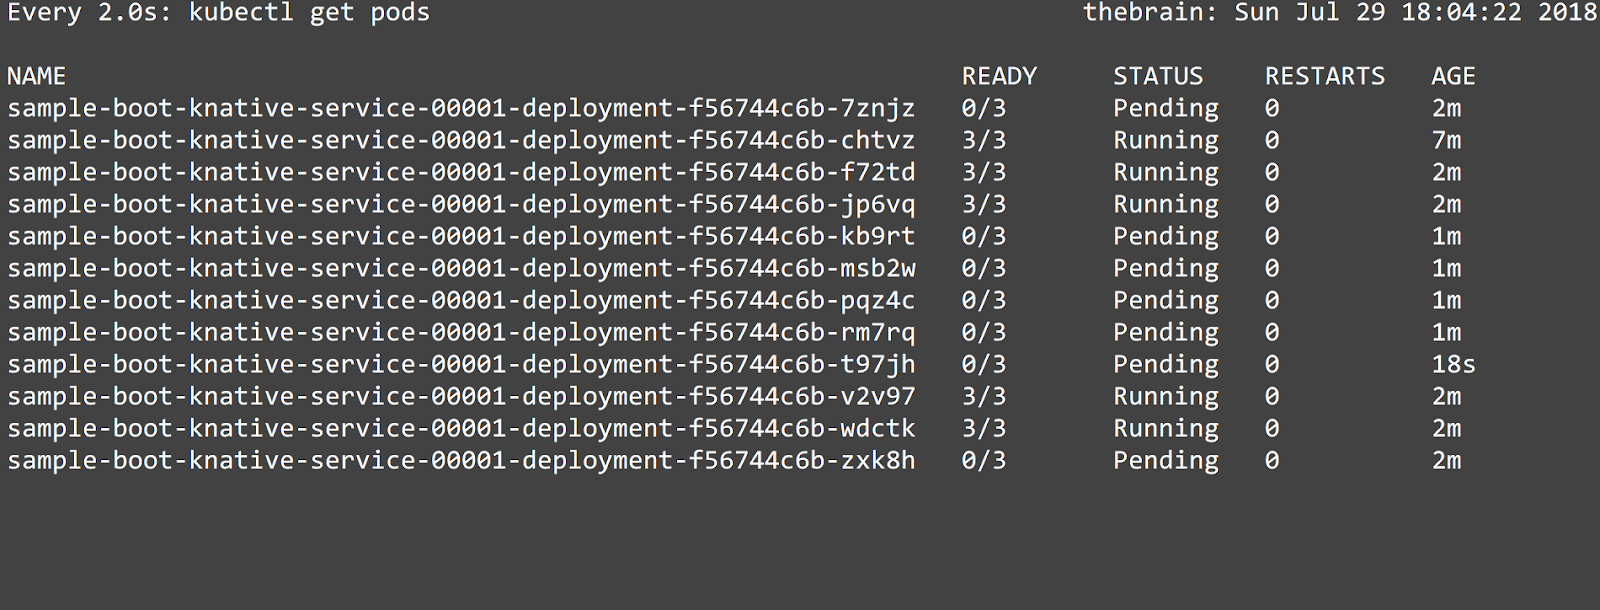
Assuming that the Knative serving service is deployed cleanly, the first oddity to see is that no pods show up for the application!


If I were to make a request to the app now, which is done via a routing layer managed by Knative - this can be retrieved for a minikube environment using the following bash script:

export GATEWAY_URL=$(echo $(minikube ip):$(kubectl get svc knative-ingressgateway -n istio-system -o 'jsonpath={.spec.ports[?(@.port==80)].nodePort}'))
export APP_DOMAIN=$(kubectl get services.serving.knative.dev sample-boot-knative-service  -o="jsonpath={.status.domain}")

and making a call to an endpoint of the app using CUrl:

curl -X "POST" "http://${GATEWAY_URL}/messages" \
     -H "Accept: application/json" \
     -H "Content-Type: application/json" \
     -H "Host: ${APP_DOMAIN}" \
     -d $'{
  "id": "1",
  "payload": "one",
  "delay": "300"
}'
OR httpie

http http://${GATEWAY_URL}/messages Host:"${APP_DOMAIN}" id=1 payload=test delay=100

should magically, using the auto-scaler component start spinning up the pods to handle the request:


The first request took almost 17 seconds to complete, the time it takes to spin up a pod, but subsequent requests are quick.

Now, to show the real power of auto-scaler I ran a small load test with a 50 user load and pods are scaled up and down as required.


Conclusion

I can see the promise of Knative in automatically managing the resources, once defined using a fairly simple manifest, in a Kubernetes environment and letting a developer focus on the code and logic.

Friday, June 22, 2018

Tracing a reactive flow - Using Spring Cloud Sleuth with Boot 2

Spring Cloud Sleuth which adds Spring instrumentation support on top of OpenZipkin Brave makes distributed tracing trivially simple for Spring Boot applications. This is a quick write up on what it takes to add support for distributed tracing using this excellent library.

Consider two applications - a client application which uses an upstream service application, both using Spring WebFlux, the reactive web stack for Spring:


My objective is to ensure that flows from user to the client application to the service application can be traced and latencies cleanly recorded for requests.


The final topology that Spring Cloud Sleuth enables is the following:


The sampled trace information from the client and the service app is exported to Zipkin via a queuing mechanism like RabbitMQ.


So what are the changes required to the client and the service app - like I said it is trivially simple! The following libraries need to be pulled in - in my case via gradle:

compile("org.springframework.cloud:spring-cloud-starter-sleuth")
 compile("org.springframework.cloud:spring-cloud-starter-zipkin")
 compile("org.springframework.amqp:spring-rabbit")

The versions are not specified as they are expected to be pulled in via Spring Cloud BOM and thanks to Spring Gradle Dependency Management plugin:


ext {
    springCloudVersion = 'Finchley.RELEASE'
}

apply plugin: 'io.spring.dependency-management'

dependencyManagement {
    imports {
        mavenBom "org.springframework.cloud:spring-cloud-dependencies:${springCloudVersion}"
    }
}

And that is actually it, any logs from the application should now start recording the trace and the spans, see how he traceid carried forward in the following logs spanning two different services:

2018-06-22 04:06:28.579  INFO [sample-client-app,c3d507df405b8aaf,c3d507df405b8aaf,true] 9 --- [server-epoll-13] sample.load.PassThroughHandler           : handling message: Message(id=null, payload=Test, delay=1000)
2018-06-22 04:06:28.586  INFO [sample-service-app,c3d507df405b8aaf,829fde759da15e63,true] 8 --- [server-epoll-11] sample.load.MessageHandler               : Handling message: Message(id=5e7ba240-f97d-405a-9633-5540bbfe0df1, payload=Test, delay=1000)

Further the Zipkin UI records the exported information and can visually show a sample trace the following way:


This sample is available in my github repository here - https://github.com/bijukunjummen/sleuth-webflux-sample and can be started up easily using docker-compose with all the dependencies wired in.

Tuesday, March 6, 2018

Spring Boot 2 native approach to SSO with OAuth 2/OpenID Connect

This post is the final part of a 3 post series exploring ways to enable SSO with an OAuth2 provider for Spring Boot 2 based applications. The 3 posts are:

1. Ways to bootstrap an OpenID Connect compliant OAuth2 Authorization Server/OpenID Provider
2. Legacy Spring Boot/Spring 5 approach to integrating with an OAuth2 Authorization Server/OpenID Provider
3. Newer Spring Boot 2/Spring 5 approach to integrating with an OAuth2 Authorization Server/OpenID Connect Provider - this post

This post will explore the shiny new way to enable SSO for a Spring Boot 2 application using the native OAuth2 support in Spring Security.

The post again assumes that everything described in the first post is completed.


Spring Boot 2 Auto-configuration


Spring Boot 2 provides an auto-configuration for native OAuth2 support in Spring Security ( see class org.springframework.boot.autoconfigure.security.oauth2.client.OAuth2ClientAutoConfiguration).
The auto-configuration is activated by the presence of "spring-security-oauth2-client" library available via the following gradle coordinates:

compile "org.springframework.security:spring-security-oauth2-client"

This auto-configuration works off a set of properties, for the UAA Identity provider that has been started up, the set of properties are the following:

uaa-base-url: http://localhost:8080/uaa

spring:
  security:
    oauth2:
      client:
        registration:
          uaa:
            client-id: client1
            client-secret: client1
            authorizationGrantType: authorization_code
            redirect_uri_template: "{baseUrl}/login/oauth2/code/{registrationId}"
            scope: resource.read,resource.write,openid,profile
            clientName: oauth2-sample-client
        provider:
          uaa:
            token-uri: ${uaa-base-url}/oauth/token
            authorization-uri: ${uaa-base-url}/oauth/authorize
            user-info-uri: ${uaa-base-url}/userinfo
            jwk-set-uri: ${uaa-base-url}/token_keys
            userNameAttribute: user_name

If I were to depend on Spring Boot 2 auto-configuration support for native OAuth2 support to do its magic and were to start the application up, I would be presented with this page on accessing the application:


Note that this login page is a default page created by Spring Security OAuth2 and by default presents the list of registrations.

Clicking on "oauth2-sample-client" presents the login page of the Identity provider, UAA in this instance:

For an OpenID Connect based flow, applications are issued an ID Token along with an Access Token which I am decoding and presenting on a page:


Customizations

One of the quick customizations that I want to make is to redirect to UAA on access of any secured page specified via a "/secured" uri pattern, the following is a set of configuration that should enable this:

package sample.oauth2.config

import org.springframework.context.annotation.Configuration
import org.springframework.security.config.annotation.web.builders.HttpSecurity
import org.springframework.security.config.annotation.web.builders.WebSecurity
import org.springframework.security.config.annotation.web.configuration.WebSecurityConfigurerAdapter

@Configuration
class OAuth2SecurityConfig : WebSecurityConfigurerAdapter() {
    override fun configure(web: WebSecurity) {
        super.configure(web)
        web.ignoring()
                .mvcMatchers(
                        "/favicon.ico",
                        "/webjars/**",
                        "/css/**"
                )
    }

    override fun configure(http: HttpSecurity) {
        http.csrf().disable()

        http.authorizeRequests()
                .antMatchers("/secured/**")
                    .authenticated()
                .antMatchers("/", "/custom_login")
                    .permitAll()
                .anyRequest()
                    .authenticated()
                .and()
                    .oauth2Login()
                    .loginPage("/custom_login")
    }
}

See the "/custom_login" being set as the URI above, which in turn simply hands over control to OAuth2 controlled endpoints which know to set the appropriate parameters and redirect to UAA:

@Controller
class LoginController {

    @RequestMapping("/custom_login")
    fun loginPage(): String {
        return "redirect:/oauth2/authorization/uaa"
    }
}


This concludes the exploration of native OAuth2 support in Spring Boo2 applications.

All of the samples are available in my github repo - https://github.com/bijukunjummen/oauth2-boot2


The following references were helpful in understanding the OAuth2 support:

1. Spring Security Documentation - https://docs.spring.io/spring-security/site/docs/current/reference/html/
2. Joe Grandja's Spring One Platform 2017 Presentation - https://www.youtube.com/watch?v=WhrOCurxFWU

Monday, February 26, 2018

Spring Boot 2 Applications and OAuth 2 - Legacy Approach

This post is the second part of a 3 post series exploring ways to enable SSO with an OAuth2 provider for Spring Boot 2 based applications. The 3 posts are:

1. Ways to bootstrap an OpenID Connect compliant OAuth2 Authorization Server/OpenID Provider
2. Legacy Spring Boot/Spring 5 approach to integrating with an OAuth2 Authorization Server/OpenID Provider - this post
3. Newer Spring Boot 2/Spring 5 approach to integrating with an OAuth2 Authorization Server/OpenID Connect Provider


The post will explore a legacy Spring Boot 2/Spring Security 5 approach to enabling OAuth2 based authentication mechanism for an application, this post assumes that all the steps in the previous blog post have been followed and UAA is up and running.

A question that probably comes to mind is why I am talking about legacy in the context of Spring Boot 2/Spring Security 5 when this should have been the new way of doing SSO! The reason is, as developers we have been using an approach with Spring Boot 1.5.x that is now considered deprecated, there are features in it however that has not been completely ported over to the new approach(ability to spin up an OAuth2 authorization server and ability to create an OAuth2 resource server are examples), in the interim, Spring Security developers(thanks Rob Winch & Joe Grandja) provided a bridge to the legacy approach in the form of a spring-security-oauth2-boot project.

Approach

So what does the legacy approach look like - I have detailed it once before here, to recap it works on the basis of an annotation called @EnableOAuth2SSO and a set of properties supporting this annotation, a sample security configuration looks like this -

import org.springframework.boot.autoconfigure.security.oauth2.client.EnableOAuth2Sso;
import org.springframework.context.annotation.Configuration;
import org.springframework.security.config.annotation.web.builders.HttpSecurity;
import org.springframework.security.config.annotation.web.builders.WebSecurity;
import org.springframework.security.config.annotation.web.configuration.WebSecurityConfigurerAdapter;

@EnableOAuth2Sso
@Configuration
public class OAuth2SecurityConfig extends WebSecurityConfigurerAdapter {
    @Override
    public void configure(WebSecurity web) throws Exception {
        super.configure(web);

        web.ignoring()
           .mvcMatchers("/favicon.ico", "/webjars/**", "/css/**");
    }

    @Override
    protected void configure(HttpSecurity http) throws Exception {
        http.csrf().disable();

        http.authorizeRequests()
                .antMatchers("/secured/**")
                    .authenticated()
                .antMatchers("/")
                    .permitAll()
                .anyRequest()
                    .authenticated();
    }

}

and the set of supporting properties to point to the UAA is the following:

ssoServiceUrl: http://localhost:8080/uaa

security:
  oauth2:
    client:
      client-id: client1
      client-secret: client1
      access-token-uri: ${ssoServiceUrl}/oauth/token
      user-authorization-uri: ${ssoServiceUrl}/oauth/authorize
    resource:
      jwt:
        key-uri: ${ssoServiceUrl}/token_key
      user-info-uri: ${ssoServiceUrl}/userinfo


With the spring-security-oauth2-boot project pulled in as a dependency:

compile 'org.springframework.cloud:spring-cloud-starter-oauth2'
compile("org.springframework.security.oauth.boot:spring-security-oauth2-autoconfigure:2.0.0.BUILD-SNAPSHOT")

these annotations just work for a Spring Boo2 application also. Note however Spring Boot 2 supports two distinct Web Frameworks - Spring Web and Spring Webflux, this approach pulls in Spring Web transitively which forces Spring Web as the default framework.

The sample in its entirety with ways to start it up is available in my github repo here - https://github.com/bijukunjummen/oauth2-boot2


Testing

Any uri starting with "/secured/**" is SSO enabled, if the index page is accessed it is displayed without needing any authentication:


Now, clicking through to a uri starting with "/secured/**" should trigger a OAuth2 Authorization Code flow:


and should present a login screen to the user via UAA:


Logging in with the credentials that were created before - user1/user1 should redirect the user back to the Spring Boot 2 legacy version of the app and should display the secured page:


This completes the legacy approach to SSO with Spring Boot 2. Note that this is just pseudo-authentication, OAuth2 is meant more for authorization to access a users resource than authentication the way it is used here. An article which clarifies this is available here. The next post with native Spring Security 5/Spring Boot2 will provide a cleaner authentication mechanism using OpenID Connect.