Monday, February 22, 2016

Spring Boot with Scala

A while back I had tried out a small Spring Boot based sample with Scala as the language and found that the combination works out quite nicely - no big surprises there actually as Scala programs ultimately run in the JVM. I have now updated the sample with the latest version of Spring Boot and some of the supporting libraries.

To very quickly revisit the sample, it is a very simple web application with a UI to manage a "Hotel" domain object managed via JPA, represented in scala the following way:

import javax.persistence.Id
import javax.persistence.GeneratedValue
import java.lang.Long
import javax.persistence.Entity
import scala.beans.BeanProperty
import org.hibernate.validator.constraints.NotEmpty

@Entity
class Hotel {

  @Id
  @GeneratedValue
  @BeanProperty
  var id: Long = _

  @BeanProperty
  @NotEmpty
  var name: String = _

  @BeanProperty
  @NotEmpty
  var address: String = _

  @BeanProperty
  @NotEmpty
  var zip: String = _
}

JPA annotations carry over quite well, one wrinkle may be the additional @BeanProperty annotation though, this is required for JPA implementations as this makes the scala compiler generate the normal Java Beans type getters and setters instead of the scala default getters and setters which don't follow the Java Bean conventions.

Spring Data makes it ridiculously simple to manage this domain type, all it requires is a marker interface and it generates a runtime implementation:

import org.springframework.data.repository.CrudRepository
import mvctest.domain.Hotel
import java.lang.Long

trait HotelRepository extends CrudRepository[Hotel, Long]

Now I have a toolkit available for managing the Hotel domain:

//save or update a hotel
hotelRepository.save(hotel)

//find one hotel
hotelRepository.findOne(id)

//find all hotels
val hotels = hotelRepository.findAll()

//delete a hotel
hotelRepository.delete(id)


And finally a controller to manage the UI flow with this repository:

@Controller
@RequestMapping(Array("/hotels"))
class HotelController @Autowired()(private val hotelRepository: HotelRepository) {

  @RequestMapping(method = Array(RequestMethod.GET))
  def list(model: Model) = {
    val hotels = hotelRepository.findAll()
    model.addAttribute("hotels", hotels)
    "hotels/list"
  }

  @RequestMapping(Array("/edit/{id}"))
  def edit(@PathVariable("id") id: Long, model: Model) = {
    model.addAttribute("hotel", hotelRepository.findOne(id))
    "hotels/edit"
  }

  @RequestMapping(method = Array(RequestMethod.GET), params = Array("form"))
  def createForm(model: Model) = {
    model.addAttribute("hotel", new Hotel())
    "hotels/create"
  }

  @RequestMapping(method = Array(RequestMethod.POST))
  def create(@Valid hotel: Hotel, bindingResult: BindingResult) = {
    if (bindingResult.hasErrors()) {
      "hotels/create"
    } else {
      hotelRepository.save(hotel)
      "redirect:/hotels"
    }
  }

  @RequestMapping(value = Array("/update"), method = Array(RequestMethod.POST))
  def update(@Valid hotel: Hotel, bindingResult: BindingResult) = {
    if (bindingResult.hasErrors()) {
      "hotels/edit"
    } else {
      hotelRepository.save(hotel)
      "redirect:/hotels"
    }
  }

  @RequestMapping(value = Array("/delete/{id}"))
  def delete(@PathVariable("id") id: Long) = {
    hotelRepository.delete(id)
    "redirect:/hotels"
  }
}

There are some wrinkles here too but should mostly make sense, the way the repository is autowired is a little non-intuitive and the way an explicit Array type has to be provided for request mapping paths and methods may be confusing.

Beyond these small concerns the code just works, do play with it, I would love any feedback on ways to improve this sample. Here is the git location of this sample - https://github.com/bijukunjummen/spring-boot-scala-web

Saturday, February 6, 2016

Marble Diagrams - Rxjava operators

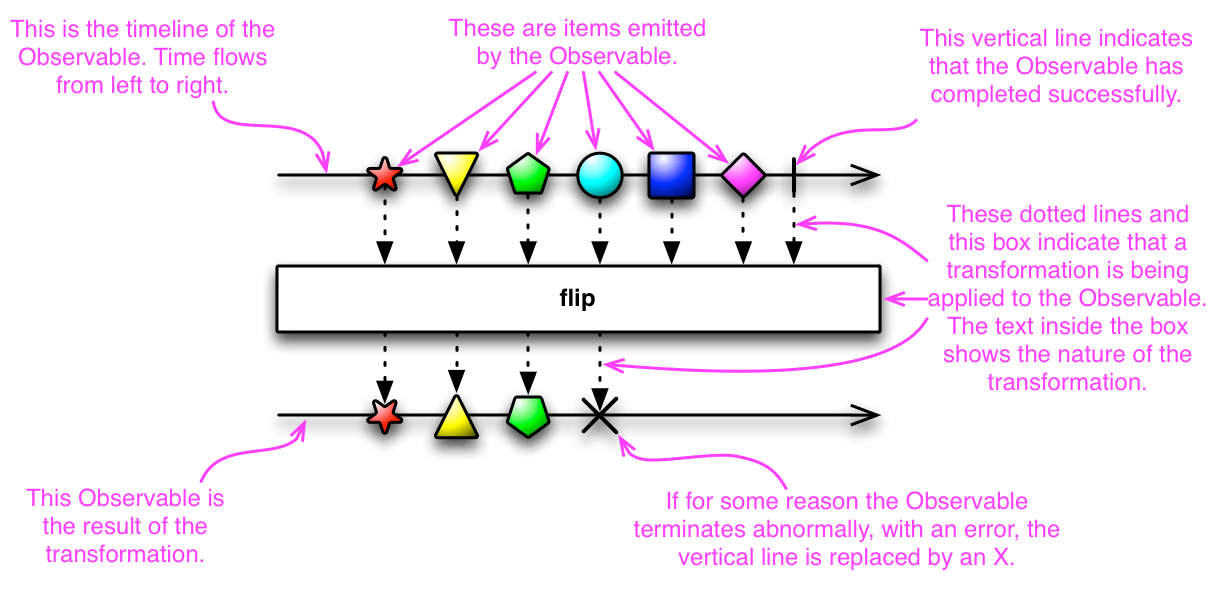
I love the use of Marble Diagrams for representing the different ReactiveX operations. It really clarifies the behavior of some complex operations. RxJava uses these diagrams in its Javadocs and provides the following legend to explain Marble diagrams:


Keeping the marble diagrams in mind, here is a sample test for flatMap operation, written using the Rx-Scala library:

val colors = Observable.just("Red", "Green", "Blue")

val f: String => Observable[String]  = (x: String) => Observable.interval(x.length() seconds).map(_ => x).take(2)

val obs: Observable[String] = colors.flatMap(f)

assert(obs.toBlocking.toList == List("Red", "Blue", "Green", "Red", "Blue", "Green"))

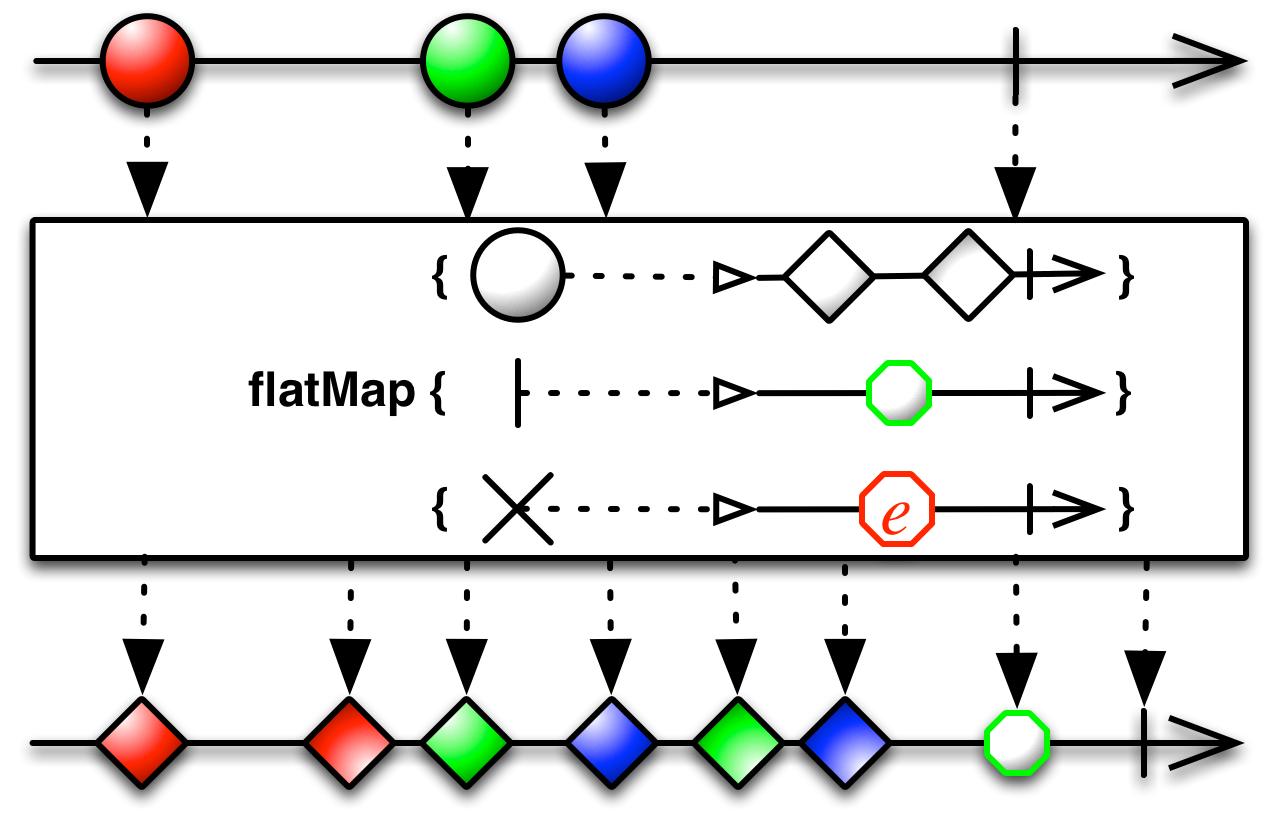
and the marble diagram for the operation:


Given this, the flow in the test should become very clear - we start with an Observable which emits three values "Red", "Green", "Blue", the function transforms an element to another Observable, calling the flatMap now makes this mapping and flattens the result to an Observable.

Another a little more complex variation of the flatMap operation has the following signature in scala:

def flatMap[R](onNext: (T) ⇒ Observable[R], onError: (Throwable) ⇒ Observable[R], onCompleted: () ⇒ Observable[R]): Observable[R]

or the following in Java:
public final <R> Observable<R> flatMap(Func1<? super T,? extends Observable<? extends R>> onNext,
                        Func1<? super java.lang.Throwable,? extends Observable<? extends R>> onError,
                        Func0<? extends Observable<? extends R>> onCompleted)


again best explained using its Marble diagram:


Here is a test for this variation of flatMap:

val colors = Observable.just("Red", "Green", "Blue")

val f: String => Observable[String]  = (x: String) => Observable.just(x, x)

val d = () => Observable.just("done")

val e: Throwable => Observable[String] = e => Observable.just(e.getMessage)

val obs: Observable[String] = colors.flatMap(f, e, d)

assert(obs.toBlocking.toList == List("Red", "Red", "Green", "Green", "Blue", "Blue", "done"))


In conclusion, I really appreciate the effort that goes behind creating these marble diagrams by the authors of ReactiveX and feel that they clarify the purpose of the operations neatly.

Friday, January 29, 2016

Spring Cloud Ribbon - Making a secured call

Something simple, but I struggled with this recently - I had to make a Netflix Ribbon based client call to a secured remote service. It turns out there are two ways to do this using Netflix Ribbon, I will demonstrate this through Spring Cloud's excellent support for Ribbon library.

In two previous blog posts I have touched on Spring Cloud Ribbon basics and some advanced customizations, continuing with the same example, assuming that I have a configuration along these lines:

sampleservice:
  ribbon:
    listOfServers: someserver:80
    ReadTimeout: 5000
    MaxAutoRetries: 2


Given this configuration, I can call the service this way:

public class RestTemplateSample {
 
    @Autowired
    private RestTemplate restTemplate;
 
    @Override
    public MessageAcknowledgement sendMessage(Message message) {
        String pongServiceUrl = "http://sampleservice/message";
        HttpEntity<Message> requestEntity = new HttpEntity<>(message);
        ResponseEntity<MessageAcknowledgement> response =  this.restTemplate.exchange(pongServiceUrl, HttpMethod.POST, requestEntity, MessageAcknowledgement.class, Maps.newHashMap());
        return response.getBody();
    }
 
}


So now if the remote service were secured, the first approach and likely the preferred way is actually quite simple, just add an additional configuration to the "named" client to indicate that the remote service is secure, note that the port also has to be appropriately specified.

sampleservice:
  ribbon:
    listOfServers: someserver:443
    ReadTimeout: 5000
    MaxAutoRetries: 2
    IsSecure: true


The second approach that also works is to simply change the url to indicate that you are calling a https endpoint, this time the "IsSecure" configuration is not required:

public class RestTemplateSample {
 
    @Autowired
    private RestTemplate restTemplate;
 
    @Override
    public MessageAcknowledgement sendMessage(Message message) {
        String pongServiceUrl = "https://sampleservice/message";
        HttpEntity<Message> requestEntity = new HttpEntity<>(message);
        ResponseEntity<MessageAcknowledgement> response =  this.restTemplate.exchange(pongServiceUrl, HttpMethod.POST, requestEntity, MessageAcknowledgement.class, Maps.newHashMap());
        return response.getBody();
    }
 
}

Saturday, January 16, 2016

Spring Cloud with Turbine

Netflix Hystrix has a neat feature called the Hystrix stream that provides real-time metrics on the state of the Hystrix commands in an application. This data tends to be very raw though, a very cool interface called the Hystrix Dashboard consumes this raw data and presents a graphical information based on the underlying raw data:


Integrating Hystrix Support and Dashboard

In a Spring-Cloud project it is very trivial to expose the Hystrix stream, all it requires is a starter application for Hystrix to be added in as a dependency and the stream functionality is available to the web application.

Step 1: Add the Spring-Cloud-Starter-hystrix:

<dependency>
    <groupId>org.springframework.cloud</groupId>
    <artifactId>spring-cloud-starter-hystrix</artifactId>
</dependency>

Step 2: Enable Hystrix support for the Application, this will expose the hystrix stream at a "/hystrix.stream" uri:

@SpringBootApplication
@EnableHystrix
public class SpringCloudApp {

    public static void main(String[] args) {
        SpringApplication.run(SpringCloudApp.class, args);
    }
}

Now for the Hystrix Dashboard application to graphically view the Hystrix stream, the following annotation will enable that and the application should be available at "/hystrix" uri:

@SpringBootApplication
@EnableHystrixDashboard
public class AggregateApp {

    public static void main(String[] args) {
        SpringApplication.run(AggregateApp.class, args);
    }
}


Spring Cloud with Turbine

Hystrix stream provides information on a single application, Turbine provides a way to aggregate this information across all installations of an application in a cluster. Integrating turbine into a Spring-Cloud based application is straightforward, all it requires is information on which clusters to expose information on and how to aggregate information about the specific clusters. As before to pull in the dependencies of Turbine:

<dependency>
    <groupId>org.springframework.cloud</groupId>
    <artifactId>spring-cloud-starter-turbine</artifactId>
    <exclusions>
        <exclusion>
            <groupId>javax.servlet</groupId>
            <artifactId>servlet-api</artifactId>
        </exclusion>
    </exclusions>
</dependency>

And to enable Turbine support in a Spring Boot based application:

@SpringBootApplication
@EnableHystrixDashboard
@EnableTurbine
public class MonitorApplication {

    public static void main(String[] args) {
        SpringApplication.run(MonitorApplication.class, args);
    }

}

This application is playing the role of both showing the Hystrix Dashboard and exposing turbine stream. Finally the configuration for turbine:

turbine:
  aggregator:
    clusterConfig: SAMPLE-HYSTRIX-AGGREGATE
  appConfig: SAMPLE-HYSTRIX-AGGREGATE

Given this configuration a turbine stream for SAMPLE-HYSTRIX-AGGREGATE cluster is available at "/turbine.stream?cluster=SAMPLE-HYSTRIX-AGGREGATE" uri, it would figure out the instances of the cluster using Eureka, source the hystrix stream from each instance and aggregate it into the turbine stream. If we were to view the Hystrix dashboard against this stream:


If you look at the counts against the host now, it indicates the 2 hosts for which the stream is being aggregated.

I have brushed over a lot of details here, an easier way to check the details may be to check my github project here

Tuesday, January 5, 2016

JWT - Generating and validating a token - Samples

JWT provides a very interesting way to represent claims between applications that can be verified and trusted. My objective here is to show a small sample to generate and validate a token using the excellent Nimbus JOSE + JWT library.

Overview

One of the best places to get an intro is here. In brief, to borrow from the material from the jwt.io site, claims are represented as an encoded json in three parts separated with a dot (.)


header.payload.signature


The header is a json that contains the type of algorithm used for signing the content(RSA in this instance) which is then url and Base64 encoded:

{
  "alg": "RS512"
}

The payload is a json containing all the claims, there are claims which are reserved but private claims are also allowed:

{
  "sub": "samplesubject",
  "name": "John Doe",
  "iss": "sampleissueer",
  "admin": true,
  "exp": 1451849539
}


here "sub"(subject), "iss"(issuer) and "exp"(expiry) are reserved claims but "name" and "admin" are private claims. The content is then Base64Url encoded.

Finally the header and payload together is signed using either a shared key or a private key and the signature is Base64 url encoded and appended to the token with a (.) separator.


Generating a Keypair

My sample is RSA based one, so the first step is to generate a Key pair. JWK is a neat way to store the Keys as a JSON representation and Nimbus library provides support for that:


import java.security.KeyPairGenerator
import java.security.interfaces.{RSAPrivateKey, RSAPublicKey}

import com.google.gson.{GsonBuilder, JsonElement, JsonParser}
import com.nimbusds.jose.Algorithm
import com.nimbusds.jose.jwk.{JWKSet, KeyUse, RSAKey}

object JWKGenerator {

  def make(keySize: Integer, keyUse: KeyUse, keyAlg: Algorithm, keyId: String) = {
    val generator = KeyPairGenerator.getInstance("RSA")
    generator.initialize(keySize)
    val kp = generator.generateKeyPair()
    val publicKey = kp.getPublic().asInstanceOf[RSAPublicKey]
    val privateKey = kp.getPrivate().asInstanceOf[RSAPrivateKey]
    new RSAKey.Builder(publicKey)
      .privateKey(privateKey)
      .keyUse(keyUse)
      .algorithm(keyAlg)
      .keyID(keyId)
      .build()
  }
 ...

}

Given this Key Pair, a JWK can be generated from this using Gson:

  def generateJWKKeypair(rsaKey: RSAKey): JsonElement = {
    val jwkSet = new JWKSet(rsaKey)
    new JsonParser().parse(jwkSet.toJSONObject(false).toJSONString)
  }

  def generateJWKJson(rsaKey: RSAKey): String = {
    val jsonElement  = generateJWKKeypair(rsaKey)
    val gson = new GsonBuilder().setPrettyPrinting().create()
    gson.toJson(jsonElement)
  }


A sample JWK based keypair looks like this:

{
  "keys": [
    {
      "p": "2_Fb6K50ayAsnnQl55pPegE_JNTeAjpDo9HThZPp6daX7Cm2s2fShtWuM8JBv42qelKIrypAAVOedLCM75VoRQ",
      "kty": "RSA",
      "q": "ye5BeGtkx_9z3V4ImX2Pfljhye7QT2rMhO8chMcCGI4JGMsaDBGUmGz56MHvWIlcqBcYbPXIWORidtMPdzp1wQ",
      "d": "gSjAIty6uDAm8ZjEHUU4wsJ8VVSJInk9iR2BSKVAAxJUQUrCVN---DKLr7tCKgWH0zlV0DjGtrfy7pO-5tcurKkK59489mOD4-1kYvnqSZmHC_zF9IrCyZWpOiHnI5VnJEeNwRz7EU8y47NjpUHWIaLl_Qsu6gOiku41Vpb14QE",
      "e": "AQAB",
      "use": "sig",
      "kid": "sample",
      "qi": "0bbcYShpGL4XNhBVrMI8fKUpUw1bWghgoyp4XeZe-EZ-wsc43REE6ZItCe1B3u14RKU2J2G57Mi9f_gGIP_FqQ",
      "dp": "O_qF5d4tQUl04YErFQ2vvsW4QoMKR_E7oOEHndXIZExxAaYefK5DayG6b8L5yxMG-nSncZ1D9ximjYvX4z4LQQ",
      "alg": "RS512",
      "dq": "jCy-eg9i-IrWLZc3NQW6dKTSqFEFffvPWYB7NZjIVa9TlUh4HmSd2Gnd2bu2oKlKDs1pgUnk-AAicgX1uHh2gQ",
      "n": "rX0zzOEJOTtv7h39VbRBoLPQ4dRutCiRn5wnd73Z1gF_QBXYkrafKIIvSUcJbMLAozRn6suVXCd8cVivYoq5hkAmcRiy0v7C4VuB1_Fou7HHoi2ISbwlv-kiZwTmXCn9YSHDBVivCwfMI87L2143ZfYUcNxNTxPt9nY6HJrtJQU"
    }
  ]
}

Generating a JWT

Now that we have a good sample keypair, load up the private and public keys:

import java.time.{LocalDateTime, ZoneOffset}
import java.util.Date

import com.nimbusds.jose._
import com.nimbusds.jose.crypto._
import com.nimbusds.jose.jwk.{JWKSet, RSAKey}
import com.nimbusds.jwt.JWTClaimsSet.Builder
import com.nimbusds.jwt._

object JwtSample {
  def main(args: Array[String]): Unit = {
    val jwkSet = JWKSet.load(JwtSample.getClass.getResource("/sample.json").toURI.toURL)
    val jwk = jwkSet.getKeyByKeyId("sample").asInstanceOf[RSAKey]

    val publicKey = jwk.toRSAPublicKey
    val privateKey = jwk.toRSAPrivateKey
 ...
}

Build a payload, sign it and generate the JWT:

    val claimsSetBuilder = new Builder()
      .subject("samplesubject")
      .claim("name", "John Doe")
      .claim("admin", true)
      .issuer("sampleissueer")
      .expirationTime(Date.from(LocalDateTime.now().plusHours(1).toInstant(ZoneOffset.UTC)))

    val signer = new RSASSASigner(privateKey)


    val signedJWT: SignedJWT = new SignedJWT(
      new JWSHeader(JWSAlgorithm.RS512),
      claimsSetBuilder.build())

    signedJWT.sign(signer)

    val s = signedJWT.serialize()


The consumer of this JWT can read the payload and validate it using the public key:

    val cSignedJWT = SignedJWT.parse(s)

    val verifier = new RSASSAVerifier(publicKey)

    println(cSignedJWT.verify(verifier))
    println(signedJWT.getJWTClaimsSet().getSubject())

Conclusion

This sample is entirely based on samples provided at the Nimbus JOSE + JWT site, you should definitely refer to the Nimbus site if you are interested in exploring this further. My samples are here

Thursday, December 24, 2015

Spring Cloud Rest Client with Netflix Ribbon - Customizations

In an earlier blog post I had covered the basic configuration involved in making a REST call using Spring Cloud which utilizes Netflix Ribbon libraries internally to load balance calls, with basic configurations like setting read timeout, number of retries etc . Here I will go over some more customizations that can be done that will require going beyond the configuration files.

Use Case

My use case is very simple - I want to specify the URL(s) that a rest call is invoked against. This may appear straightforward to start with however there are a few catches to consider. By default if Spring Cloud sees Eureka related libraries in the classpath the behavior is to use Eureka to discover the instances of a service and loadbalance across the instances.

Approach 1 - Use a non-loadbalanced Rest Template

An approach that will work is to use an instance of RestTemplate that does not use Ribbon at all:

@Bean
public RestOperations nonLoadbalancedRestTemplate() {
    return new RestTemplate();
}

Now, where you need the Rest Template, you can inject this instance in, knowing that Spring Cloud also would have instantiated another instance that supports Eureka, so this injection will have to be done by name this way:

@Service("restTemplateDirectPongClient")
public class RestTemplateDirectPongClient implements PongClient {

    private final RestOperations restTemplate;

    @Autowired
    public RestTemplateDirectPongClient(@Qualifier("nonLoadbalancedRestTemplate") RestOperations restTemplate) {
        this.restTemplate = restTemplate;
    }

    ...
}

The big catch with the approach however is now that we have bypassed Ribbon all the features that Ribbon provides are lost - we would not have features like automatic retry, read and connect timeouts, loadbalancing in case we had multiple urls. So a better approach may be the following.

Approach 2 - Customize Ribbon based Rest Template

In the earlier blog post I had shown some basic customization of Ribbon which can be made using a configuration file:

samplepong:
  ribbon:
    DeploymentContextBasedVipAddresses: sample-pong
    ReadTimeout: 5000
    MaxAutoRetries: 2

All the customizations that you would normally do through a configuration file for Ribbon however do not carry over, in this specific instance I want to use a list of server instances that I specify instead of letting Ribbon figure out via a Eureka call. Using raw ribbon it is specified the following way:

samplepong.ribbon.NIWSServerListClassName=com.netflix.loadbalancer.ConfigurationBasedServerList
samplepong.ribbon.listOfServers=127.0.0.1:8082

This specific configuration will not work with Spring Cloud however, the way to specify a list of servers is by specifying a configuration file along these lines:

package org.bk.noscan.consumer.ribbon;

import com.netflix.client.config.IClientConfig;
import com.netflix.loadbalancer.ConfigurationBasedServerList;
import com.netflix.loadbalancer.Server;
import com.netflix.loadbalancer.ServerList;
import org.springframework.cloud.netflix.ribbon.RibbonClientConfiguration;
import org.springframework.context.annotation.Bean;
import org.springframework.context.annotation.Configuration;

@Configuration
public class PongDirectCallRibbonConfiguration extends RibbonClientConfiguration {

    @Bean
    @Override
    public ServerList<Server> ribbonServerList(IClientConfig clientConfig) {
        ConfigurationBasedServerList serverList = new ConfigurationBasedServerList();
        serverList.initWithNiwsConfig(clientConfig);
        return serverList;
    }

}

and telling Ribbon to use this configuration for the specific "named client" that we are concerned about:

@RibbonClients({
        @RibbonClient(name = "samplepongdirect", configuration = PongDirectCallRibbonConfiguration.class),
})

With this configuration in place, the list of servers can now be specified using configuration this way:

samplepongdirect:
  ribbon:
    DeploymentContextBasedVipAddresses: sample-pong
    listOfServers: localhost:8082
    ReadTimeout: 5000
    MaxAutoRetries: 2

One thing to note is that since the Ribbon Configuration is a normal Spring configuration it will likely get picked up as part of the @ComponentScan annotation, since this is very specific for Ribbon we would not want this configuration to be picked up this way. I have avoided that by specifying a package not in the normal classpath scan "org.bk.noscan.*" package!, I am not sure if there is another clean way to do this but this approach has worked well for me.

This approach is little more extensive than the first approach, however the advantage is that once this is in place all the features of Ribbon carry over.

Conclusion

This concludes the customizations involved in using Spring Cloud with Ribbon. If you are interested in exploring the code a little further I have this integrated in my github repo here.

References

Spring Cloud reference documentation has been an awesome source of information for all the details presented here. I had mistakenly opened a github issue thinking that it is a Spring Cloud issue and got some very useful information through the discussion here

Sunday, December 6, 2015

Spring Cloud Rest Client with Netflix Ribbon - Basics

In an earlier blog post I had covered the different options for a REST client in the Spring Cloud world. All the options wrap around a Netflix OSS based component called Ribbon which handles the aspects related to loadbalancing the calls across different instances hosting a service, handling failovers, timeouts etc. Here I will cover a few ways to customize the behavior of underlying Ribbon components when used with Spring Cloud and follow it up with more comprehensive customizations.

Creating a Rest Client


To recap, first consider a case where a simple service needs to be called:


A typical way to make this call using Spring is to inject in a RestTemplate and use it make this call, the following way:


public class RestTemplateBasedPongClient implements PongClient {

    @Autowired
    private RestTemplate restTemplate;

    @Override
    public MessageAcknowledgement sendMessage(Message message) {
        String pongServiceUrl = "http://serviceurl/message";
        HttpEntity<Message> requestEntity = new HttpEntity<>(message);
        ResponseEntity<MessageAcknowledgement> response =  this.restTemplate.exchange(pongServiceUrl, HttpMethod.POST, requestEntity, MessageAcknowledgement.class, Maps.newHashMap());
        return response.getBody();
    }

}

There is nothing special here. When using Spring Cloud however the same code behaves differently, now the RestTemplate internally uses Netflix OSS Ribbon libraries to make the call. This helps as the typical call flow is to first find the instances running the service and then to loadbalance the calls across the instances and to maintain this state.

Rest Client With Ribbon


Let me digress a little to touch on Ribbon, Ribbon uses an abstraction called a "Named client" to control the behavior of a remote service call - the name by which the service has registered with Eureka, timeout for service calls, how many retries in case of failures etc. These are specified through configuration files, and the entries are typically along these lines, note that the "Named client" here is "samplepong" and the properties have this as a prefix:

samplepong.ribbon.MaxAutoRetries=2
samplepong.ribbon.MaxAutoRetriesNextServer=2
samplepong.ribbon.OkToRetryOnAllOperations=true
samplepong.ribbon.ServerListRefreshInterval=2000
samplepong.ribbon.ConnectTimeout=5000
samplepong.ribbon.ReadTimeout=90000
samplepong.ribbon.EnableZoneAffinity=false
samplepong.ribbon.DeploymentContextBasedVipAddresses=sample-pong
samplepong.ribbon.NIWSServerListClassName=com.netflix.niws.loadbalancer.DiscoveryEnabledNIWSServerList


Coming back to Spring Cloud, it supports the concept of a "Named Client" in a very clever way through the Url hostname, so the RestTemplate call would now look like this:

ResponseEntity<MessageAcknowledgement> response =  this.restTemplate.exchange("http://samplepong/message", HttpMethod.POST, requestEntity, MessageAcknowledgement.class, Maps.newHashMap());

The "samplepong" in the url is the "Named client" and any customization for the behavior of the underlying Ribbon can be made by specifying the properties using this prefix. Since this is a Spring Cloud applications the properties can be specified cleanly in a yaml format along these lines:

samplepong:
  ribbon:
    DeploymentContextBasedVipAddresses: sample-pong
    ReadTimeout: 5000
    MaxAutoRetries: 2


Conclusion

This covers the basics of how Spring Cloud abstracts out the underlying the Ribbon libraries to provide a very intuitive facade to make remote service calls in the Cloud environment. There are some details that I have skimmed over on some of the customizations, I will cover these in a newer post. Here is my github repo with the code that I have used for the article.