Showing posts with label Spring Integration. Show all posts

Sunday, November 13, 2016

Spring Kafka Producer/Consumer sample

My objective here is to show how Spring Kafka provides an abstraction to raw Kafka Producer and Consumer API's that is easy to use and is familiar to someone with a Spring background.

Sample scenario


The sample scenario is a simple one, I have a system which produces a message and another which processes it


Implementation using Raw Kafka Producer/Consumer API's

To start with I have used raw Kafka Producer and Consumer API's to implement this scenario. If you would rather look at the code, I have it available in my github repo here.

Producer

The following sets up a KafkaProducer instance which is used for sending a message to a Kafka topic:

KafkaProducer<String, WorkUnit> producer 
    = new KafkaProducer<>(kafkaProps, stringKeySerializer(), workUnitJsonSerializer());

I have used a variation of the KafkaProducer constructor which takes in a custom Serializer to convert the domain object to a json representation.

Once an instance of KafkaProducer is available, it can be used for sending a message to the Kafka cluster, here I have used a synchronous version of the sender which waits for a response to be back.

ProducerRecord<String, WorkUnit> record 
                = new ProducerRecord<>("workunits", workUnit.getId(), workUnit);

RecordMetadata recordMetadata = this.workUnitProducer.send(record).get();

Consumer

On the Consumer side we create a KafkaConsumer with a variation of the constructor taking in a Deserializer which knows how to read a json message and translate that to the domain instance:

KafkaConsumer<String, WorkUnit> consumer  
    = new KafkaConsumer<>(props, stringKeyDeserializer(), workUnitJsonValueDeserializer());

Once an instance of KafkaConsumer is available a listener loop can be put in place which reads a batch of records, processes them and waits for more records to come through:

consumer.subscribe("workunits);

try {
    while (true) {
        ConsumerRecords<String, WorkUnit> records = this.consumer.poll(100);
        for (ConsumerRecord<String, WorkUnit> record : records) {
            log.info("consuming from topic = {}, partition = {}, offset = {}, key = {}, value = {}",
                    record.topic(), record.partition(), record.offset(), record.key(), record.value());

        }
    }
} finally {
    this.consumer.close();
}


Implementation using Spring Kafka 


I have the implementation using Spring-kafka available in my github repo.

Producer

Spring-Kafka provides a KafkaTemplate class as a wrapper over the KafkaProducer to send messages to a Kafka topic:

@Bean
public ProducerFactory<String, WorkUnit> producerFactory() {
    return new DefaultKafkaProducerFactory<>(producerConfigs(), stringKeySerializer(), workUnitJsonSerializer());
}

@Bean
public KafkaTemplate<String, WorkUnit> workUnitsKafkaTemplate() {
    KafkaTemplate<String, WorkUnit> kafkaTemplate =  new KafkaTemplate<>(producerFactory());
    kafkaTemplate.setDefaultTopic("workunits");
    return kafkaTemplate;
}

One thing to note is that whereas earlier I had implemented a custom Serializer/Deserializer to send a domain type as json and then to convert it back, Spring-Kafka provides Seralizer/Deserializer for json out of the box.

And using KafkaTemplate to send a message:

SendResult<String, WorkUnit> sendResult = 
    workUnitsKafkaTemplate.sendDefault(workUnit.getId(), workUnit).get();

RecordMetadata recordMetadata = sendResult.getRecordMetadata();

LOGGER.info("topic = {}, partition = {}, offset = {}, workUnit = {}",
        recordMetadata.topic(), recordMetadata.partition(), recordMetadata.offset(), workUnit);

Consumer

The consumer part is implemented using a Listener pattern that should be familiar to anybody who has implemented listeners for RabbitMQ/ActiveMQ. Here is first the configuration to set-up a listener container:

@Bean
public ConcurrentKafkaListenerContainerFactory<String, WorkUnit> kafkaListenerContainerFactory() {
    ConcurrentKafkaListenerContainerFactory<String, WorkUnit> factory =
            new ConcurrentKafkaListenerContainerFactory<>();
    factory.setConcurrency(1);
    factory.setConsumerFactory(consumerFactory());
    return factory;
}

@Bean
public ConsumerFactory<String, WorkUnit> consumerFactory() {
    return new DefaultKafkaConsumerFactory<>(consumerProps(), stringKeyDeserializer(), workUnitJsonValueDeserializer());
}


and the service which responds to messages read by the container:

@Service
public class WorkUnitsConsumer {
    private static final Logger log = LoggerFactory.getLogger(WorkUnitsConsumer.class);

    @KafkaListener(topics = "workunits")
    public void onReceiving(WorkUnit workUnit, @Header(KafkaHeaders.OFFSET) Integer offset,
                            @Header(KafkaHeaders.RECEIVED_PARTITION_ID) int partition,
                            @Header(KafkaHeaders.RECEIVED_TOPIC) String topic) {
        log.info("Processing topic = {}, partition = {}, offset = {}, workUnit = {}",
                topic, partition, offset, workUnit);
    }
}

Here all the complexities of setting up a listener loop like with the raw consumer is avoided and is nicely hidden by the listener container.


Conclusion

I have brushed over a lot of the internals of setting up batch sizes, variations in acknowledgement, different API signatures. My intention is just to demonstrate a common use case using the raw Kafka API's and show how Spring-Kafka wrapper simplifies it.

If you are interested in exploring further, the raw producer consumer sample is available here and the Spring Kafka one here

Friday, October 21, 2016

Tracing Spring Integration Flow with Spring Cloud Sleuth

Spring Cloud Sleuth is an awesome project that provides a way to trace requests that span multiple systems. Spring Cloud sleuth can optionally export this trace data to Zipkin where it can be visualized in a neat way. I especially love the fact that Spring Cloud Sleuth integrates deeply with Spring Integration and can nicely trace out the flow of a message.


Consider the following -


I have two different systems here - a work dispatcher producing "Work Unit"s and a Work Handler consuming them. They talk over a RabbitMQ broker. Just to mix the flow up a bit, I also have a retry mechanism in place which retries the message every 20 seconds in case of a processing failure


Both these systems are described using Spring Integration Java DSL, the outbound flow dispatching the WorkUnits looks like this:

@Configuration
public class WorksOutbound {

    @Autowired
    private RabbitConfig rabbitConfig;

    @Bean
    public IntegrationFlow toOutboundQueueFlow() {
        return IntegrationFlows.from("worksChannel")
                .transform(Transformers.toJson())
                .log()
                .handle(Amqp.outboundGateway(rabbitConfig.worksRabbitTemplate()))
                .transform(Transformers.fromJson(WorkUnitResponse.class))
                .get();
    }

    @Bean
    public IntegrationFlow handleErrors() {
        return IntegrationFlows.from("errorChannel")
                .transform((MessagingException e) -> e.getFailedMessage().getPayload())
                .transform(Transformers.fromJson(WorkUnit.class))
                .transform((WorkUnit failedWorkUnit) -> new WorkUnitResponse(failedWorkUnit.getId(), failedWorkUnit.getDefinition(), false))
                .get();
    }

}

This is eminently readable - the "Work Unit" comes through a "works channel" and is dispatched to a RabbitMQ queue after tranforming to json. Note that the dispatch is via an outbound gateway, this means that the Spring integration would put the necessary infrastructure in place to wait for a reply to be back from the remote system. In case of an error, say if the reply does not appear in time, a stock response is provided back to the user.

On the Work Handler side a similar flow handles the message:

@Configuration
public class WorkInbound {

    @Autowired
    private RabbitConfig rabbitConfig;

    @Bean
    public IntegrationFlow inboundFlow() {
        return IntegrationFlows.from(
                Amqp.inboundGateway(rabbitConfig.workListenerContainer()))
                .transform(Transformers.fromJson(WorkUnit.class))
                .log()
                .filter("(headers['x-death'] != null) ? headers['x-death'][0].count < 3: true", f -> f.discardChannel("nullChannel"))
                .handle("workHandler", "process")
                .transform(Transformers.toJson())
                .get();
    }

}

The only wrinkle in this flow is the retry logic which discards the message after 3 retries. If you are interested in the details of how the retry is being hooked up, I have more details here.


So now, given this fairly involved flow, here is how Spring Cloud Sleuth with Zipkin integrated looks like:


Spring Cloud Sleuth intercepts every message channel and tags the message as it flows through the channel.


Now for something a little more interesting, if the flow were more complex with 3 retries each 20 seconds apart, again the flow is beautifully brought out by Spring Cloud Sleuth and its integration with Zipkin.


Conclusion


If you maintain a Spring Integration based flow, Spring Cloud Sleuth is an addition to the project and can trace the runtime path of a message and show it visually using the Zipkin UI. I look forward to exploring more of the nuances of this excellent project.


The sample that I have demonstrated here is available in my github repo - https://github.com/bijukunjummen/si-with-sleuth-sample

Saturday, September 10, 2016

RabbitMQ retries using Spring Integration

I recently read about an approach to retry with RabbitMQ here and wanted to try a similar approach with Spring Integration, which provides an awesome set of integration abstractions.

TL;DR the problem being solved is to retry a message(in case of failures in processing) a few times with a large delay between retries(say 10 mins +). The approach makes use of the RabbitMQ support for Dead Letter Exchanges and looks something like this


The gist of the flow is :
1. A Work dispatcher creates "Work Unit"(s) and sends it to a RabbitMQ queue via an exchange.
2. The Work queue is set with a Dead Letter exchange. If the message processing fails for any reason the "Work Unit" ends up with the Work Unit Dead Letter Queue.
3. Work Unit Dead Letter queue is in-turn set with the Work Unit exchange as the Dead Letter Exchange, this way creating a cycle. Further, the expiration of messages in the dead letter queue is set to say 10 mins, this way once the message expires it will be back again in the Work unit queue.
4. To break the cycle the processing code has to stop processing once a certain count threshold is exceeded.


Implementation using Spring Integration


I have covered a straight happy path flow using Spring Integration and RabbitMQ before, here I will mostly be building on top of this code.

A good part of the set-up is the configuration of the appropriate dead letter exchanges/queues, and looks like this when expressed using Spring's Java Configuration:

@Configuration
public class RabbitConfig {

    @Autowired
    private ConnectionFactory rabbitConnectionFactory;

    @Bean
    Exchange worksExchange() {
        return ExchangeBuilder.topicExchange("work.exchange")
                .durable()
                .build();
    }


    @Bean
    public Queue worksQueue() {
        return QueueBuilder.durable("work.queue")
                .withArgument("x-dead-letter-exchange", worksDlExchange().getName())
                .build();
    }

    @Bean
    Binding worksBinding() {
        return BindingBuilder
                .bind(worksQueue())
                .to(worksExchange()).with("#").noargs();
    }
    
    // Dead letter exchange for holding rejected work units..
    @Bean
    Exchange worksDlExchange() {
        return ExchangeBuilder
                .topicExchange("work.exchange.dl")
                .durable()
                .build();
    }

    //Queue to hold Deadletter messages from worksQueue
    @Bean
    public Queue worksDLQueue() {
        return QueueBuilder
                .durable("works.queue.dl")
                .withArgument("x-message-ttl", 20000)
                .withArgument("x-dead-letter-exchange", worksExchange().getName())
                .build();
    }

    @Bean
    Binding worksDlBinding() {
        return BindingBuilder
                .bind(worksDLQueue())
                .to(worksDlExchange()).with("#")
                .noargs();
    }
    ...
}


Note that here I have set the TTL of the Dead Letter queue to 20 seconds, this means that after 20 seconds a failed message will be back in the processing queue. Once this set-up is in place and the appropriate structures are created in RabbitMQ, the consuming part of the code looks like this, expressed using Spring Integration Java DSL:

@Configuration
public class WorkInbound {

    @Autowired
    private RabbitConfig rabbitConfig;

    @Bean
    public IntegrationFlow inboundFlow() {
        return IntegrationFlows.from(
                Amqp.inboundAdapter(rabbitConfig.workListenerContainer()))
                .transform(Transformers.fromJson(WorkUnit.class))
                .log()
                .filter("(headers['x-death'] != null) ? headers['x-death'][0].count <= 3: true", f -> f.discardChannel("nullChannel"))
                .handle("workHandler", "process")
                .get();
    }

}

Most of the retry logic here is handled by the RabbitMQ infrastructure, the only change here is to break the cycle by explicitly discarding the message after a certain 2 retries. This break is expressed as a filter above, looking at the header called "x-death" that RabbitMQ adds to the message once it is sent to Dead Letter exchange. The filter is admittedly a little ugly - it can likely be expressed a little better in Java code.


One more thing to note is that the retry logic could have been expressed in-process using Spring Integration, however I wanted to investigate a flow where the retry times can be high (say 15 to 20 mins) which will not work well in-process and is also not cluster safe as I want any instances of an application to potentially handle the retry of a message.

If you want to explore further, do try the sample at my github repo - https://github.com/bijukunjummen/si-dsl-rabbit-sample

Reference:

Retry With RabbitMQ: http://dev.venntro.com/2014/07/back-off-and-retry-with-rabbitmq

Wednesday, August 24, 2016

Integrating with RabbitMQ using Spring Cloud Stream

In my previous post I wrote about a very simple integration scenario between two systems - one generating a work unit and another processing that work unit and how Spring Integration makes such integration very easy.


Here I will demonstrate how this integration scenario can be simplified even further using Spring Cloud Stream

I have the sample code available here - the right maven dependencies for Spring Cloud Stream is available in the pom.xml.

Producer


So again starting with the producer responsible for generating the work units. All that needs to be done code wise to send messages to RabbitMQ is to have a java configuration along these lines:

@Configuration
@EnableBinding(WorkUnitsSource.class)
@IntegrationComponentScan
public class IntegrationConfiguration {}

This looks deceptively simple but does a lot under the covers, from what I can understand and glean from the documentation these are what this configuration triggers:

1. Spring Integration message channels based on the classes that are bound to the @EnableBinding annotation are created. The WorkUnitsSource class above is the definition of a custom channel called "worksChannel" and looks like this:

import org.springframework.cloud.stream.annotation.Output;
import org.springframework.messaging.MessageChannel;

public interface WorkUnitsSource {

    String CHANNEL_NAME = "worksChannel";

    @Output
    MessageChannel worksChannel();

}

2. Based on which "binder" implementation is available at runtime(say RabbitMQ, Kaffka, Redis, Gemfire), the channel in the previous step will be connected to the appropriate structures in the system - so for eg, I am want my "worksChannel" to in turn send messages to RabbitMQ, Spring Cloud Stream would take care of automatically creating a topic exchange in RabbitMQ

I wanted some further customizations in terms of how the data is sent to RabbitMQ - specifically I wanted my domain objects to be serialized to json before being sent across and I want to specify the name of the RabbitMQ exchange that the payload is sent to, this is controlled by certain configurations that can be attached to the channel the following way using a yaml file:

spring:
  cloud:
    stream:
      bindings:
        worksChannel:
          destination: work.exchange
          contentType: application/json
          group: testgroup

One final detail is a way for the rest of the application to interact with Spring Cloud Stream, this can be done directly in Spring Integration by defining a message gateway:

import org.springframework.integration.annotation.Gateway;
import org.springframework.integration.annotation.MessagingGateway;
import works.service.domain.WorkUnit;

@MessagingGateway
public interface WorkUnitGateway {
 @Gateway(requestChannel = WorkUnitsSource.CHANNEL_NAME)
 void generate(WorkUnit workUnit);

}

That is essentially it, Spring Cloud Stream would now wire up the entire Spring integration flow, create the appropriate structures in RabbitMQ.


Consumer


Similar to the Producer, first I want to define the channel called "worksChannel" which would handle the incoming message from RabbitMQ:

import org.springframework.cloud.stream.annotation.Input;
import org.springframework.messaging.SubscribableChannel;

public interface WorkUnitsSink {
    String CHANNEL_NAME = "worksChannel";

    @Input
    SubscribableChannel worksChannel();
}

and let Spring Cloud Stream create the channels and RabbitMQ bindings based on this definition:

import org.springframework.cloud.stream.annotation.EnableBinding;
import org.springframework.context.annotation.Configuration;

@Configuration
@EnableBinding(WorkUnitsSink.class)
public class IntegrationConfiguration {}

To process the messages, Spring Cloud Stream provides a listener which can be created the following way:

@Service
public class WorkHandler {
    private static final Logger LOGGER = LoggerFactory.getLogger(WorkHandler.class);

    @StreamListener(WorkUnitsSink.CHANNEL_NAME)
    public void process(WorkUnit workUnit) {
        LOGGER.info("Handling work unit - id: {}, definition: {}", workUnit.getId(), workUnit.getDefinition());
    }
}

And finally the configuration which connects this channel to the RabbitMQ infrastructure expressed in a yaml file:

spring:
  cloud:
    stream:
      bindings:
        worksChannel:
          destination: work.exchange
          group: testgroup


Now if the producer and any number of consumers were started up, the message sent via the producer would be sent to a Rabbit MQ topic exchange as a json, retrieved by the consumer, deserialized to an object and passed to the work processor.

A good amount of the boiler plate involved in creating the RabbitMQ infrastructure is now handled purely by convention by the Spring Cloud Stream libraries. Though Spring Cloud Stream attempts to provide a facade over the raw Spring Integration, it is useful to have a basic knowledge of Spring integration to use Spring Cloud Stream effectively.

The sample described here is available at my github repository

Monday, August 22, 2016

Integrating with Rabbit MQ using Spring Integration Java DSL

I recently attended the Spring One conference 2016 in Las Vegas and had the good fortune to see from near and far some of the people that I have admired for a long time in the Software World. I personally met two of them who have actually merged some of my Spring Integration related minor contributions from a few years ago - Gary Russel and Artem Bilan and they inspired me to look again at Spring Integration which I have not used for a while.

I was once more reminded of how Spring Integration makes any complex Enterprise integration scenario look easy. I am happy to see that Spring Integration Java based DSL is now fully integrated into the Spring Integration umbrella and higher level abstractions like Spring Cloud Stream(introductions thanks to my good friend and a contributor to this project Soby Chacko) which makes some of the message driven scenarios even easier.

In this post I am just revisiting a very simple integration scenario with RabbitMQ and in a later post will re-implement it using Spring Cloud Stream.

Consider a scenario where two services are talking to each other via a RabbitMQ broker in between, one of them generating some kind of a work, the other processing this work.


Producer


The Work unit producing/dispatching part can be expressed in code using Spring Integration Java DSL the following way:


@Configuration
public class WorksOutbound {

    @Autowired
    private RabbitConfig rabbitConfig;

    @Bean
    public IntegrationFlow toOutboundQueueFlow() {
        return IntegrationFlows.from("worksChannel")
                .transform(Transformers.toJson())
                .handle(Amqp.outboundAdapter(rabbitConfig.worksRabbitTemplate()))
                .get();
    }
}

This is eminently readable - the flow starts by reading a message off a channel called "worksChannel", transforms the message into a json and dispatches it off using an Outbound channel adapter to a RabbitMQ exchange. Now, how does the message get to the channel called "worksChannel" - I have configured it via a Messaging gateway, an entry point to the Spring Integration world -

@MessagingGateway
public interface WorkUnitGateway {
 @Gateway(requestChannel = "worksChannel")
 void generate(WorkUnit workUnit);

}

So now if a java client wanted to dispatch a "work unit" to rabbitmq, the call would look like this :

WorkUnit sampleWorkUnit = new WorkUnit(UUID.randomUUID().toString(), definition);
workUnitGateway.generate(sampleWorkUnit);

I have brushed over a few things here - specifically the Rabbit MQ configuration, that is run of the mill however and is available here

Consumer

Along the lines of a producer, a consumers flow would start by receiving a message from RabbitMQ queue, transforming it to a domain model and then processing the message, expressed using Spring Integration Java DSL the following way:

@Configuration
public class WorkInbound {

    @Autowired
    private RabbitConfig rabbitConfig;

    @Autowired
    private ConnectionFactory connectionFactory;

    @Bean
    public IntegrationFlow inboundFlow() {
        return IntegrationFlows.from(
                Amqp.inboundAdapter(connectionFactory, rabbitConfig.worksQueue()).concurrentConsumers(3))
                .transform(Transformers.fromJson(WorkUnit.class))
                .handle("workHandler", "process")
                .get();
    }
}

The code should be intuitive, the workHandler above is a simple Java pojo and looks like this, doing the very important job of just logging the payload:

@Service
public class WorkHandler {
    private static final Logger LOGGER = LoggerFactory.getLogger(WorkHandler.class);

    public void process(WorkUnit workUnit) {
        LOGGER.info("Handling work unit - id: {}, definition: {}", workUnit.getId(), workUnit.getDefinition());
    }
}


That is essentially it, Spring Integration provides an awesome facade to what would have been a fairly complicated code had it been attempted using straight Java and raw RabbitMQ libraries. Spring Cloud Stream makes this entire set-up even simpler and would be the topic of a future post.


I have posted this entire code at my github repo if you are interested in taking this for a spin.

Saturday, December 13, 2014

RabbitMQ - Processing messages serially using Spring integration Java DSL

If you ever have a need to process messages serially with RabbitMQ with a cluster of listeners processing the messages, the best way that I have seen is to use a "exclusive consumer" flag on a listener with 1 thread on each listener processing the messages.

Exclusive consumer flag ensures that only 1 consumer can read messages from the specific queue, and 1 thread on that consumer ensures that the messages are processed serially. There is a catch however, I will go over it later.

Let me demonstrate this behavior with a Spring Boot and Spring Integration based RabbitMQ message consumer.

First, this is the configuration for setting up a queue using Spring java configuration, note that since this is a Spring Boot application, it automatically creates a RabbitMQ connection factory when the Spring-amqp library is added to the list of dependencies:

@Configuration
@Configuration
public class RabbitConfig {

    @Autowired
    private ConnectionFactory rabbitConnectionFactory;

    @Bean
    public Queue sampleQueue() {
        return new Queue("sample.queue", true, false, false);
    }

}

Given this sample queue, a listener which gets the messages from this queue and processes them looks like this, the flow is written using the excellent Spring integration Java DSL library:

@Configuration
public class RabbitInboundFlow {
    private static final Logger logger = LoggerFactory.getLogger(RabbitInboundFlow.class);

    @Autowired
    private RabbitConfig rabbitConfig;

    @Autowired
    private ConnectionFactory connectionFactory;

    @Bean
    public SimpleMessageListenerContainer simpleMessageListenerContainer() {
        SimpleMessageListenerContainer listenerContainer = new SimpleMessageListenerContainer();
        listenerContainer.setConnectionFactory(this.connectionFactory);
        listenerContainer.setQueues(this.rabbitConfig.sampleQueue());
        listenerContainer.setConcurrentConsumers(1);
        listenerContainer.setExclusive(true);
        return listenerContainer;
    }

    @Bean
    public IntegrationFlow inboundFlow() {
        return IntegrationFlows.from(Amqp.inboundAdapter(simpleMessageListenerContainer()))
                .transform(Transformers.objectToString())
                .handle((m) -> {
                    logger.info("Processed  {}", m.getPayload());
                })
                .get();
    }

}


The flow is very concisely expressed in the inboundFlow method, a message payload from RabbitMQ is transformed from byte array to String and finally processed by simply logging the message to the logs

The important part of the flow is the listener configuration, note the flag which sets the consumer to be an exclusive consumer and within this consumer the number of threads processing is set to 1. Given this even if multiple instances of the application is started up only 1 of the listeners will be able to connect and process messages.


Now for the catch, consider a case where the processing of messages takes a while to complete and rolls back during processing of the message. If the instance of the application handling the message were to be stopped in the middle of processing such a message, then the behavior is a different instance will start handling the messages in the queue, when the stopped instance rolls back the message, the rolled back message is then delivered to the new exclusive consumer, thus getting a message out of order.

If you are interested in exploring this further, here is a github project to play with this feature: https://github.com/bijukunjummen/test-rabbit-exclusive

Saturday, July 19, 2014

Tailing a file - Spring Websocket sample

This is a sample that I have wanted to try for sometime - A Websocket application to tail the contents of a file.


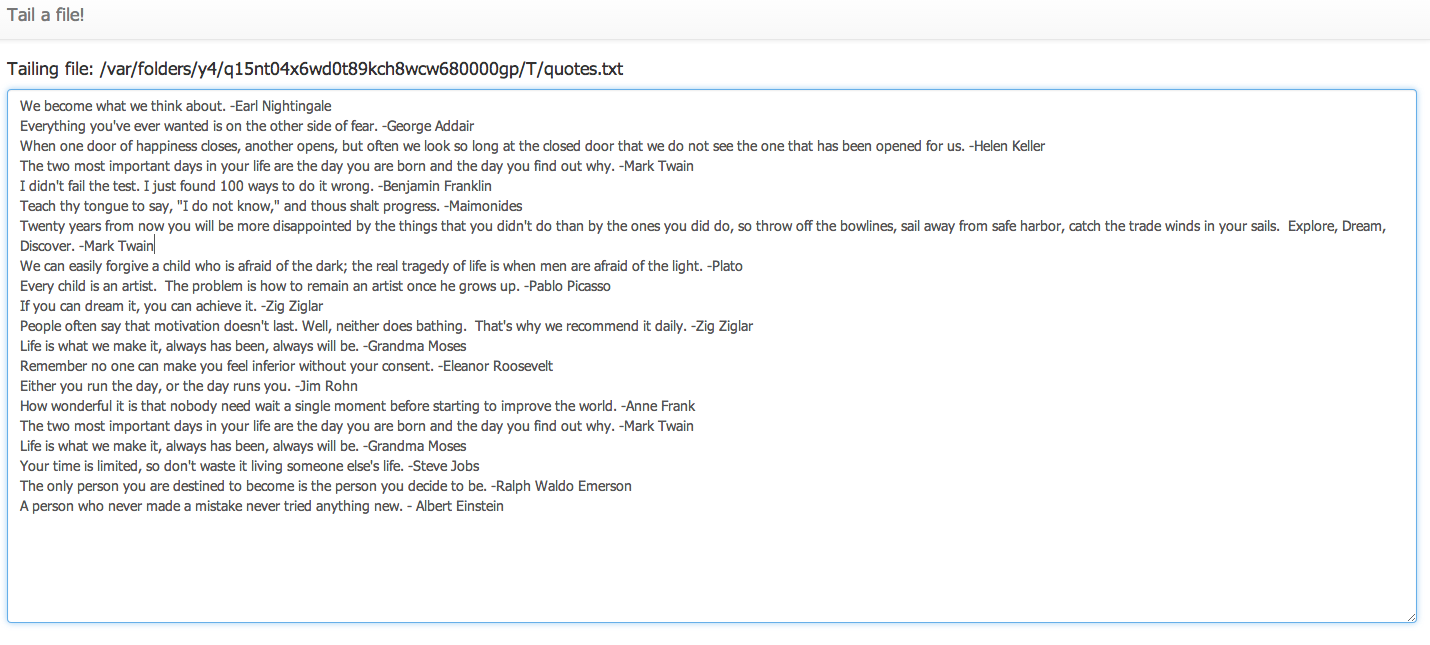
The following is the final view of the web-application:


There are a few parts to this application:

Generating a File to tail:


I chose to use a set of 100 random quotes as a source of the file content, every few seconds the application generates a quote and writes this quote to the temporary file. Spring Integration is used for wiring this flow for writing the contents to the file:

<int:channel id="toFileChannel"/>

<int:inbound-channel-adapter ref="randomQuoteGenerator" method="generateQuote" channel="toFileChannel">
	<int:poller fixed-delay="2000"/>
</int:inbound-channel-adapter>

<int:chain input-channel="toFileChannel">
	<int:header-enricher>
		<int:header name="file_name" value="quotes.txt"/>
	</int:header-enricher>
	<int-file:outbound-channel-adapter directory="#{systemProperties['java.io.tmpdir']}" mode="APPEND" />
</int:chain>

Just a quick note, Spring Integration flows can now also be written using a Java Based DSL, and this flow using Java is available here

Tailing the file and sending the content to a broker


The actual tailing of the file itself can be accomplished by OS specific tail command or by using a library like Apache Commons IO. Again in my case I decided to use Spring Integration which provides Inbound channel adapters to tail a file purely using configuration, this flow looks like this:
<int:channel id="toTopicChannel"/>

<int-file:tail-inbound-channel-adapter id="fileInboundChannelAdapter"
				channel="toTopicChannel"
				file="#{systemProperties['java.io.tmpdir']}/quotes.txt"
				delay="2000"
				file-delay="10000"/>

<int:outbound-channel-adapter ref="fileContentRecordingService" method="sendLinesToTopic" channel="toTopicChannel"/>
and its working Java equivalent

There is a reference to a "fileContentRecordingService" above, this is the component which will direct the lines of the file to a place where the Websocket client will subscribe to.

Websocket server configuration

Spring Websocket support makes it super simple to write a Websocket based application, in this instance the entire working configuration is the following:
@Configuration
@EnableWebSocketMessageBroker
public class WebSocketDefaultConfig extends AbstractWebSocketMessageBrokerConfigurer {

	@Override
	public void configureMessageBroker(MessageBrokerRegistry config) {
		//config.enableStompBrokerRelay("/topic/", "/queue/");
		config.enableSimpleBroker("/topic/", "/queue/");
		config.setApplicationDestinationPrefixes("/app");
	}

	@Override
	public void registerStompEndpoints(StompEndpointRegistry registry) {
		registry.addEndpoint("/tailfilesep").withSockJS();
	}
}

This may seem a little over the top, but what these few lines of configuration does is very powerful and the configuration can be better understood by going through the reference here. In brief, it sets up a websocket endpoint at '/tailfileep' uri, this endpoint is enhanced with SockJS support, Stomp is used as a sub-protocol, endpoints `/topic` and `/queue` is configured to a real broker like RabbitMQ or ActiveMQ but in this specific to an in-memory one.

Going back to the "fileContentRecordingService" once more, this component essentially takes the line of the file and sends it this in-memory broker, SimpMessagingTemplate facilitates this wiring:

public class FileContentRecordingService {
	@Autowired
	private SimpMessagingTemplate simpMessagingTemplate;

	public void sendLinesToTopic(String line) {
		this.simpMessagingTemplate.convertAndSend("/topic/tailfiles", line);
	}
}


Websocket UI configuration

The UI is angularjs based, the client controller is set up this way and internally uses the javascript libraries for sockjs and stomp support:

var tailFilesApp = angular.module("tailFilesApp",[]);

tailFilesApp.controller("TailFilesCtrl", function ($scope) {
    function init() {
        $scope.buffer = new CircularBuffer(20);
    }

    $scope.initSockets = function() {
        $scope.socket={};
        $scope.socket.client = new SockJS("/tailfilesep);
        $scope.socket.stomp = Stomp.over($scope.socket.client);
        $scope.socket.stomp.connect({}, function() {
            $scope.socket.stomp.subscribe("/topic/tailfiles", $scope.notify);
        });
        $scope.socket.client.onclose = $scope.reconnect;
    };

    $scope.notify = function(message) {
        $scope.$apply(function() {
            $scope.buffer.add(angular.fromJson(message.body));
        });
    };

    $scope.reconnect = function() {
        setTimeout($scope.initSockets, 10000);
    };

    init();
    $scope.initSockets();
});

The meat of this code is the "notify" function which the callback acting on the messages from the server, in this instance the new lines coming into the file and showing it in a textarea.


This wraps up the entire application to tail a file. A complete working sample without any external dependencies is available at this github location, instructions to start it up is also available at that location.

Conclusion

Spring Websockets provides a concise way to create Websocket based applications, this sample provides a good demonstration of this support. I had presented on this topic recently at my local JUG (IndyJUG) and a deck with the presentation is available here

Sunday, June 29, 2014

Spring Integration Java DSL sample - further simplification with Jms namespace factories

In an earlier blog entry I had touched on a fictitious rube goldberg flow for capitalizing a string through a complicated series of steps, the premise of the article was to introduce Spring Integration Java DSL as an alternative to defining integration flows through xml configuration files.

I learned a few new things after writing that blog entry, thanks to Artem Bilan and wanted to document those learnings here:


So, first my original sample, here I have the following flow(the one's in bold):

  1. Take in a message of this type - "hello from spring integ"
  2. Split it up into individual words(hello, from, spring, integ)
  3. Send each word to a ActiveMQ queue
  4. Pick up the word fragments from the queue and capitalize each word
  5. Place the response back into a response queue
  6. Pick up the message, re-sequence based on the original sequence of the words
  7. Aggregate back into a sentence("HELLO FROM SPRING INTEG") and
  8. Return the sentence back to the calling application.

EchoFlowOutbound.java:
@Bean
 public DirectChannel sequenceChannel() {
  return new DirectChannel();
 }

 @Bean
 public DirectChannel requestChannel() {
  return new DirectChannel();
 }

 @Bean
 public IntegrationFlow toOutboundQueueFlow() {
  return IntegrationFlows.from(requestChannel())
    .split(s -> s.applySequence(true).get().getT2().setDelimiters("\\s"))
    .handle(jmsOutboundGateway())
    .get();
 }

 @Bean
 public IntegrationFlow flowOnReturnOfMessage() {
  return IntegrationFlows.from(sequenceChannel())
    .resequence()
    .aggregate(aggregate ->
      aggregate.outputProcessor(g ->
        Joiner.on(" ").join(g.getMessages()
          .stream()
          .map(m -> (String) m.getPayload()).collect(toList())))
      , null)
    .get();
 }

@Bean
public JmsOutboundGateway jmsOutboundGateway() {
 JmsOutboundGateway jmsOutboundGateway = new JmsOutboundGateway();
 jmsOutboundGateway.setConnectionFactory(this.connectionFactory);
 jmsOutboundGateway.setRequestDestinationName("amq.outbound");
 jmsOutboundGateway.setReplyChannel(sequenceChannel());
 return jmsOutboundGateway;
}

It turns out, based on Artem Bilan's feedback, that a few things can be optimized here.

First notice how I have explicitly defined two direct channels, "requestChannel" for starting the flow that takes in the string message and the "sequenceChannel" to handle the message once it returns back from the jms message queue, these can actually be totally removed and the flow made a little more concise this way:

@Bean
public IntegrationFlow toOutboundQueueFlow() {
 return IntegrationFlows.from("requestChannel")
   .split(s -> s.applySequence(true).get().getT2().setDelimiters("\\s"))
   .handle(jmsOutboundGateway())
   .resequence()
   .aggregate(aggregate ->
     aggregate.outputProcessor(g ->
       Joiner.on(" ").join(g.getMessages()
         .stream()
         .map(m -> (String) m.getPayload()).collect(toList())))
     , null)
   .get();
}

@Bean
public JmsOutboundGateway jmsOutboundGateway() {
 JmsOutboundGateway jmsOutboundGateway = new JmsOutboundGateway();
 jmsOutboundGateway.setConnectionFactory(this.connectionFactory);
 jmsOutboundGateway.setRequestDestinationName("amq.outbound");
 return jmsOutboundGateway;
}


"requestChannel" is now being implicitly created just by declaring a name for it. The sequence channel is more interesting, quoting Artem Bilan -
do not specify outputChannel for AbstractReplyProducingMessageHandler and rely on DSL
, what it means is that here jmsOutboundGateway is a AbstractReplyProducingMessageHandler and its reply channel is implicitly derived by the DSL. Further, two methods which were earlier handling the flows for sending out the message to the queue and then continuing once the message is back, is collapsed into one. And IMHO it does read a little better because of this change.


The second good change and the topic of this article is the introduction of the Jms namespace factories, when I had written the previous blog article, DSL had support for defining the AMQ inbound/outbound adapter/gateway, now there is support for Jms based inbound/adapter adapter/gateways also, this simplifies the flow even further, the flow now looks like this:

@Bean
public IntegrationFlow toOutboundQueueFlow() {
 return IntegrationFlows.from("requestChannel")
   .split(s -> s.applySequence(true).get().getT2().setDelimiters("\\s"))
   .handle(Jms.outboundGateway(connectionFactory)
     .requestDestination("amq.outbound"))
   .resequence()
   .aggregate(aggregate ->
     aggregate.outputProcessor(g ->
       Joiner.on(" ").join(g.getMessages()
         .stream()
         .map(m -> (String) m.getPayload()).collect(toList())))
     , null)
   .get();
}

The inbound Jms part of the flow also simplifies to the following:

@Bean
public IntegrationFlow inboundFlow() {
 return IntegrationFlows.from(Jms.inboundGateway(connectionFactory)
   .destination("amq.outbound"))
   .transform((String s) -> s.toUpperCase())
   .get();
}


Thus, to conclude, Spring Integration Java DSL is an exciting new way to concisely configure Spring Integration flows. It is already very impressive in how it simplifies the readability of flows, the introduction of the Jms namespace factories takes it even further for JMS based flows.


I have updated my sample application with the changes that I have listed in this article - https://github.com/bijukunjummen/rg-si

Saturday, May 31, 2014

Spring Integration Java DSL sample

A new Java based DSL has now been introduced for Spring Integration which makes it possible to define the Spring Integration message flows using pure java based configuration instead of using the Spring XML based configuration.

I tried the DSL for a sample Integration flow that I have - I call it the Rube Goldberg flow, for it follows a convoluted path in trying to capitalize a string passed in as input. The flow looks like this and does some crazy things to perform a simple task:


  1. It takes in a message of this type - "hello from spring integ"
  2. splits it up into individual words(hello, from, spring, integ)
  3. sends each word to a ActiveMQ queue
  4. from the queue the word fragments are picked up by a enricher to capitalize each word
  5. placing the response back into a response queue
  6. It is picked up, resequenced based on the original sequence of the words
  7. aggregated back into a sentence("HELLO FROM SPRING INTEG") and
  8. returned back to the application.

To start with Spring Integration Java DSL, a simple Xml based configuration to capitalize a String would look like this:

<channel id="requestChannel"/>

<gateway id="echoGateway" service-interface="rube.simple.EchoGateway" default-request-channel="requestChannel" />

<transformer input-channel="requestChannel" expression="payload.toUpperCase()" />  

There is nothing much going on here, a messaging gateway takes in the message passed in from the application, capitalizes it in a transformer and this is returned back to the application.

Expressing this in Spring Integration Java DSL:

@Configuration
@EnableIntegration
@IntegrationComponentScan
@ComponentScan
public class EchoFlow {

 @Bean
 public IntegrationFlow simpleEchoFlow() {
  return IntegrationFlows.from("requestChannel")
    .transform((String s) -> s.toUpperCase())
    .get();
 }
}

@MessagingGateway
public interface EchoGateway {
 @Gateway(requestChannel = "requestChannel")
 String echo(String message);
}

Do note that @MessagingGateway annotation is not a part of Spring Integration Java DSL, it is an existing component in Spring Integration and serves the same purpose as the gateway component in XML based configuration. I like the fact that the transformation can be expressed using typesafe Java 8 lambda expressions rather than the Spring-EL expression. Note that the transformation expression could have coded in quite few alternate ways:

??.transform((String s) -> s.toUpperCase())

Or:

??.<String, String>transform(s -> s.toUpperCase())

Or using method references:
??.<String, String>transform(String::toUpperCase)


Moving onto the more complicated Rube Goldberg flow to accomplish the same task, again starting with XML based configuration. There are two configurations to express this flow:

rube-1.xml: This configuration takes care of steps 1, 2, 3, 6, 7, 8 :
  1. It takes in a message of this type - "hello from spring integ"
  2. splits it up into individual words(hello, from, spring, integ)
  3. sends each word to a ActiveMQ queue
  4. from the queue the word fragments are picked up by a enricher to capitalize each word
  5. placing the response back into a response queue
  6. It is picked up, resequenced based on the original sequence of the words
  7. aggregated back into a sentence("HELLO FROM SPRING INTEG") and
  8. returned back to the application.

<channel id="requestChannel"/>

<!--Step 1, 8-->
<gateway id="echoGateway" service-interface="rube.complicated.EchoGateway" default-request-channel="requestChannel"
   default-reply-timeout="5000"/>

<channel id="toJmsOutbound"/>

<!--Step 2-->
<splitter input-channel="requestChannel" output-channel="toJmsOutbound" expression="payload.split('\s')"
    apply-sequence="true"/>

<channel id="sequenceChannel"/>

<!--Step 3-->
<int-jms:outbound-gateway request-channel="toJmsOutbound" reply-channel="sequenceChannel"
        request-destination="amq.outbound" extract-request-payload="true"/>


<!--On the way back from the queue-->
<channel id="aggregateChannel"/>

<!--Step 6-->
<resequencer input-channel="sequenceChannel" output-channel="aggregateChannel" release-partial-sequences="false"/>

<!--Step 7-->
<aggregator input-channel="aggregateChannel"
   expression="T(com.google.common.base.Joiner).on(' ').join(![payload])"/>

and rube-2.xml for steps 4, 5:
  1. It takes in a message of this type - "hello from spring integ"
  2. splits it up into individual words(hello, from, spring, integ)
  3. sends each word to a ActiveMQ queue
  4. from the queue the word fragments are picked up by a enricher to capitalize each word
  5. placing the response back into a response queue
  6. It is picked up, resequenced based on the original sequence of the words
  7. aggregated back into a sentence("HELLO FROM SPRING INTEG") and
  8. returned back to the application.

<channel id="enhanceMessageChannel"/>

<int-jms:inbound-gateway request-channel="enhanceMessageChannel" request-destination="amq.outbound"/>

<transformer input-channel="enhanceMessageChannel" expression="(payload + '').toUpperCase()"/>


Now, expressing this Rube Goldberg flow using Spring Integration Java DSL, the configuration looks like this, again in two parts:

EchoFlowOutbound.java:
@Bean
 public DirectChannel sequenceChannel() {
  return new DirectChannel();
 }

 @Bean
 public DirectChannel requestChannel() {
  return new DirectChannel();
 }

 @Bean
 public IntegrationFlow toOutboundQueueFlow() {
  return IntegrationFlows.from(requestChannel())
    .split(s -> s.applySequence(true).get().getT2().setDelimiters("\\s"))
    .handle(jmsOutboundGateway())
    .get();
 }

 @Bean
 public IntegrationFlow flowOnReturnOfMessage() {
  return IntegrationFlows.from(sequenceChannel())
    .resequence()
    .aggregate(aggregate ->
      aggregate.outputProcessor(g ->
        Joiner.on(" ").join(g.getMessages()
          .stream()
          .map(m -> (String) m.getPayload()).collect(toList())))
      , null)
    .get();
 }

and EchoFlowInbound.java:
@Bean
public JmsMessageDrivenEndpoint jmsInbound() {
 return new JmsMessageDrivenEndpoint(listenerContainer(), messageListener());
}

@Bean
public IntegrationFlow inboundFlow() {
 return IntegrationFlows.from(enhanceMessageChannel())
   .transform((String s) -> s.toUpperCase())
   .get();
}

Again here the code is completely typesafe and is checked for any errors at development time rather than at runtime as with the XML based configuration. Again I like the fact that transformation, aggregation statements can be expressed concisely using Java 8 lamda expressions as opposed to Spring-EL expressions.

What I have not displayed here is some of the support code, to set up the activemq test infrastructure, this configuration continues to remain as xml and I have included this code in a sample github project.

All in all, I am very excited to see this new way of expressing the Spring Integration messaging flow using pure Java and I am looking forward to seeing its continuing evolution and may be even try and participate in its evolution in small ways.


Here is the entire working code in a github repo: https://github.com/bijukunjummen/rg-si


References and Acknowledgement:
  • Spring Integration Java DSL introduction blog article by Artem Bilan: https://spring.io/blog/2014/05/08/spring-integration-java-dsl-milestone-1-released
  • Spring Integration Java DSL website and wiki: https://github.com/spring-projects/spring-integration-extensions/wiki/Spring-Integration-Java-DSL-Reference. A lot of code has been shamelessly copied over from this wiki by me :-). Also, a big thanks to Artem for guidance on a question that I had
  • Webinar by Gary Russell on Spring Integration 4.0 in which Spring Integration Java DSL is covered in great detail.


Saturday, March 8, 2014

Websockets with Spring 4

I am throwing the entire kitchen sink into a small web application that I am developing as part of this post - Spring Boot, Spring Integration, RabbitMQ and finally the topic of the post, the Websocket support in Spring MVC with Spring 4.

Real-time quake listing application

The final app will list the earthquake occurrences around the world and is updated in realtime(if a minute can be considered realtime enough), along these lines:


Storing the Quake Information

The first part of the application is polling the data from USGS Earthquake hazards program every minute and storing it. I have chosen to store it directly into a RabbitMQ topic, which will be later used for the Websockets integration. Spring Integration is a great fit for the requirements of such a feature - using just configuration I can poll the USGS service providing a json feed of this information and write it to a RabbitMQ topic.

This is how this flow looks:


and a raw complete Spring integration flow for the same is the following, the only code missing here is the configuration for rabbitmq which is part of another configuration file:

<import resource="rabbit-context.xml"/>
 <int:inbound-channel-adapter channel="quakeinfotrigger" expression="''">
  <int:poller fixed-delay="60000"></int:poller>
 </int:inbound-channel-adapter>
 
 <int:channel id="quakeinfo"/>

 <int:channel id="quakeinfotrigger"></int:channel>

 <int-http:outbound-gateway id="quakerHttpGateway"
     request-channel="quakeinfotrigger"
     url="http://earthquake.usgs.gov/earthquakes/feed/geojson/all/hour"
     http-method="GET"
     expected-response-type="java.lang.String"
     charset="UTF-8"
     reply-channel="quakeinfo">
 </int-http:outbound-gateway>

 <int-amqp:outbound-channel-adapter amqp-template="amqpTemplate" channel="quakeinfo" />


So, now that I have a flow which collects the Earthquake information and stores it into a RabbitMQ topic called "amq.topic" and internally plugs in a routing key of "quakes.all" to each of the quake information message, the next step is to figure out how to show this information dynamically on the browser application.

Presenting the Quake information

Spring Framework 4.0+ makes it easy to develop the web part of the application with the Websocket based messaging support now built into the framework. Spring 4.0 uses the STOMP as higher level protocol over raw websockets - I have included references which provide much more clarity on the details of the Websocket support.

In essence, Spring will act as a intermediary for the browser to subscribe to the RabbitMQ quakes topic and display realtime information as new quake information flows in, this diagram from the references sums this up well:


Spring 4 Websockets support with an external broker requires the broker to support STOMP protocol, which is easy to enable with RabbitMQ. With the STOMP support in RabbitMQ in place, the Spring MVC configuration looks like this:

@Configuration
@EnableWebSocketMessageBroker
public class WebSocketConfig extends AbstractWebSocketMessageBrokerConfigurer {

 @Override
 public void configureMessageBroker(MessageBrokerRegistry config) {
  config.enableStompBrokerRelay("/topic/");
  config.setApplicationDestinationPrefixes("/app");
 }

 @Override
 public void registerStompEndpoints(StompEndpointRegistry registry) {
  registry.addEndpoint("/quakesep").withSockJS();
 }
}


  • "/topic" is being registered as a endpoint where Spring acts as a gateway to the RabbitMQ STOMP support
  • "/app" is the application prefix where Spring MVC will listen for browser requests encoded within the STOMP message frame, in this specific instance I am not getting any requests from the UI and so this endpoint is not really used
  • "/quakesep" is the websocket endpoint

This is all that is required on the server side!

Now for the client to subscribe to the message in the RabbitMQ topic, I have implemented it along the lines of the sample in one of the reference articles. The sample uses sockjs client, a javascript library for websocket emulation in browsers.

This is how the javascript code to connect to the websocket endpoint "/quakesep" and subscribing to the "/topic/quakes.all" endpoint looks like. This internally registers a temporary queue with RabbitMQ for this websocket session and maps a AMQP routing key of "quakes.all" to this temporary queue, in essence sending all the quake messages to the temporary queue for the session.

function connect() {
      var socket = new SockJS('/quakesep');
      stompClient = Stomp.over(socket);
      stompClient.connect({}, function(frame) {
          console.log('Connected: ' + frame);
          stompClient.subscribe('/topic/quakes.all', function(message){
              showQuakeInfo(message.body);
          });
      });
  }

the showQuakeInfo function above simply displays fresh quake information when available from RabbitMQ.


The entire sample was put together with Spring Boot, this has ensured that the dependencies declared in the pom file is kept to a bare minimum, the amount of configuration to start up the application is surprisingly small - essentially the WebSocketConfig code that I displayed above!

I have the code available here in github

References

1. Websocket architecture in Spring Framework
2. Webinar on building Websocket based applications using Spring Framework

Wednesday, February 12, 2014

Spring Integration Standalone application with Spring Boot

I had earlier blogged about a way to write a standalone Spring Integration application. Spring Boot makes creating this standalone application much simpler.

The simple flow was to poll the USGS service providing information about the earthquake activity around the world and to log this information. The flow described using Spring Integration is the following:

 <int:inbound-channel-adapter channel="quakeinfotrigger.channel" expression="''">
  <int:poller fixed-delay="60000"></int:poller>
 </int:inbound-channel-adapter>
 
 <int:channel id="quakeinfo.channel">
  <int:queue capacity="10"/>
 </int:channel>

 <int:channel id="quakeinfotrigger.channel"></int:channel> 

 <int-http:outbound-gateway id="quakerHttpGateway"
     request-channel="quakeinfotrigger.channel"
     url="http://earthquake.usgs.gov/earthquakes/feed/geojson/all/hour"
     http-method="GET"
     expected-response-type="java.lang.String"
     charset="UTF-8"
     reply-timeout="5000"
     reply-channel="quakeinfo.channel">     
 </int-http:outbound-gateway>
 
 <int:logging-channel-adapter id="messageLogger" log-full-message="true" channel="quakeinfo.channel" level="ERROR">
  <int:poller fixed-delay="5000" ></int:poller>
 </int:logging-channel-adapter>


Pre-boot, the way to write a main program to start this flow would have been along these lines:

package standalone;
import org.springframework.context.support.ClassPathXmlApplicationContext;
 
public class Main {
 public static void main(String[] args) {
  ClassPathXmlApplicationContext applicationContext = new ClassPathXmlApplicationContext("classpath:/httpgateway.xml");
  applicationContext.registerShutdownHook();
 }
}

With Spring-boot however the configuration is IMHO simpler:

package standalone;

import org.springframework.boot.SpringApplication;
import org.springframework.context.annotation.Configuration;
import org.springframework.context.annotation.ImportResource;

@Configuration
@ImportResource("classpath:httpgateway.xml")
public class Main {

 public static void main(String[] args) {
  SpringApplication.run(Main.class, args);
 }
}

And with this change, along with the spring-boot-maven-plugin plugin, the application can be started up this way:

mvn spring-boot:run

I had a very small hand in fixing this start-up script by contributing a change to the plugin to start-up the application without needing to manually run the compilation step first.


Even better, the spring-boot-maven-plugin provides tools to package the entire application into a executable jar which gets triggered during the package phase, along the lines of shade plugin:

mvn package 

and the executable jar run this way:

java -jar target/si-standalone-sample-1.0-SNAPSHOT.jar

An updated project with this change is available at this github location - https://github.com/bijukunjummen/si-standalone-sample


Thursday, January 9, 2014

Spring Integration Publisher

Consider a hypothetical requirement - You have a service class in your application and you want to capture some information around the calls to this service:

@Service
public class SampleBean {
 private static final Logger logger = LoggerFactory.getLogger(SampleBean.class);

 public Response call(Request request) {
  logger.info("SampleBean.call invoked");
  return new Response(true);
 }
}

AOP is a great fit for such a requirement, it allows the information around a method call(a pointcut) to be cleanly captured and some processing(an advice) to be done with this information:

public class AuditAspect {
 private static final Logger logger = LoggerFactory.getLogger(AuditAspect.class);
 @Pointcut("execution( * core.SampleBean.call(model.Request)) && args(r)")
 public void beanCalls(Request r){}

 @Around("beanCalls(r)")
 public Object auditCalls(ProceedingJoinPoint pjp, Request r) {
     logger.info("Capturing request: " + r);
  try{
   Object response = pjp.proceed();
   logger.info("Capturing response: " + response);
   return response;
  }catch(Throwable e) {
   throw new RuntimeException(e);
  }
 }
}


This appears to be good enough. Now what if I wanted to return the response back to the client immediately but continue to process the context of the method call - well we can place the logic of Advice in a separate thread using a ThreadPool. Let me add another layer of complexity now, what if we wanted to absolutely ensure that context is not lost - a good way to do this would be to keep the context of the method call outside the JVM, typically messaging providers like RabbitMQ and ActiveMQ will fit in very well.


Considering these additional requirements, a simpler solution especially with messaging scenarios coming into play will be to use Spring Integration. Let us start by defining a new Spring Integration application context:

<?xml version="1.0" encoding="UTF-8"?>
<beans:beans xmlns="http://www.springframework.org/schema/integration"
    xmlns:beans="http://www.springframework.org/schema/beans"
 xmlns:xsi="http://www.w3.org/2001/XMLSchema-instance"
 xsi:schemaLocation="http://www.springframework.org/schema/integration http://www.springframework.org/schema/integration/spring-integration.xsd
  http://www.springframework.org/schema/beans http://www.springframework.org/schema/beans/spring-beans.xsd">

    <annotation-config/>

    <channel id="tobeprocessedlater"/>

    <logging-channel-adapter channel="tobeprocessedlater" log-full-message="true"/>

</beans:beans>

It just has the definition of a channel, and an outbound adapter which reads from this channel and logs the full message. To capture the context of the call to the SampleBean a Publisher annotation can be added to the relevant methods of SampleBean which will direct "stuff" to the channel which is added to the annotation.

@Service
public class SampleBean {
 private static final Logger logger = LoggerFactory.getLogger(SampleBean.class);

 @Publisher(channel = "tobeprocessedlater")
 public Response call(@Header("request") Request request) {
  logger.info("SampleBean.call invoked");
  return new Response(true);
 }
}

what "stuff" is sent to this "tobeprocessedlater" channel is specified through additional annotations - by default the return value from the method is sent to the channel, additionally I have tagged the request also with the @Header annotation, this will make the request to be sent in as a header to the response message. Just for completeness, the integration context has a <annotation-config/> tag, this tag registers the relevant components that look for @Publisher annotation and weave in the additional action to be performed if it finds one.

If this code is executed now, the output will be along these lines:

                       core.SampleBean - SampleBean.call invoked
o.s.integration.handler.LoggingHandler - [Payload=Response{success=true}][Headers={request=RequestType1{attr='null'}, id=52997b10-dc8e-e0eb-a82a-88c1df68fca5, timestamp=1389268390212}]

Now, to layer in the first requirement, to handle the advice(in this case the logging) in a separate thread of execution:

This can be done with just a configuration change! - instead of publishing the message to a direct channel, publish it to a channel type that can buffer messages or use an executor to dispatch messages, I have opted to use an executor channel in this example:

    <channel id="tobeprocessedlater">
        <dispatcher task-executor="taskExecutor"/>
    </channel>

Now to add the requirement to make the async message processing a little more reliable by publishing it to an external Messaging provider(and processing the messages later), let me demonstrate this by publishing the messages to RabbitMQ, the code change again is pure configuration and nothing in the code changes!:

    <channel id="tobeprocessedlater"/>

    <int-amqp:outbound-channel-adapter amqp-template="amqpTemplate" channel="tobeprocessedlater"  />

The messaging sink could have been anything - a database, a file system, ActiveMQ, and the change that would have been required is pure configuration.

Wednesday, May 22, 2013

Spring Integration File Polling and Tests

I recently implemented a small project where we had to poll a folder for new files and then trigger a service flow on the contents of the file.

Spring Integration is a great fit for this requirement as it comes with a channel adapter that can scan a folder for new files and then take the file through a messaging flow.

The objective of this specific article is to go over how a file poller flow can be tested.

To start with consider a simple flow implemented using the following Spring integration configuration:

<beans:beans xmlns="http://www.springframework.org/schema/integration"
    .....
 <channel id="fileChannel"></channel>
 <channel id="processedFileChannel"></channel>

 <int-file:inbound-channel-adapter directory="${inbound.folder}" channel="fileChannel" filename-pattern="*.*">
  <poller fixed-delay="5000"></poller>
 </int-file:inbound-channel-adapter>
 
 <service-activator input-channel="fileChannel" ref="fileHandlerService" method="handle" output-channel="processedFileChannel">
 </service-activator>
 
 <logging-channel-adapter id="loggingChannelAdapter" channel="processedFileChannel"></logging-channel-adapter>
 
 <beans:bean name="fileHandlerService" class="files.RealFileHandlingService"/>
 <context:property-placeholder properties-ref="localProps" local-override="true"/>
 
 <util:properties id="localProps">
 </util:properties>
</beans:beans>

This is better represented in a diagram:


Simple Testing of the flow

Now to test this flow, my first approach was to put a sample file into a folder in the classpath, dynamically discover and use this folder name during test and to write the final message into a test channel and assert on the messages coming into this channel. This is how the test configuration which composes the original Spring config looks like:

<beans:beans xmlns="http://www.springframework.org/schema/integration"
    ....
 <beans:import resource="si-fileprocessing.xml"/>
 <util:properties id="localProps">
  <beans:prop key="inbound.folder">#{new java.io.File(T(java.io.File).getResource("/samplefolder/samplefile.txt").toURI()).parent}</beans:prop>
 </util:properties>
 <channel id="testChannel">
  <queue/>
 </channel>
 
 <bridge id="loggingChannelAdapter" input-channel="processedFileChannel" output-channel="testChannel"></bridge>
</beans:beans>

and the test looks like this:
@Autowired @Qualifier("testChannel") PollableChannel testChannel;

@Test
public void testService() throws Exception{
 Message<?> message = this.testChannel.receive(5000);
 assertThat((String)message.getPayload(), equalTo("Test Sample file content"));
}

This works neatly, especially note that the path can be entirely provided in the configuration using a Spring-EL expression :
#{new java.io.File(T(java.io.File).getResource("/samplefolder/samplefile.txt").toURI()).parent}

Mocking out the Service

Now, to take it a little further, what if I want to mock the service that is processing the file (files.RealFileHandlingService). There is an issue here which will become clear once the mock is implemented. An approach to injecting in a mock service is to use Mockito and a helper function that it provides to create a mock this way using Spring configuration file:

<beans:bean name="fileHandlerService" factory-method="mock" class="org.mockito.Mockito">
 <beans:constructor-arg value="files.FileHandlingService"></beans:constructor-arg>
</beans:bean>

Once this mock bean is created, the behavior for the mock can be added in the @Before annotated method of junit, this way:

@Before
public void setUp() {
 when(fileHandlingServiceMock.handle((File)(anyObject()))).thenReturn("Completed File Processing");
}

@Test
public void testService() throws Exception{
 Message<?> message = this.testChannel.receive(5000);
 assertThat((String)message.getPayload(), equalTo("Completed File Processing"));
}

If the test is repeated now, surprisingly it will fail and the reason is - Spring application context is fully initialized by the time the call comes to the @Before method of Junit and the poller scanning the file coming into the folder gets triggered BEFORE the mock behavior is added on and so without the correct behavior of the mock service the test fails.

I am sure there are other fixes, but the fix that worked for me was to essentially control which folder is scanned and at what point the file is placed in the folder for the flow to be triggered. This is heavily based on some tests that I have seen in Spring Integration project itself. The trick is to create a temporary folder first using Spring config and set that folder as the polling folder:
<beans:bean id="temp" class="org.junit.rules.TemporaryFolder"
   init-method="create" destroy-method="delete"/>

<beans:bean id="inputDirectory" class="java.io.File">
 <beans:constructor-arg value="#{temp.newFolder('sitest').path}"/>
</beans:bean> 

<util:properties id="localProps">
 <beans:prop key="inbound.folder">#{inputDirectory.getAbsolutePath()}</beans:prop>
</util:properties>

Now place the file in the temporary folder only during the test run, this way @Before annotated method gets a chance to add behavior to the mock and the mocked behavior can be cleanly asserted:

@RunWith(SpringJUnit4ClassRunner.class)
@ContextConfiguration("si-test.xml")
public class FileHandlingFlowTest {
 @Autowired @Qualifier("testChannel") private PollableChannel testChannel;
 @Autowired private FileHandlingService fileHandlingServiceMock;
 @Autowired @Qualifier("inputDirectory") private File inputDirectory;
 
 @Before
 public void setUp() {
  when(fileHandlingServiceMock.handle((File)(anyObject()))).thenReturn("Completed File Processing");
 }
 
 @Test
 public void testService() throws Exception{
  Files.copy(new File(this.getClass().getResource("/samplefolder/samplefile.txt").toURI()), new File(inputDirectory, "samplefile.txt"));
  Message<?> message = this.testChannel.receive(5000);
  assertThat((String)message.getPayload(), equalTo("Completed File Processing"));
 }
}

Friday, November 16, 2012

Spring Integration Standalone application

Creating a standalone Spring application and by extension a Spring Integration application is very easy. As long as a non-daemon thread is active, the main thread does not terminate, so if the Spring Integration application has some task related or polling related threads active the main task will be alive.

Consider the Spring Integration application that I had outlined in my previous Blog entry:

<?xml version="1.0" encoding="UTF-8"?>
<beans xmlns="http://www.springframework.org/schema/beans"
 xmlns:xsi="http://www.w3.org/2001/XMLSchema-instance"
 xmlns:int="http://www.springframework.org/schema/integration"
 xmlns:int-http="http://www.springframework.org/schema/integration/http"
 xsi:schemaLocation="http://www.springframework.org/schema/integration http://www.springframework.org/schema/integration/spring-integration.xsd
  http://www.springframework.org/schema/beans http://www.springframework.org/schema/beans/spring-beans.xsd
  http://www.springframework.org/schema/integration/http http://www.springframework.org/schema/integration/http/spring-integration-http.xsd">

 <int:inbound-channel-adapter channel="quakeinfotrigger.channel" expression="''">
  <int:poller fixed-delay="60000"></int:poller>
 </int:inbound-channel-adapter>
 
 <int:channel id="quakeinfo.channel">
  <int:queue capacity="10"/>
 </int:channel>

 <int:channel id="quakeinfotrigger.channel"></int:channel> 

 <int-http:outbound-gateway id="quakerHttpGateway"
     request-channel="quakeinfotrigger.channel"
     url="http://earthquake.usgs.gov/earthquakes/feed/geojson/all/hour"
     http-method="GET"
     expected-response-type="java.lang.String"
     charset="UTF-8"
     reply-timeout="5000"
     reply-channel="quakeinfo.channel">     
 </int-http:outbound-gateway>
 
 <int:logging-channel-adapter id="messageLogger" log-full-message="true" channel="quakeinfo.channel" level="ERROR">
  <int:poller fixed-delay="5000" ></int:poller>
 </int:logging-channel-adapter>

</beans>

The above Spring Integration flow polls a http endpoint every minute and prints the contents to System out. Now to write a standalone application out of this, is as simple as the following:
package standalone;

import org.springframework.context.support.ClassPathXmlApplicationContext;

public class Main {

 public static void main(String[] args) {
  ClassPathXmlApplicationContext applicationContext = new ClassPathXmlApplicationContext("classpath:/httpgateway.xml");
  applicationContext.registerShutdownHook();
 }
}

Initialize the ApplicationContext, and register a shutdown hook for orderly shutdown of the context, that's it! Since the sample flow above spawns threads to poll an http endpoint the application stays active with just the above code.

This sample is available at the following github repo:
https://github.com/bijukunjummen/si-standalone-sample

Thursday, November 15, 2012

Polling an http end point using Spring Integration

It is a little non-intuitive if you want to write a flow with Spring Integration which polls an http end point and gathers some content from the http end point for further processing.

Spring Integration provides a couple of ways for integrating with a HTTP endpoint -

1. Http Outbound adapter - to send the messages to an http endpoint
2. Http Outbound gateway - to send messages to an http endpoint and to collect the response as a message

My first instinct to poll the http endpoint was to use a Http Inbound channel adapter, the wrong assumption that I made was that the adapter will be responsible for getting the information from an endpoint - what Http Inbound Gateway actually does is to expose an Http endpoint and wait for requests to come in! , this is why I started by saying that it was a little non-intuitive to me that to poll a URL and collect content from it I will actually have to use a Http Outbound gateway

With this clarified, consider an example where I want to poll the USGS Earth Quake information feed available at this url - http://earthquake.usgs.gov/earthquakes/feed/geojson/all/hour

This is how my sample http Outbound component looks like:

<int:channel id="quakeinfo.channel">
  <int:queue capacity="10"/>
 </int:channel>

 <int:channel id="quakeinfotrigger.channel"></int:channel> 

 <int-http:outbound-gateway id="quakerHttpGateway"
     request-channel="quakeinfotrigger.channel"
     url="http://earthquake.usgs.gov/earthquakes/feed/geojson/all/hour"
     http-method="GET"
     expected-response-type="java.lang.String"
     charset="UTF-8"
     reply-timeout="5000"
     reply-channel="quakeinfo.channel">     
 </int-http:outbound-gateway>

Here the http outbound gateway waits for messages to come into the quakeinfotrigger channel, sends out a GET request to the "http://earthquake.usgs.gov/earthquakes/feed/geojson/all/hour" url, and places the response json string into the "quakeinfo.channel" channel

Testing this is easy:

@RunWith(SpringJUnit4ClassRunner.class)
@ContextConfiguration("httpgateway.xml")
public class TestHttpOutboundGateway {
 
 @Autowired @Qualifier("quakeinfo.channel") PollableChannel quakeinfoChannel;
 @Autowired @Qualifier("quakeinfotrigger.channel") MessageChannel quakeinfoTriggerChannel;

 @Test
 public void testHttpOutbound() {
  quakeinfoTriggerChannel.send(MessageBuilder.withPayload("").build());
  Message<?> message = quakeinfoChannel.receive();
  assertThat(message.getPayload(), is(notNullValue()));
 }

}

What I am doing here is getting a reference to the channel which triggers the outbound gateway to send a message to the http endpoint and reference to another channel where the response from the http endpoint is placed. I am triggering the test flow by placing a dummy empty message in the trigger channel and then waiting on message to be available on the response channel and asserting on the contents.

This works cleanly, however my original intent was to write a poller which would trigger polling of this endpoint once every minute or so, to do this what I have to do is essentially place a dummy message into the "quakeinfotrigger.channel" channel every minute and this is easily accomplished using a Spring Integration "poller" and a bit of Spring Expression language:

<int:inbound-channel-adapter channel="quakeinfotrigger.channel" expression="''">
 <int:poller fixed-delay="60000"></int:poller>
</int:inbound-channel-adapter>

Here I have a Spring inbound-channel-adapter triggered attached to a poller , with the poller triggering an empty message every minute.

All this looks a little convoluted but works nicely - here is a gist with a working code

References:

1. Based on a question I had posed at the Spring forum http://forum.springsource.org/showthread.php?130711-Need-help-with-polling-to-a-json-based-HTTP-service


Friday, July 27, 2012

Spring Integration - Session 2 - More Hello Worlds

This is a follow up to Spring Integration Session 1

The first session was a simple Hello World application using Spring Integration. I want to take it a little further by considering a few more scenarios around it

So the first change to the Hello World application is to add in a Gateway component. To quickly revisit the earlier test program:

package org.bk.si.helloworld.hw1;

import org.junit.Test;
import org.junit.runner.RunWith;
import org.springframework.beans.factory.annotation.Autowired;
import org.springframework.beans.factory.annotation.Qualifier;
import org.springframework.integration.Message;
import org.springframework.integration.MessageChannel;
import org.springframework.integration.message.GenericMessage;
import org.springframework.test.context.ContextConfiguration;
import org.springframework.test.context.junit4.SpringJUnit4ClassRunner;

@RunWith(SpringJUnit4ClassRunner.class)
@ContextConfiguration("helloworld.xml")
public class HelloWorldTest {
 
 @Autowired
 @Qualifier("messageChannel")
 MessageChannel messageChannel;

 @Test
 public void testHelloWorld() {
  Message<String> helloWorld = new GenericMessage<String>("Hello World");
  messageChannel.send(helloWorld);
 }
}


In the lines highlighted above, the test is dependent on a Spring Integration specific component - a Message Channel, and in the test an explicit Spring Integration Message is constructed and sent to the Message Channel. There is a little too much coupling with Spring Integration which is the Messaging System here.

A Gateway component provides a facade to the messaging system, shielding the user application(in this case the Unit test) from the details of Messaging System - the messaging channel, Message and explicit sending of a message.

An example first to illustrate how the test will look with a Gateway component in place:

package org.bk.si.helloworld.hw2;

import org.junit.Test;
import org.junit.runner.RunWith;
import org.springframework.beans.factory.annotation.Autowired;
import org.springframework.test.context.ContextConfiguration;
import org.springframework.test.context.junit4.SpringJUnit4ClassRunner;


@RunWith(SpringJUnit4ClassRunner.class)
@ContextConfiguration("helloworld.xml")
public class HelloWorldTest {

 @Autowired Greeter greeter;

 @Test
 public void testHelloWorld(){
   this.greeter.sendGreeting("Hello World");
 }
}


The Greeter interface above is the Gateway component. Now that this component has been introduced there is no dependency to Spring Integration in this test - there is no mention of Message, Message Channel in the code at all.

The Gateway component is also a very simple Java Interface defined this way:

package org.bk.si.helloworld.hw2;

public interface Greeter {
 public void sendGreeting(String message);
}

So now the question is who takes care of creating the messaging and sending the message to a message channel - it is through Spring Integration configuration:

<?xml version="1.0" encoding="UTF-8"?>
<beans xmlns="http://www.springframework.org/schema/beans"
 xmlns:xsi="http://www.w3.org/2001/XMLSchema-instance"
 xmlns:int="http://www.springframework.org/schema/integration"
 xmlns:int-stream="http://www.springframework.org/schema/integration/stream"
 xsi:schemaLocation="http://www.springframework.org/schema/integration http://www.springframework.org/schema/integration/spring-integration-2.1.xsd
  http://www.springframework.org/schema/integration/stream http://www.springframework.org/schema/integration/stream/spring-integration-stream-2.1.xsd
  http://www.springframework.org/schema/beans http://www.springframework.org/schema/beans/spring-beans.xsd">


 <int:channel id="messagesChannel"></int:channel>
 
 <int:gateway service-interface="org.bk.si.helloworld.hw2.Greeter" default-request-channel="messagesChannel"></int:gateway>
 
 <int-stream:stdout-channel-adapter channel="messagesChannel" append-newline="true"/>
 

</beans>


The highlighted line above creates the Gateway component out of the Greeter interface, a proxy is created in the background which handles everything that was being done explicitly earlier - creating the messaging and sending the message to the message channel.


Now to add a little more complexity to the Hello World sample:

Consider the following test:
package org.bk.si.helloworld.hw3;

import org.junit.Test;
import org.junit.runner.RunWith;
import org.springframework.beans.factory.annotation.Autowired;
import org.springframework.test.context.ContextConfiguration;
import org.springframework.test.context.junit4.SpringJUnit4ClassRunner;


@RunWith(SpringJUnit4ClassRunner.class)
@ContextConfiguration("helloworld.xml")
public class HelloWorldTest {

 @Autowired Greeter greeter;

 @Test
 public void testHelloWorld(){
  System.out.println("Started..");
  long start = System.nanoTime();
  for (int i=0;i<10;i++){
   this.greeter.sendMessage(String.format("Hello World %d",i));
  }
  System.out.println("Completed..");
  System.out.println(String.format("Took %f ms", (System.nanoTime()-start)/10e6));
 }
}

This is same as the previous unit test, except that in this case the "Hello World" message is being dispatched 10 times. The supporting Spring Integration configuration file is the following:

<?xml version="1.0" encoding="UTF-8"?>
<beans xmlns="http://www.springframework.org/schema/beans"
 xmlns:xsi="http://www.w3.org/2001/XMLSchema-instance"
 xmlns:int="http://www.springframework.org/schema/integration"
 xmlns:int-stream="http://www.springframework.org/schema/integration/stream"
 xsi:schemaLocation="http://www.springframework.org/schema/integration http://www.springframework.org/schema/integration/spring-integration-2.1.xsd
  http://www.springframework.org/schema/integration/stream http://www.springframework.org/schema/integration/stream/spring-integration-stream-2.1.xsd
  http://www.springframework.org/schema/beans http://www.springframework.org/schema/beans/spring-beans.xsd">


 <int:publish-subscribe-channel id="messagesChannel"/>
 <int:gateway service-interface="org.bk.si.helloworld.hw3.Greeter" default-request-channel="messagesChannel"></int:gateway>
 
 
 <int-stream:stderr-channel-adapter channel="messagesChannel" append-newline="true"/>
 <int-stream:stdout-channel-adapter channel="messagesChannel" append-newline="true"/>
 
</beans>


If I run this test now, the output is along these lines:


The lines in red are being printed to syserr and in black are being printed to sysout.

So the question is why are some of them going to sysout and some of them going to syserr and why not to both?

The answer is because of the type of channel - "messagesChannel" above is a "Direct Channel" in the Spring Integration terminology and has "Point to point" semantics. The point-to-point semantics basically means that when a message comes into the Messaging Channel, only 1 receiver gets the message - so in this case either the standard out adapter OR the standard err adapter ends up printing the message that is coming into the message channel.

So to print to both adapters, the fix is to simply change the semantics of the channel - instead of a Point to Point channel, make it a Publish-Subscribe channel, which is a channel broadcasting out a message to multiple receivers. The change is very simple using Spring Integration:

<?xml version="1.0" encoding="UTF-8"?>
<beans xmlns="http://www.springframework.org/schema/beans"
 xmlns:xsi="http://www.w3.org/2001/XMLSchema-instance"
 xmlns:int="http://www.springframework.org/schema/integration"
 xmlns:int-stream="http://www.springframework.org/schema/integration/stream"
 xsi:schemaLocation="http://www.springframework.org/schema/integration http://www.springframework.org/schema/integration/spring-integration-2.1.xsd
  http://www.springframework.org/schema/integration/stream http://www.springframework.org/schema/integration/stream/spring-integration-stream-2.1.xsd
  http://www.springframework.org/schema/beans http://www.springframework.org/schema/beans/spring-beans.xsd">


 <int:publish-subscribe-channel id="messagesChannel"/>
 <int:gateway service-interface="org.bk.si.helloworld.hw3.Greeter" default-request-channel="messagesChannel"></int:gateway>
 
 
 <int-stream:stderr-channel-adapter channel="messagesChannel" append-newline="true"/>
 <int-stream:stdout-channel-adapter channel="messagesChannel" append-newline="true"/>
 
</beans>


The output now will be the messages being printed to BOTH sysout and syserr

So this completes the introduction to a Gateway component, Direct Channel and Publish Subscribe channel.