Showing posts with label gcp. Show all posts

Thursday, December 29, 2022

Bigtable Pagination in Java

 Consider a set of rows stored in Bigtable table called “people”:


My objective is to be able to paginate a few records at a time, say with each page containing 4 records:


Page 1:


Page 2:


Page 3:


High-Level Approach

A high level approach to doing this is to introduce two parameters:

  • Offset — the point from which to retrieve the records.
  • Limit — the number of records to retrieve per page
Limit in all cases is 4 in my example. Offset provides some way to indicate where to retrieve the next set of records from. Bigtable orders the record lexicographically using the key of each row, so one way to indicate offset is by using the key of the last record on a page. Given this, and using a marker offset of empty string for the first page, offset and record for each page looks like this:

Page 1 — offset: “”, limit: 4


Page 2 — offset: “person#id-004”, limit: 4

Page 3 — offset: “person#id-008”, limit: 4


The challenge now is in figuring out how to retrieve a set of records given a prefix, an offset, and a limit.

Retrieving records given a prefix, offset, limit

Bigtable java client provides a “readRows” api, that takes in a Query and returns a list of rows.

import com.google.cloud.bigtable.data.v2.BigtableDataClient
import com.google.cloud.bigtable.data.v2.models.Query
import com.google.cloud.bigtable.data.v2.models.Row

val rows: List<Row> = bigtableDataClient.readRows(query).toList()

Now, Query has a variant that takes in a prefix and returns rows matching the prefix:

import com.google.cloud.bigtable.data.v2.BigtableDataClient
import com.google.cloud.bigtable.data.v2.models.Query
import com.google.cloud.bigtable.data.v2.models.Row

val query: Query = Query.create("people").limit(limit).prefix(keyPrefix)
val rows: List<Row> = bigtableDataClient.readRows(query).toList()        

This works for the first page, however, for subsequent pages, the offset needs to be accounted for.

A way to get this to work is to use a Query that takes in a range:

import com.google.cloud.bigtable.data.v2.BigtableDataClient
import com.google.cloud.bigtable.data.v2.models.Query
import com.google.cloud.bigtable.data.v2.models.Row
import com.google.cloud.bigtable.data.v2.models.Range

val range: Range.ByteStringRange = 
    Range.ByteStringRange
        .unbounded()
        .startOpen(offset)
        .endOpen(end)

val query: Query = Query.create("people")
                    .limit(limit)
                    .range(range)

The problem with this is to figure out what the end of the range should be. This is where a neat utility that the Bigtable Java library provides comes in. This utility given a prefix of “abc”, calculates the end of the range to be “abd”

import com.google.cloud.bigtable.data.v2.models.Range

val range = Range.ByteStringRange.prefix("abc")
Putting this all together, a query that fetches paginated rows at an offset looks like this:

val query: Query =
    Query.create("people")
        .limit(limit)
        .range(Range.ByteStringRange
            .prefix(keyPrefix)
            .startOpen(offset))

val rows: List<Row> = bigtableDataClient.readRows(query).toList()

When returning the result, the final key needs to be returned so that it can be used as the offset for the next page, this can be done in Kotlin by having the following type:

data class Page<T>(val data: List<T>, val nextOffset: String)

Conclusion

I have a full example available here — this pulls in the right library dependencies and has all the mechanics of pagination wrapped into a working sample.

Cloud Run Health Checks — Spring Boot App

 Cloud Run services now can configure startup and liveness probes for a running container.


The startup probe is for determining when a container has cleanly started up and is ready to take traffic. A Liveness probe kicks off once a container has started up, to ensure that the container remains functional — Cloud Run would restart a container if the liveness probe fails.


Implementing Health Check Probes

A Cloud Run service can be described using a manifest file and a sample manifest looks like this:


apiVersion: serving.knative.dev/v1
kind: Service
metadata:
  annotations:
    run.googleapis.com/ingress: all
  name: health-cloudrun-sample
spec:
  template:
    metadata:
      annotations:
        autoscaling.knative.dev/maxScale: '5'
        autoscaling.knative.dev/minScale: '1'
    spec:
      containers:
        image: us-west1-docker.pkg.dev/sample-proj/sample-repo/health-app-image:latest

        startupProbe:
          httpGet:
            httpHeaders:
            - name: HOST
              value: localhost:8080
            path: /actuator/health/readiness
          initialDelaySeconds: 15
          timeoutSeconds: 1
          failureThreshold: 5
          periodSeconds: 10

        livenessProbe:
          httpGet:
            httpHeaders:
            - name: HOST
              value: localhost:8080
            path: /actuator/health/liveness
          timeoutSeconds: 1
          periodSeconds: 10
          failureThreshold: 5

        ports:
        - containerPort: 8080
          name: http1
        resources:
          limits:
            cpu: 1000m
            memory: 512Mi


This manifest can then be used for deployment to Cloud Run the following way:

gcloud run services replace sample-manifest.yaml --region=us-west1

Now, coming back to the manifest, the startup probe is defined this way:

startupProbe:
  httpGet:
    httpHeaders:
    - name: HOST
      value: localhost:8080
    path: /actuator/health/readiness
  initialDelaySeconds: 15
  timeoutSeconds: 1
  failureThreshold: 5
  periodSeconds: 10

It is set to make an http request to a /actuator/health/readiness path. There is an explicit HOST header also provided, this is temporary though as Cloud Run health checks currently have a bug where this header is missing from the health check requests.

The rest of the properties indicate the following:

  • initialDelaySeconds — delay for performing the first probe
  • timeoutSeconds — timeout for the health check request
  • failureThreshold — number of tries before the container is marked as not ready
  • periodSeconds — the delay between probes

Once the startup probe succeeds, Cloud Run would mark the container as being available to handle the traffic.

A livenessProbe follows a similar pattern:

livenessProbe:
  httpGet:
    httpHeaders:
    - name: HOST
      value: localhost:8080
    path: /actuator/health/liveness
  timeoutSeconds: 1
  periodSeconds: 10
  failureThreshold: 5

From a Spring Boot application perspective, all that needs to be done is to enable the Health check endpoints as described here


Conclusion

Start-Up probe ensures that a container receives traffic only when ready and a Liveness probe ensures that the container remains healthy during its operation, else gets restarted by the infrastructure. These health probes are a welcome addition to the already excellent feature set of Cloud Run.


Wednesday, December 28, 2022

Skaffold for Cloud Run and Local Environments

In one of my previous posts, I had explored using Cloud Deploy to deploy to a Cloud Run environment. Cloud Deploy uses a Skaffold file to internally orchestrate the steps required to build an image, adding the coordinates of the image to the manifest files and deploying it to a runtime. This works out great, not so much for local development and testing though. The reason is a lack of local Cloud Run runtime.

A good alternative is to simply use a local distribution of Kubernetes — say a minikube or kind. This will allow Skaffold to be used to its full power — with an ability to provide a quick development loop, debug, etc. I have documented some of the features here. The catch however is that there will now need to be two different sets of details of the environments maintained along with their corresponding sets of manifests — ones targeting Cloud Run, targeting minikube.


Skaffold patching is a way to do this and this post will go into the high-level details of the approach.

Skaffold Profiles and Patches

My original Skaffold configuration looks like this, targeting a Cloud Run environment:

apiVersion: skaffold/v3alpha1
kind: Config
metadata:
  name: clouddeploy-cloudrun-skaffold
manifests:
  kustomize:
    paths:
      - manifests/base
build:
  artifacts:
    - image: clouddeploy-cloudrun-app-image
      jib: { }
profiles:
  - name: dev
    manifests:
      kustomize:
        paths:
          - manifests/overlays/dev
  - name: prod
    manifests:
      kustomize:
        paths:
          - manifests/overlays/prod
deploy:
  cloudrun:
    region: us-west1-a

The “deploy.cloudrun” part indicates that it is targeting a Cloud Run environment.

So now, I want a different behavior in “local” environment, the way to do this in skaffold is to create a Skaffold profile that specifies what is different about this environment:

apiVersion: skaffold/v3alpha1
kind: Config
metadata:
  name: clouddeploy-cloudrun-skaffold
manifests:
  kustomize:
    paths:
      - manifests/base
build:
  artifacts:
    - image: clouddeploy-cloudrun-app-image
      jib: { }
profiles:
  - name: local
    # Something different on local
  - name: dev
    manifests:
      kustomize:
        paths:
          - manifests/overlays/dev
  - name: prod
    manifests:
      kustomize:
        paths:
          - manifests/overlays/prod
deploy:
  cloudrun:
    region: us-west1-a

I have two things different on local,

the deploy environment will be a minikube-based Kubernetes environment
the manifests file will be for this Kubernetes environment.
For the first requirement:

apiVersion: skaffold/v3alpha1
kind: Config
metadata:
  name: clouddeploy-cloudrun-skaffold
manifests:
  kustomize:
    paths:
      - manifests/base
build:
  artifacts:
    - image: clouddeploy-cloudrun-app-image
      jib: { }
profiles:
  - name: local
    patches:
      - op: remove
        path: /deploy/cloudrun
    deploy:
      kubectl: { }
  - name: dev
    manifests:
      kustomize:
        paths:
          - manifests/overlays/dev
  - name: prod
    manifests:
      kustomize:
        paths:
          - manifests/overlays/prod
deploy:
  cloudrun:
    region: us-west1-a

To specify the deploy environment where patches come, here the patch indicates that I want to remove Cloudrun as a deployment environment and add in Kubernetes.

And for the second requirement of generating a Kubernetes manifest, a rawYaml tag is introduced:

apiVersion: skaffold/v3alpha1
kind: Config
metadata:
  name: clouddeploy-cloudrun-skaffold
manifests:
  kustomize:
    paths:
      - manifests/base
build:
  artifacts:
    - image: clouddeploy-cloudrun-app-image
      jib: { }
profiles:
  - name: local
    manifests:
      kustomize: { }
      rawYaml:
        - kube/app.yaml
    patches:
      - op: remove
        path: /deploy/cloudrun
    deploy:
      kubectl: { }
  - name: dev
    manifests:
      kustomize:
        paths:
          - manifests/overlays/dev
  - name: prod
    manifests:
      kustomize:
        paths:
          - manifests/overlays/prod
deploy:
  cloudrun:
    region: us-west1-a

In this way a combination of Skaffold profiles and patches are used for tweaking the local deployment for Minikube.

Activating Profiles

When testing on local the “local” profile can be activated this way with Skaffold — with a -p flag:

skaffold dev -p local

One of the most useful command that I got to use is the “diagnose” command in skaffold which clearly showed what skaffold configuration is active for specific profiles:

skaffold diagnose -p local

which generated this resolved configuration for me:

apiVersion: skaffold/v3
kind: Config
metadata:
  name: clouddeploy-cloudrun-skaffold
build:
  artifacts:
  - image: clouddeploy-cloudrun-app-image
    context: .
    jib: {}
  tagPolicy:
    gitCommit: {}
  local:
    concurrency: 1
manifests:
  rawYaml:
  - /Users/biju/learn/clouddeploy-cloudrun-sample/kube/app.yaml
  kustomize: {}
deploy:
  kubectl: {}
  logs:
    prefix: container

Conclusion

There will likely be better support for Cloud Run on a local environment, for now, a minikube based Kubernetes is a good stand-in. Skaffold with profiles and patches can target this environment on a local box. This allows Skaffold features like quick development loop, debugging, etc to be activated while an application is in the process of being developed.

Saturday, September 24, 2022

Cloud Deploy with Cloud Run

Google Cloud Deploy is a service to continuously deploy to Google Cloud Application runtimes. It has supported Google Kubernetes Engine(GKE) so far, and now is starting to support Cloud Run. This post is about a quick trial of this new and exciting support in Cloud Deploy. 

It may be simpler to explore the entire sample which is available in my github repo herehttps://github.com/bijukunjummen/clouddeploy-cloudrun-sample 


End to end Flow

The sample attempts to do the following:


A Cloud Build based build first builds an image. This image is handed over to Cloud Deploy which deploys to Cloud Run. A "dev" and "prod" target is simulated by the Cloud Run applications having names prefixed with the environment name.

Building an image

There are way too many ways to build a container image, my personal favorite is  the excellent Google jib tool which requires a simple plugin to be in place to create AND publish a container image. Once an image is created, the next task is to get the tagged image name for use with say a Kubernetes deployment manifest. 


Skaffold does a great job of orchestrating these two steps, creating an image and rendering the application runtime manifests with the image locations. Since the deployment is to a Cloud Run environment, the manifest looks something like this:


Now, manifest for each target environment may look a little different, so for eg in my case the application name targeted towards dev environment has a "dev-" prefix and for prod environment has a "prod-" prefix. This is where another tool called Kustomize fits in. Kustomize is fairly intuitive, it expresses the variations for each environment as a patch file, so for eg, in my case where I want to prefix the name of the application in the dev environment with a "dev-", the Kustomize configuration looks something like this:

So now, we have 3 tools:
  1. For building an image - Google Jib
  2. Generating the manifests based on environment - Kustomize
  3. Rending the image name in the manifests - Skaffold
Skaffold does a great job of wiring all the tools together, and looks something like this for my example:


Deploying the Image

In the Google Cloud Environment, Cloud Build is used for calling Skaffold and building the image, I have a cloudbuild.yaml file available with my sample, which shows how skaffold is invoked and the image built.

Let's come to the topic of the post, about deploying this image to Cloud Run using Cloud Deploy. Cloud Deploy uses a configuration file to describe where the image needs to be deployed, which is Cloud Run in this instance and how the deployment needs to be promoted across environments. The environments are referred to as "targets" and look like this in my configuration:

They point to the project and region for the Cloud Run service.

Next is the configuration to describe how the pipeline will take the application through the targets:

This simply shows that application will be first deployed to the "dev" target and then promoted to the "prod" target after approval.

The "profiles" in the each of the stages show the profile that will be activated in skaffold, which simply determines which overlay of kustomize will be used to create the manifest.

That covers the entire Cloud Deploy configuration. The next step once the configuration file is ready is to create the deployment pipeline, which is done using a command which looks like this:

gcloud deploy apply --file=clouddeploy.yaml --region=us-west1

and registers the pipeline with Cloud Deploy service.


So just to quickly recap, I now have the image built by Cloud Build, the manifests generated using skaffold, kustomize, and a pipeline registered with Cloud Deploy, the next step is to trigger the pipeline for the image and the artifacts, which is done through another command, which is hooked up to Cloud Build:
gcloud deploy releases create release-$SHORT_SHA --delivery-pipeline clouddeploy-cloudrun-sample --region us-west1 --build-artifacts artifacts.json

This would trigger the deploy to the different Cloud Run targets - "dev" in my case to start with:


Once deployed, I have a shiny Cloud Run app all ready to accept requests!


This can now be promoted to my "prod" target with a manual approval process:


Conclusion

Cloud Deploy's support for Cloud Run works great, it takes a familiar tooling with Skaffold typically meant for Kubernetes manifests and uses it cleverly for Cloud Run deployment flows. I look forward to more capabilities in Cloud Deploy with support for Blue/Green, Canary deployment models.

Thursday, June 23, 2022

Google Cloud Functions (2nd Gen) Java Sample

Cloud Functions (2nd Gen) is Google’s Serverless Functions as a Service Platform. 2nd Generation is now built on top of the excellent Google Cloud Run as a base. Think of Google Cloud Run as a Serverless environment for running containers which respond to events(http being the most basic, all sorts of other events via eventarc).


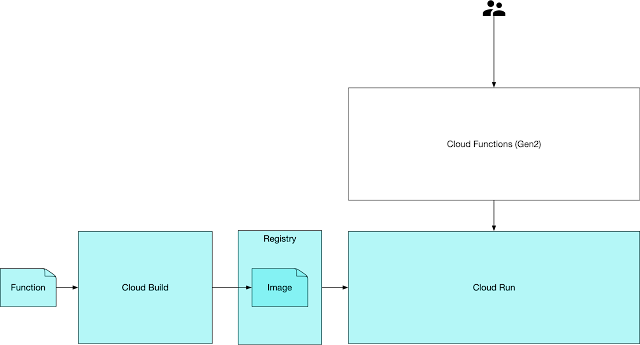
The blue area above shows the flow of code, the Google Cloud cli for Cloud Function, orchestrates the flow where the source code is placed in Google Cloud Storage bucket, a Cloud Build is triggered to build this code, package it into a container and finally this container is run using Cloud Run which the user can access via Cloud Functions console. Cloud Functions essentially becomes a pass through to Cloud Run.

The rest of this post will go into the details of how such a function can be written using Java.

tl;dr — sample code is available herehttps://github.com/bijukunjummen/http-cloudfunction-java-gradle, and has all the relevant pieces hooked up.

Method Signature

To expose a function to respond to http events is fairly straightforward, it just needs to conform to the functions framework interface, for java it is available herehttps://github.com/GoogleCloudPlatform/functions-framework-java

To pull in this dependency using gradle as the build tool looks like this:
  
  compileOnly("com.google.cloud.functions:functions-framework-api:1.0.4")

The dependency is required purely for compilation, at runtime the dependency is provided through a base image that Functions build time uses.

The function signature looks like this:

Testing the Function

This function can be tested locally using an Invoker that is provided by the functions-framework-api, my code https://github.com/bijukunjummen/http-cloudfunction-java-gradle shows how it can be hooked up with gradle, suffice to say that invoker allows an endpoint to brought up and tested with utilities like curl.

Deploying the Function

Now comes the easy part about deploying the function. Since a lot of Google Cloud Services need to be orchestrated to get a function deployed — GCS, Cloud Build, Cloud Run and Cloud Function, the command line to deploy the function does a great job of indicating which services need to be activated, the command to run looks like this:

gcloud beta functions deploy java-http-function \
--gen2 \
--runtime java17 \
--trigger-http \
--entry-point functions.HelloHttp \
--source ./build/libs/ \
--allow-unauthenticated    
    

Note that atleast for Java, it is sufficient to build the code locally and provide the built uber jar(jar with all dependencies packaged in) as the source.

Once deployed, the endpoint can be found using the following command:

gcloud beta functions describe java-http-function --gen2
and the resulting endpoint accessed via a curl command!

curl https://java-http-function-abc-uw.a.run.app
Hello World

What is Deployed

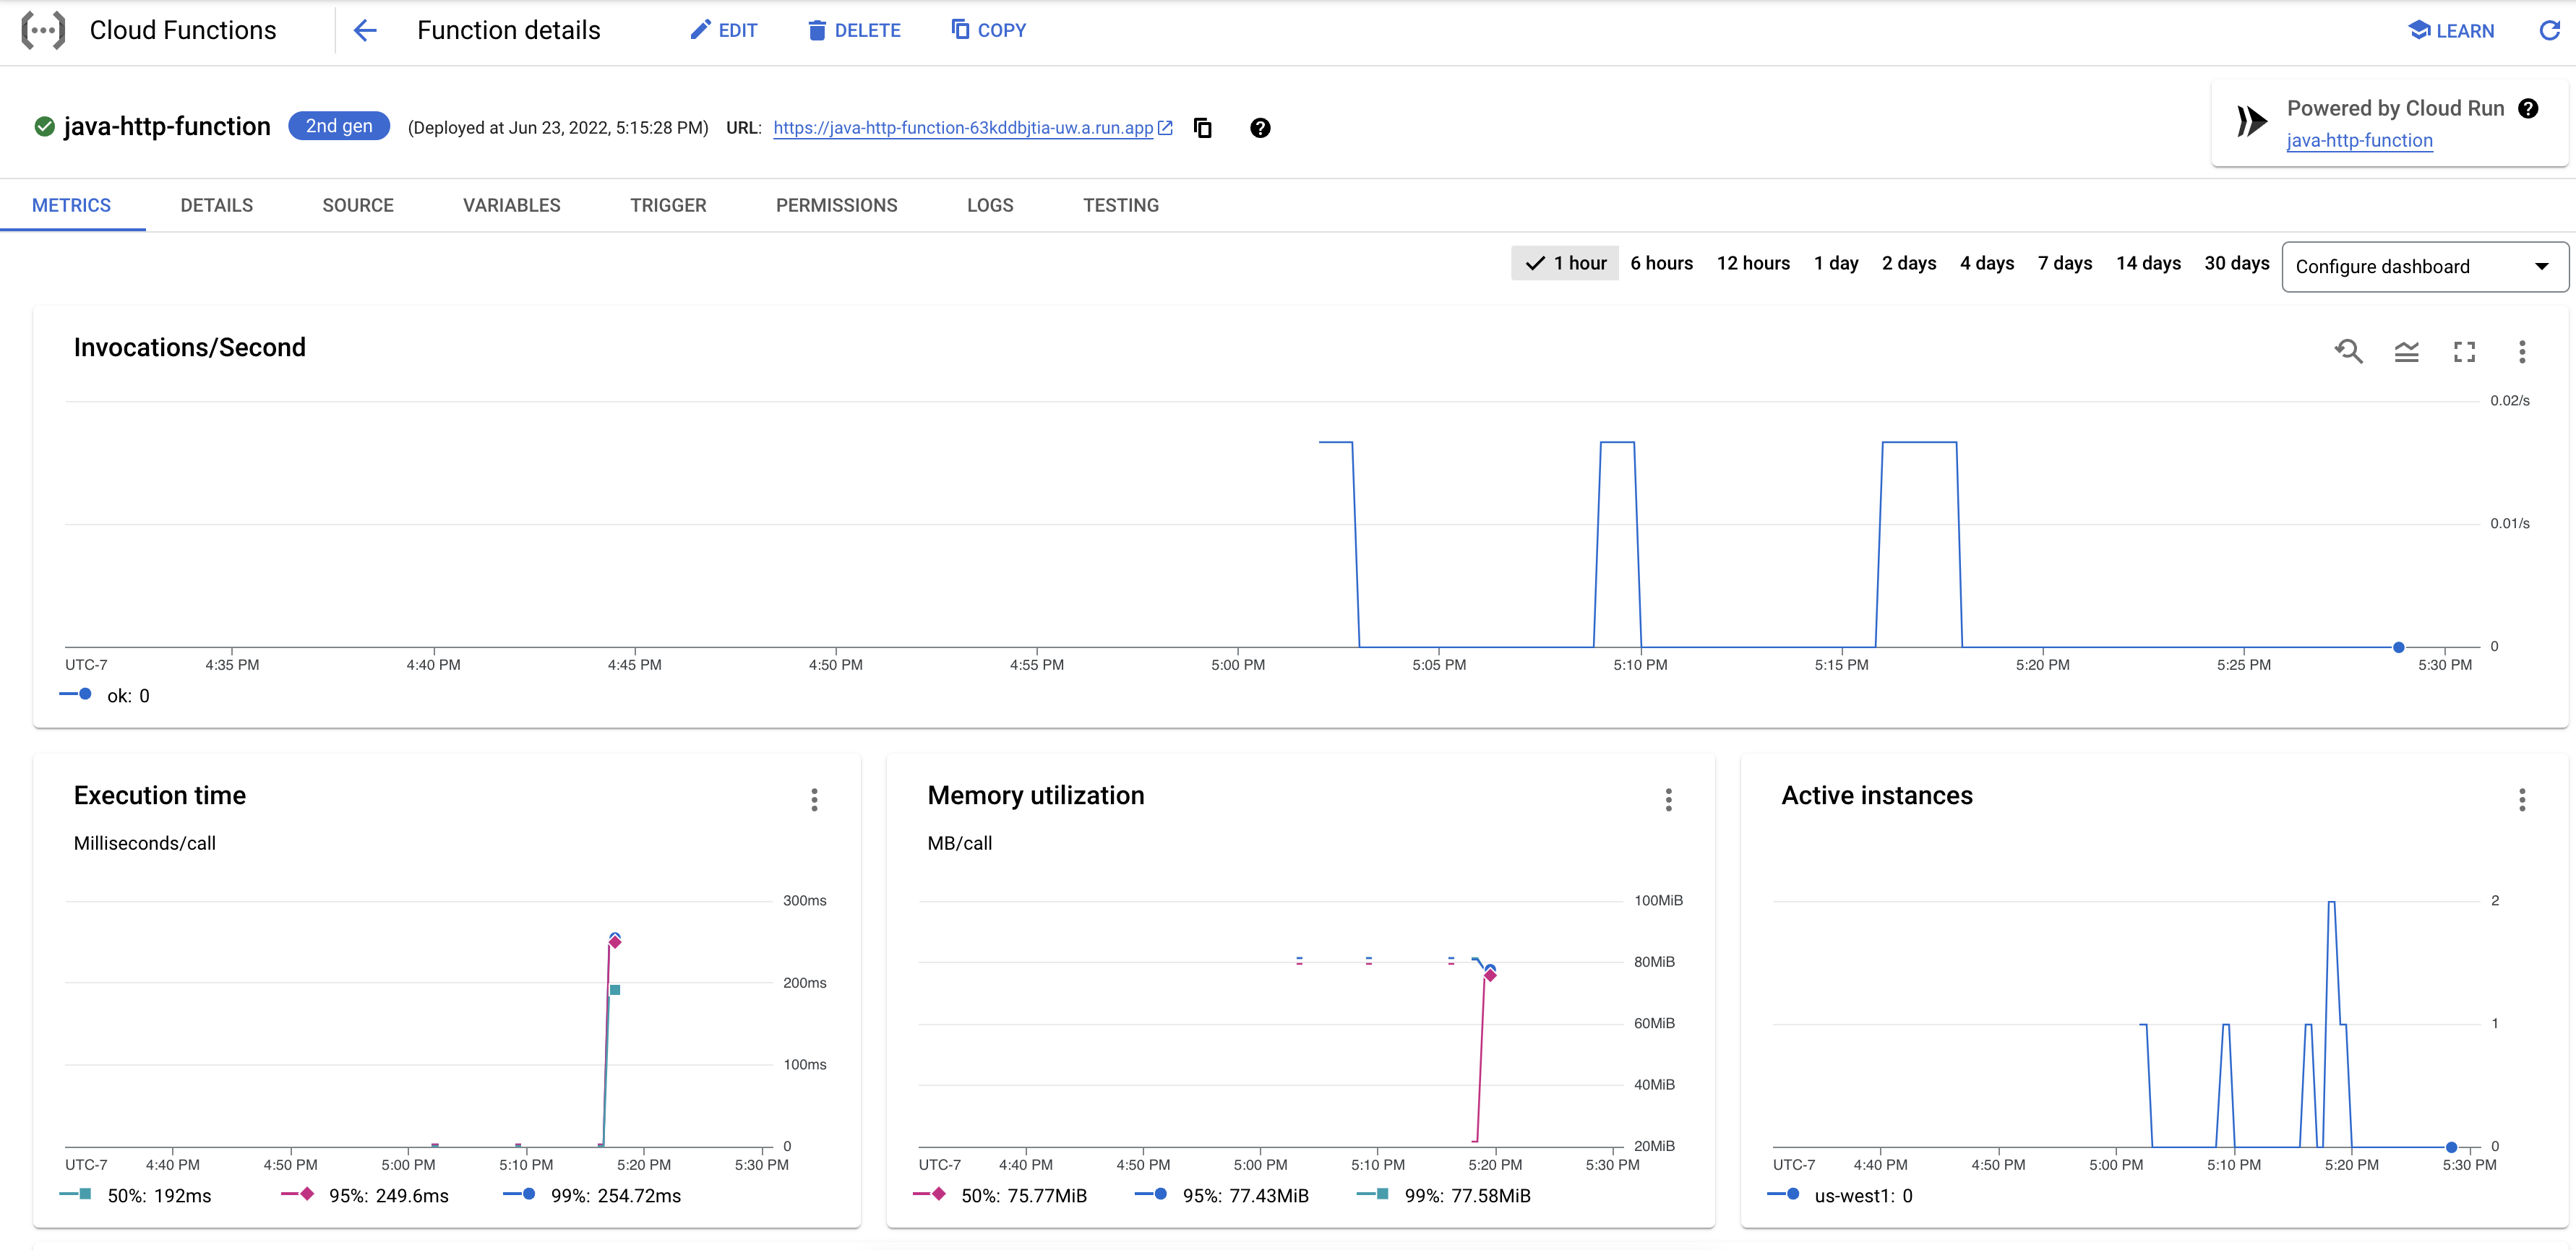
This is a bit of an exploration of what gets deployed into a GCP project, let’s start with the Cloud Function itself.


See how for a Gen2 function, a “Powered by Cloud Run” shows up which links to the actual cloud run deployment that powers this cloud function, clicking through leads to:


Conclusion

This concludes the steps to deploy a simple Java based Gen2 Cloud Function that responds to http calls. The post shows how the Gen 2 Cloud Function is more or less a pass through to Cloud Run. The sample is available in my github repository — https://github.com/bijukunjummen/http-cloudfunction-java-gradle


Saturday, May 14, 2022

Google Cloud Structured Logging for Java Applications

 One advice for logging that I have seen when targeting applications to cloud platforms is to simply write to Standard Out and platform takes care of sending it to the appropriate log sinks. This mostly works except when it doesn't - it especially doesn't when analyzing failure scenarios. Typically for Java applications this means looking through a stack trace and each line of a stack trace is treated as a separate log entry by the log sinks, this creates these problems:

  1. Correlating multiple line of output as being part of a single stack trace
  2. Since applications are multi-threaded even related logs may not be in just the right order
  3. The severity of logs is not correctly determined and so does not find its way into the Error Reporting system

This post will go into a few approaches when logging from a Java application in Google Cloud Platform


Problem

Let me go over the problem once more, so say I were to log the following way in Java code:

  LOGGER.info("Hello Logging") 
  

And it shows up the following way in the GCP Logging console

{
  "textPayload": "2022-04-29 22:00:12.057  INFO 1 --- [or-http-epoll-1] org.bk.web.GreetingsController           : Hello Logging",
  "insertId": "626c5fec0000e25a9b667889",
  "resource": {
    "type": "cloud_run_revision",
    "labels": {
      "service_name": "hello-cloud-run-sample",
      "configuration_name": "hello-cloud-run-sample",
      "project_id": "biju-altostrat-demo",
      "revision_name": "hello-cloud-run-sample-00008-qow",
      "location": "us-central1"
    }
  },
  "timestamp": "2022-04-29T22:00:12.057946Z",
  "labels": {
    "instanceId": "instanceid"
  },
  "logName": "projects/myproject/logs/run.googleapis.com%2Fstdout",
  "receiveTimestamp": "2022-04-29T22:00:12.077339403Z"
}
  

This looks reasonable. Now consider the case of logging in case of an error:

{
  "textPayload": "\t\tat reactor.core.publisher.Operators$MultiSubscriptionSubscriber.onSubscribe(Operators.java:2068) ~[reactor-core-3.4.17.jar:3.4.17]",
  "insertId": "626c619b00005956ab868f3f",
  "resource": {
    "type": "cloud_run_revision",
    "labels": {
      "revision_name": "hello-cloud-run-sample-00008-qow",
      "project_id": "biju-altostrat-demo",
      "location": "us-central1",
      "configuration_name": "hello-cloud-run-sample",
      "service_name": "hello-cloud-run-sample"
    }
  },
  "timestamp": "2022-04-29T22:07:23.022870Z",
  "labels": {
    "instanceId": "0067430fbd3ad615324262b55e1604eb6acbd21e59fa5fadd15cb4e033adedd66031dba29e1b81d507872b2c3c6cd58a83a7f0794965f8c5f7a97507bb5b27fb33"
  },
  "logName": "projects/biju-altostrat-demo/logs/run.googleapis.com%2Fstdout",
  "receiveTimestamp": "2022-04-29T22:07:23.317981870Z"
}

There would be multiple of these in the GCP logging console, for each line of the stack trace with no way to correlate them together. Additionally, there is no severity attached to these event and so the error would not end up with Google Cloud Error Reporting service.

Configuring Logging

There are a few approaches to configuring logging for a Java application targeted to be deployed to Google Cloud. The simplest approach, if using Logback, is to use the Logging appender provided by Google Cloud available here - https://github.com/googleapis/java-logging-logback.

Adding the appender is easy, a logback.xml file with the appender configured looks like this:

<configuration>
    <appender name="gcpLoggingAppender" class="com.google.cloud.logging.logback.LoggingAppender">
    </appender>
    <root level="INFO">
        <appender-ref ref="gcpLoggingAppender"/>
    </root>
</configuration>
This works great, but it has a huge catch. It requires connectivity to a GCP environment as it writes the logs directly to Cloud Logging system, which is not ideal for local testing. 

An approach that works when running in a GCP environment as well as locally is to simply direct the output to Standard Out, this will ensure that the logs are written in a json structured format and shipped correctly to Cloud Logging.
<configuration>
    <appender name="gcpLoggingAppender" class="com.google.cloud.logging.logback.LoggingAppender">
        <redirectToStdout>true</redirectToStdout>
    </appender>
    <root level="INFO">
        <appender-ref ref="gcpLoggingAppender"/>
    </root>
</configuration>
If you are using Spring Boot as the framework, the approach can be even be customized such that on a local environment the logs get written to Standard Out in a line by line manner, and when deployed to GCP, the logs are written as Json output:
<configuration>
    <include resource="org/springframework/boot/logging/logback/defaults.xml"/>
    <include resource="org/springframework/boot/logging/logback/console-appender.xml"/>

    <appender name="gcpLoggingAppender" class="com.google.cloud.logging.logback.LoggingAppender">
        <redirectToStdout>true</redirectToStdout>
    </appender>

    <root level="INFO">
        <springProfile name="gcp">
            <appender-ref ref="gcpLoggingAppender"/>
        </springProfile>
        <springProfile name="local">
            <appender-ref ref="CONSOLE"/>
        </springProfile>
    </root>
</configuration>  
  

This Works..But

Google Cloud logging appender works great, however there is an issue. It doesn't capture the entirety of a stack trace for some reason. I have an issue open which should address this. In the meantime if capturing the full stack in the logs is important then a different approach is to simply write a json formatted log using the native json layout provided by logback:

<appender name="jsonLoggingAppender" class="ch.qos.logback.core.ConsoleAppender">
    <layout class="ch.qos.logback.contrib.json.classic.JsonLayout">
        <jsonFormatter class="ch.qos.logback.contrib.jackson.JacksonJsonFormatter">
        </jsonFormatter>
        <timestampFormat>yyyy-MM-dd HH:mm:ss.SSS</timestampFormat>
        <appendLineSeparator>true</appendLineSeparator>
    </layout>
</appender> 
  
The fields however does not match the structured log format recommended by GCP, especially the severity, a quick tweak can be made by implementing a custom JsonLayout class that looks like this:

package org.bk.logback.custom;

import ch.qos.logback.classic.Level;
import ch.qos.logback.classic.spi.ILoggingEvent;
import ch.qos.logback.contrib.json.classic.JsonLayout;
import com.google.cloud.logging.Severity;

import java.util.Map;

public class GcpJsonLayout extends JsonLayout {
    private static final String SEVERITY_FIELD = "severity";

    @Override
    protected void addCustomDataToJsonMap(Map<String, Object> map, ILoggingEvent event) {
        map.put(SEVERITY_FIELD, severityFor(event.getLevel()));
    }

    private static Severity severityFor(Level level) {
        return switch (level.toInt()) {
            // TRACE
            case 5000 -> Severity.DEBUG;
            // DEBUG
            case 10000 -> Severity.DEBUG;
            // INFO
            case 20000 -> Severity.INFO;
            // WARNING
            case 30000 -> Severity.WARNING;
            // ERROR
            case 40000 -> Severity.ERROR;
            default -> Severity.DEFAULT;
        };
    }
}

which takes care of mapping to the right Severity levels for Cloud Error reporting. 

Conclusion

Use Google Cloud Logback appender and you should be set. Consider the alternate approaches only if you think you are lacking more of the stacktrace.

Saturday, April 30, 2022

Calling Google Cloud Services in Java

If you want to call Google Cloud Services using a Java based codebase, then broadly there are two approaches to incorporating the client libraries in your code — the first, let’s call it a “direct” approach is to use the Google Cloud Client libraries available here, the second approach is to use a “wrapper”, Spring Cloud GCP libraries available here.

So given both these libraries which one should you use. My take is simple — if you have a Spring Boot based app likely Spring Cloud GCP should be the preferred approach else the “direct” libraries.


Using Pub/Sub Client libraries

The best way to see the two approaches in action is to use it for making a call — in this case to publish a message to Cloud Pubsub.
The kind of contract I am expecting to implement looks like this:

The “message” is a simple type and looks like this, represented as a Java record:


Given this, let’s start with the “direct” approach.

Direct Approach

The best way that I have found to get to the libraries is using this page — https://github.com/googleapis/google-cloud-java/, which in turn links to the client libraries for the specific GCP services, the cloud pub/sub one is here — https://github.com/googleapis/java-pubsub. I use gradle for my builds and to pull in pub/sub libs with gradle is done this way:


implementation platform('com.google.cloud:libraries-bom:25.1.0')
implementation('com.google.cloud:google-cloud-pubsub')
With the library pulled in, the code to publish a message looks like this:


The message is converted to a raw json and published to Cloud Pub/Sub which returns a ApiFuture type. I have previously covered how such a type can be converted to reactive types which is finally returned from the publishing code.

The “publisher” is created using a helper method:


Publisher publisher = Publisher.newBuilder("sampletopic").build();

Spring Cloud GCP Approach

The documentation for Spring Cloud GCP project is available here, first to pull in the dependencies, for a Gradle based project it looks like this:


dependencies {
   implementation 'com.google.cloud:spring-cloud-gcp-starter-pubsub'
}

dependencyManagement {
   imports {
      mavenBom "com.google.cloud:spring-cloud-gcp-dependencies:${springCloudGcpVersion}"
      mavenBom "org.springframework.cloud:spring-cloud-dependencies:${springCloudVersion}"
   }
}

With the right dependencies pulled in Spring Boot Auto-configuration comes into play and automatically creates a type called the PubSubTemplate with properties that can tweak configuration A code to publish a message to a topic using a PubSubTemplate looks like this:

Comparison


Given these two code snippets, these are some of the differences:
  • Spring Cloud GCP has taken care of a bunch of boiler plate around how to create a Publisher (and subscriber if listening to messages)
  • The PubSubTemplate provides simpler helper methods for publishing messages and for listening to messages, the return type which is ListenableFuture with PubSubTemplate can easily be transformed to reactive types unlike the ApiFuture return type
  • Testing with Spring Cloud GCP is much simpler as the Publisher needs to be tweaked extensively to work with an emulator and Spring Cloud GCP handles this complication under the covers

Conclusion

The conclusion for me is that Spring Cloud GCP is compelling, if a project is Spring Boot based then Spring Cloud GCP will fit in great and provides just the right level of abstraction in dealing with the Google Cloud API’s.
The snippets in this blog post doesn’t do justice to some of the complexities of the codebase, my github repo may help with a complete working codebase with both “direct” and Spring cloud GCP based code — https://github.com/bijukunjummen/gcp-pub-sub-sample

Saturday, March 5, 2022

Modeling one-to-many relation in Firestore, Bigtable, Spanner

I like working with services that need little to no provisioning effort — these are typically termed as Fully Managed services by different Providers.

The most provisioning effort is typically required for database systems, I remember having to operate a Cassandra cluster in a previous job and the amount of effort spent on provisioning, upkeep was far from trivial and I appreciated and empathized with the role of a Database administrator dearly during that time.

My objective in this post is to explore how a one-to-many relationship can be maintained in 3 managed database solutions on Google Cloud — Firestore, Bigtable and Spanner.

Data Model

The data model is to represent a Chat Room with Chat Messages in the rooms.


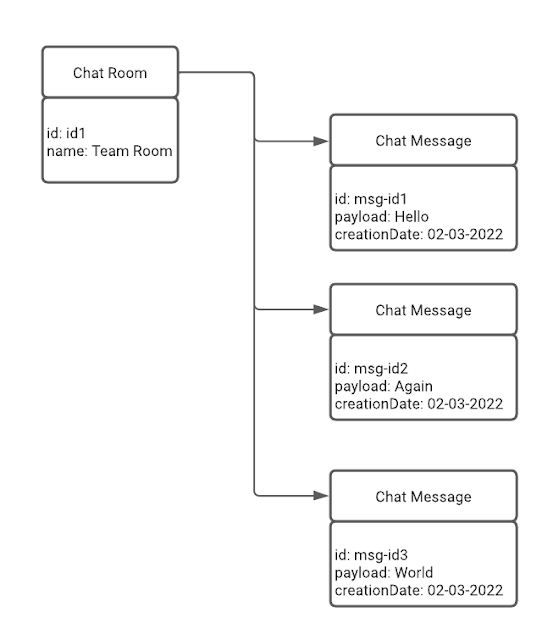
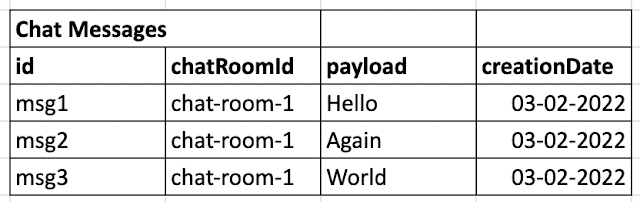
Chat Room just has name as an attribute. Each Chat Room has a set of Chat Messages, with each message having a payload and creation date as attributes. A sample would look something like this:


So now comes the interesting question, how can this one-to-many relation be modeled using Firestore, Bigtable and Spanner. Let’s start with Firestore.

One-to-many using Firestore

Managing a One-to-many relation comes naturally to Firestore. The concepts map directly to the structures of Firestore:

  • Each Chat Room instance and each Chat Message can be thought of as a Firestore “Document”.
  • All the Chat Room instances are part of a “ChatRooms” “Collection”
  • Each Chat Room “Document” has a “Sub-Collection” to hold all the Chat Messages relevant to it, this way establishing a One-to-Many relationship


One-to-Many using Bigtable

A quick aside, in Bigtable information is stored in the following form


Each Chat Room and Chat Room message can be added in as rows with carefully crafted row keys.

  • A chat room, needs to be retrieved by its id, so a row key may look something like this: “ROOM/R#room-id”
  • Chat Room message row key can be something like this: “MESSAGES/R#chatroom-id/M#message-id”

Since Bigtable queries can be based on prefixes, a retrieval of messages by a prefix of “MESSAGES/R#chatroom-id” would retrieve all messages in the Chat Room “chatroom-id”. Not as intuitive as the Firestore structure as it requires carefully thinking about the row key structure.

One-to-Many using Spanner

Spanner behaves like a traditional relational database with a lot of smarts under the covers to scale massively. So for a one-to-many data model perspective, the relational concepts just carry over.

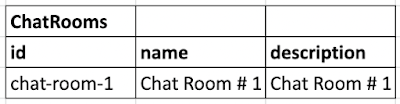
Chat Rooms can be stored in a “ChatRooms” table with the columns holding attributes of a chat room

Chat Messages can be stored in a “ChatMessages” table with columns holding the attributes of a chat message. A foreign key, say “ChatRoomId” in Chat Message can point to the relevant Chat Room.


Given this, all chat messages for a room can be retrieved using a query on Chat Messages with a filter on the Chat Room Id.

Conclusion

I hope this gives a taste of what it takes to model in these three excellent fully managed GCP databases.

Tuesday, February 1, 2022

Google Cloud Java Client — ApiFuture to Reactive types

 Google Cloud Java Client libraries use a ApiFuture type to represent the result of an API call. The calls are asynchronous and the ApiFuture type represents the result once the call is completed.

If you have used Reactive stream based libraries like Project Reactor, a big benefit of using the Reactive types like Mono and Flux is that they provide a rich set of operators that provide a way to transform the data once available from the asynchronous call.

This should become clearer in an example. Consider a Cloud Firestore call to retrieve a ChatRoom entity by id:


There are few issues here, the “get()” call is used for blocking and waiting on the response of the async call to come through, which can throw an exception which needs to be accounted for. Then the response is shaped into the ChatRoom type.

Now, look at the same flow with reactive types, assuming that there is a utility available to convert the ApiFuture type to the Mono type:


Here the map operator takes care of transforming the result to the required “ChatRoom” type and any exception is wrapped in Mono type itself.

Alright, so now how can the ApiFutureUtil be implemented, a basic implementation looks like this:


This utility serves the purpose of transforming the ApiFuture type, however one catch is that this Mono type is hot. What does this mean — normally reactive streams pipeline(with all the operators chained together) represents the computation, this computation comes alive only when somebody subscribes to this pipeline, with a ApiFuture converted to Mono, even without anybody subscribing, the result will still be emitted. This is okay as the purpose is to use the Mono type for its operators. If “cold” is desired then even the Api call itself can be deferred something like this:


I hope this gives some idea of how Reactive Stream types can be created from ApiFuture. This is far from original though, if you desire a canned approach of doing this, a better solution is to use Spring-Cloud-Gcp Java library which already has these utilities baked in.

Sunday, January 16, 2022

Service to Service Call Pattern - Multi-Cluster Ingress

Multi-Cluster Ingress is a neat feature of Anthos and GKE (Google Kubernetes Engine), whereby a user accessing an application that is hosted on multiple GKE clusters, in different zones is directed to the right cluster that is nearest to the user!

So for eg. consider two GKE clusters, one in us-west1, based out of Oregon, USA and another in europe-north1, based out of Finland. An application is installed to these two clusters. Now, a user accessing the application from US will be lead to the GKE cluster in us-west1 and a user coming in from Europe will be lead to the GKE cluster in europe-north1. Multi-cluster Ingress enables this easily!


Enabling Multi-Cluster Ingress

Alright, so how does this work. 

Let me once again assume that I have two clusters available in my GCP project, one in us-west1-a zone and another in europe-north1-a, and an app called "Caller" deployed to these two clusters. For a cluster, the way to get traffic into the cluster from a user outside of it is typically done using an "Ingress"


This works great for a single cluster, however not so for a bunch of clusters. A different kind of an Ingress resource is required that spans GKE clusters and this is where a Multi-Cluster ingress comes in - an ingress that spans clusters.

Multi-Cluster Ingress is a Custom resource provided by GKE and looks something like this:


It is defined in one of the clusters, designated as a "config" cluster. 
See how there is a a reference to "sample-caller-mcs" above, that is pointing to a "MultiClusterService" resource, which is again a custom resource that will work only in the context of a GKE project. A definition for such a resource, looks almost like a Service and here is the one for "sample-caller-mcs"


Now that there is a MultiClusterIngress defined pointing to a MultiClusterService, what all happens under the covers:
1. A load balancer is created which uses an ip advertised using anycast - better details are here. These anycast ip's help get the request through to the cluster closest to the user.
2. A Network Endpoint Group(NEG) is created for every cluster that matches the definition of MultiClusterService. These NEG's are used as the backend of the loadbalancer.

Sample Application

I have a sample set of applications and deployment manifests available here that demonstrates Multi-Cluster Ingress. There are instructions to go with it here. This brings up an environment which looks like this:


Now to simulate a request coming in from us-west1-a is easy for me since I am in US, another approach is to simply spin up an instance in us-west1-a and use that to make a request the following way:


And the "caller" invoked should be the one in us-west1-a, similarly if the request is made from an instance in europe-north1-a:


The "caller" invoked will be the one in europe-north1-a!!

Conclusion

This really boggles my mind, being able to spin up two clusters on two different continents, and having a request from the user directed to the one closest to them, in a fairly simple way. There is a lot going on under the covers, however this is abstracted out using the resource types of MultiClusterIngress and MultiClusterService. 

Tuesday, January 4, 2022

Service to Service call pattern - Using Anthos Service Mesh

Anthos Service Mesh makes it very simple for a service in one cluster to call service in another cluster. Not just calling the service but also doing so securely, with fault tolerance and observability built-in.


This is a fourth in a series of posts on service to service call patterns in Google Cloud. 

The first post explored Service to Service call pattern in a GKE runtime using a Kubernetes Service abstraction

The second post explored Service to Service call pattern in a GKE runtime with Anthos Service mesh

The third post explored the call pattern across multiple GKE runtimes with Multi-Cluster Service

Target Call Pattern

There are two services deployed to two different clusters. The "caller" in "cluster1" invokes the "producer" in "cluster2".


Creating Clusters and Anthos Service Mesh

The entire script to create the cluster is here. The script:
1. Spins up two GKE standard clusters
2. Adds firewall rules to enable ip's in one cluster to reach the other cluster
3. Installs service mesh on each of the clusters

Caller and Producer Installation

The caller and the producer is deployed using the normal kubernetes deployment descriptors, no additional special resource is required to get the set-up to work, so for eg, the callers deployment looks like this:

apiVersion: apps/v1
kind: Deployment
metadata:
  name: sample-caller-v1
  labels:
    app: sample-caller
    version: v1
spec:
  replicas: 1
  selector:
    matchLabels:
      app: sample-caller
      version: v1
  template:
    metadata:
      labels:
        app: sample-caller
        version: v1
    spec:
      serviceAccountName: sample-caller-sa
      containers:
        - name: sample-caller
          image: us-docker.pkg.dev/biju-altostrat-demo/docker-repo/sample-caller:latest
          ports:
            - containerPort: 8080
		....            

Caller to Producer Call

The neat thing with this entire set-up is that from the callers perspective a call continues to be made to the dns name of a service representing the producer. So assuming that the producer's service is deployed to the same namespace, then a  dns name of "producer" should just work.

So with this in place, a call from the caller to producer looks something like this:

The call fails, with a message that the "sample-producer" host name in cluster1 cannot be resolved. This is perfectly okay as such a service has not been created in cluster1. Creating such a service:


resolves the issue and a call cleanly goes through!! This is magical, see how the service in cluster 1 resolves the pods in cluster2!

Additionally the presence of x-forwarded-client-cert header in the producer indicates that the mTLS is being used during the call. 

Fault Tolerance

So security via mTLS is accounted for, now I want to layer in some level of fault tolerance. This can be done by ensuring that the calls timeout instead of just hanging, and not making repeated calls to producer if it starts to be non-responsive. This is typically done using istio configuration. Since Anthos service mesh is essentially a managed istio, the configuration for timeout looks something like this, using a VirtualService configuration


And circuit breaker, using a Destination Rule which looks like this:

All of it is just straight kubernetes configuration and it just works across multiple clusters.

Conclusion

The fact that I can treat multiple clusters as if they were a single cluster is I believe the real value proposition of Anthos Service Mesh, all the work around how to enable such a communication securely with fault tolerance is what the Mesh brings to the table.

My repository has all the sample that I have used for the post - https://github.com/bijukunjummen/sample-service-to-service

Thursday, December 30, 2021

Cloud Bigtable - Write and Retrieval

This is a quick write up based on a few days of experimentation with Cloud Bigtable, with the following objectives:

1. Using an emulator for local development

2. A high level schema design with retrieval patterns in mind

3. Finding records

Emulator

Cloud Bigtable emulator provides a way to test the Bigtable functionality locally.  Setting up the emulator is easy and is described in this document. Assuming that the gcloud utility, which is a CLI to work with the Google Cloud resources, is available on the machine, then the following command should get the emulator in place:
gcloud components install bigtable
Once installed, the emulator can be started up using the following command:
gcloud beta emulators bigtable start --host-port=localhost:8086
This brings up the emulator at port 8086.


Working with the Emulator

Now that a local instance of Bigtable is up, working with it requires another utility called "cbt", which can be installed, again using gcloud, the following way:
gcloud components install cbt
A table to hold an entity modeled after a "Hotel", call it "hotels" along with a "columnfamily" to hold the details, called "hotel_details", looks like this:
BIGTABLE_EMULATOR_HOST=localhost:8086
cbt -project "project-id" createtable hotels
cbt -project "project-id" createfamily hotels hotel_details
Now that the emulator and the cbt utility is available, let's start with a modeling exercise. Take this modeling exercise with a pinch of salt, my knowledge of Bigtable is evolving and the approach here likely will need heavy polishing.


Schema Design for an Entity

So my objective is to provide basic write and read functionality on a "Hotel" entity, described using a golang struct the following way:
type Hotel struct {
	Id      string
	Name    string
	Address string
	Zip     string
	State   string
}
To store such an entity into Bigtable attention should be paid to how the data will ultimately be read. In my case, there are going to be two read patterns. 
  1. Retrieval by Hotel's id field
  2. Retrieving a list of hotels by the zip code
Now, Bigtable supports only 1 index, called the "Row key", and retrieval of a single record can be using this "Row key" or a set of records can be retrieved using the prefix of a row key.

In my case it will be difficult to support retrieval by id AND retrieval by zip code using one Row key, so my schema design is to have multiple records with different row keys for a single Hotel entity, along these lines, say for a Hotel which looks like this:


To support retrieval by id my row key looks something like this:
H/id#id1 along with data for the hotel being set to different column names.

To support retrieval by zip code my row key looks like this:
H/Zip#OR-1/Id#id1, the data this time points to the row key of the actual data which is H/id#id1, this way the entire data for the hotel does not have to duplicated. Given this row key, say if all hotels with a Zip code of OR-1 has to be retrieved, I can do it using a row key prefix of "H/Zip#OR-1" and then hydrate the information using the Id from the data.

So with this storing the information of a real hotel into Bigtable and querying it back looks like this in raw form:

----------------------------------------
H/Id#d7d63398-3442-413b-8859-3e73016fc5cc
  hotel_details:address                    @ 2021/12/29-20:53:30.816000
    "525 SW Morrison St, Portland"
  hotel_details:id                         @ 2021/12/29-20:53:30.816000
    "d7d63398-3442-413b-8859-3e73016fc5cc"
  hotel_details:name                       @ 2021/12/29-20:53:30.816000
    "The Nines"
  hotel_details:state                      @ 2021/12/29-20:53:30.816000
    "OR"
  hotel_details:zip                        @ 2021/12/29-20:53:30.816000
    "97204"
----------------------------------------
H/Zip#97204/Id#d7d63398-3442-413b-8859-3e73016fc5cc
  hotel_details:key                        @ 2021/12/29-20:53:30.816000
    "H/Id#d7d63398-3442-413b-8859-3e73016fc5cc"
This works quite well, I am not entirely sure if this optimal though, I will revisit the approach once I have gained a little more experience with using Bigtable

Retrieving by Zip Code

Assuming that a bunch of Hotels are present in the database with this schema design, a retrieval by zip code looks like this in golang:

func findHotels(table *bigtable.Table, ctx context.Context, zip string) ([]types.Hotel, error) {
	searchPrefix := fmt.Sprintf("H/Zip#%s", zip)
	var keys []string
	var hotels []types.Hotel
	err := table.ReadRows(ctx, bigtable.PrefixRange(searchPrefix),
		func(row bigtable.Row) bool {
			keys = append(keys, keyFromRow(row))
			return true
		})

	if err != nil {
		return nil, fmt.Errorf("error in searching by zip code: %v", err)
	}

	err = table.ReadRows(ctx, bigtable.RowList(keys), func(row bigtable.Row) bool {
		hotels = append(hotels, hotelFromRow(row))
		return true
	})
	if err != nil {
		return nil, fmt.Errorf("error in retrieving by keys: %v", err)
	}
	return hotels, nil
}
The code starts by generating the search prefix, which has a pattern of "H/Zip#zipcode" and retrieves the id from the retrieved records, and then batches a call to the table with the retrieved id's to get the details.

Conclusion

It may be easier to follow this along with real code, which is in my github repository available here - https://github.com/bijukunjummen/golang-bigtable-sample. This has sample to write to Bigtable and then retrieve from it.

Monday, December 20, 2021

Service to Service call patterns - Multi-cluster Service

This is third blog post as part of a series exploring service to service call patterns in different application runtimes in Google Cloud.

The first post explored Service to Service call pattern in a GKE runtime using a Kubernetes Service abstraction

The second post explored Service to Service call pattern in a GKE runtime with Anthos Service mesh

This post will explore the call pattern across multiple GKE runtimes with Multi-Cluster Service providing a way for calls to be made across clusters.

Mind you, the preferred way for service to service call ACROSS clusters is using Anthos Service Mesh, which will be covered in the next blog post, however Multi-Cluster service is also a perfectly valid approach in the absence of Anthos Service Mesh.

Target Architecture

A target architecture that I am aiming for is the following:


Here two different applications are hosted on two separate Kubernetes clusters in different availability zones and the Service(called "Caller") in one cluster invokes the Service(called "Producer") in another cluster.

Creating the Cluster with Multi-Cluster Services

The details on bringing up 2 clusters and enabling Multi-cluster services is detailed in this document

Services Installation

Assuming that the 2 GKE clusters are now available, the first cluster holds the Caller and an Ingress Gateway to enable the UI of the caller to be accessible to the user. This is through a deployment descriptor which looks something like this for the caller:


apiVersion: apps/v1
kind: Deployment
metadata:
  name: sample-caller-v1
  labels:
    app: sample-caller
    version: v1
spec:
  replicas: 1
  selector:
    matchLabels:
      app: sample-caller
      version: v1
  template:
    metadata:
      labels:
        app: sample-caller
        version: v1
    spec:
      serviceAccountName: sample-caller-sa
      containers:
        - name: sample-caller
          image: us-docker.pkg.dev/sample/docker-repo/sample-caller:latest
          imagePullPolicy: IfNotPresent
          ports:
            - containerPort: 8080
          securityContext:
            runAsUser: 1000
          resources:
            requests:
              memory: "256Mi"
          livenessProbe:
            httpGet:
              path: /actuator/health/liveness
              port: 8080
            initialDelaySeconds: 3
            periodSeconds: 3
          readinessProbe:
            httpGet:
              path: /actuator/health/readiness
              port: 8080
I have reproduced the entire yaml just for demonstration, there is nothing that should stand out in the file.

Along the same lines the Producer application is deployed to the second cluster.

Caller to Producer call - Using Multi-Cluster Services

The right approach to getting service to service call working across a cluster is to use a feature of Anthos called Multi-cluster service and is described in detail in this blog post and this how to post

The short of it is that if a "ServiceExport" resource is defined in cluster 2 and if the same namespace exists in Cluster 1 then the Service is resolved using a host name of the form "service-name.namespace.svc.clusterset.local" and in my case this maps to "sample-producer.istio-apps.svc.clusterset.local"!. The ServiceExport resource looks something like this:


kind: ServiceExport
apiVersion: net.gke.io/v1
metadata:
  namespace: istio-apps
  name: sample-producer
This is the only change that I have to make to the caller, instead of calling Producer using "sample-producer", now it uses the host name of "sample-producer.istio-apps.svc.clusterset.local" and everything resolves cleanly and the call continues to work across the cluster.

View from the caller:

View from the Producer:


Conclusion

I hope this clarifies to some extent how service to service call can be enabled across multiple clusters, even across regions. 

There are a few small catches, for eg, to get the Mutual TLS to work across clusters is not easy. This is cleanly solved when using Anthos Service Mesh and will be detailed in the next blog post.


Thursday, November 18, 2021

Service to Service call patterns - GKE with Anthos Service Mesh on a single cluster

 This is second in a series of posts exploring service to service call patterns in some of the application runtimes on Google Cloud. The first in the series explored service to service call patterns in GKE

This post will expand on it by adding in a Service Mesh, specifically Anthos Service Mesh, and explore how the service to service patterns change in the presence of a mesh. The service to service call with be across services in a single cluster. The next post will explore services deployed to multiple GKE clusters.


Set-Up

The steps to set-up a GKE cluster and install Anthos service mesh on top of it is described in this document - https://cloud.google.com/service-mesh/docs/unified-install/install, in brief these are the commands that I had to run in my GCP Project to get a cluster running:


If the installation of cluster and the mesh has run through cleanly, a good way to verify the installation is to see if the cluster gets registered as a Anthos managed cluster in the Google Cloud Console.


The services that I will be installing is fairly simple and looks like this:


Using a UI, the caller can make the producer behave in certain ways:
  • Introduce response time delays
  • Respond with certain status codes
This will help check how the mesh environment will behave in the face of these behaviors.


The codebase for the "caller" and "producer" are in this repository - https://github.com/bijukunjummen/sample-service-to-service, there are kubernetes manifests available in the repository to bring up these services.

Behavior 1 - Mutual TLS

The first behavior that I want to see is for the the caller and the producer to verify each others identities by presenting and validating their certificates.

This can be done by adding in a istio DestinationRule for the producer, along these lines:


This also adds in the DestinationRule for the caller, this is because the caller gets the call from the browser via an Ingress Gateway and even this call needs to be authenticated using mtls

Alright now that the set-up in place, the following is what gets captured as the request flows from the Browser to the Ingress Gateway to the Caller to the Producer.


The sign that the mTLS works is seeing the "x-forwarded-client-cert" header, this is in both the Callers headers coming in from Ingress-gateway, and in the "Producers" headers coming in from the Caller.

Behavior 2 - Timeout

The second behavior that I want to explore is the timeouts. A request timeout can be set for the call from the Caller to Producer by creating a Virtual Service for the Producer with the value set, along these lines:


With this configuration in place a request from the caller with a delay of 6 seconds, causes the Mesh to timeout and present an error that looks like this:


The mesh responds with a http status code of 504 with a message of "Upstream timed out". 

Behavior 3 - Circuit Breaker

Circuit breaker is implemented using a Destination Rule resource
Here I have configuration which breaks the circuit if 3 continuous 5XX responses are received from the Producer in a 15 second interval, and then does not make a request for another 15 seconds

With this configuration in place a request with broken circuit looks like this:

The mesh responds with a http status code of 503 and a message of "no healthy upstream"


Conclusion

The neat thing is that in all scenarios so far, the way the Caller calls the Producer remains exactly the same, it is the mesh which injects in the appropriate security controls through mTLS and the resilience of calling service through timeouts and circuit breaker.