Friday, July 27, 2012

Spring Integration - Session 2 - More Hello Worlds

This is a follow up to Spring Integration Session 1

The first session was a simple Hello World application using Spring Integration. I want to take it a little further by considering a few more scenarios around it

So the first change to the Hello World application is to add in a Gateway component. To quickly revisit the earlier test program:

package org.bk.si.helloworld.hw1;

import org.junit.Test;
import org.junit.runner.RunWith;
import org.springframework.beans.factory.annotation.Autowired;
import org.springframework.beans.factory.annotation.Qualifier;
import org.springframework.integration.Message;
import org.springframework.integration.MessageChannel;
import org.springframework.integration.message.GenericMessage;
import org.springframework.test.context.ContextConfiguration;
import org.springframework.test.context.junit4.SpringJUnit4ClassRunner;

@RunWith(SpringJUnit4ClassRunner.class)
@ContextConfiguration("helloworld.xml")
public class HelloWorldTest {
 
 @Autowired
 @Qualifier("messageChannel")
 MessageChannel messageChannel;

 @Test
 public void testHelloWorld() {
  Message<String> helloWorld = new GenericMessage<String>("Hello World");
  messageChannel.send(helloWorld);
 }
}


In the lines highlighted above, the test is dependent on a Spring Integration specific component - a Message Channel, and in the test an explicit Spring Integration Message is constructed and sent to the Message Channel. There is a little too much coupling with Spring Integration which is the Messaging System here.

A Gateway component provides a facade to the messaging system, shielding the user application(in this case the Unit test) from the details of Messaging System - the messaging channel, Message and explicit sending of a message.

An example first to illustrate how the test will look with a Gateway component in place:

package org.bk.si.helloworld.hw2;

import org.junit.Test;
import org.junit.runner.RunWith;
import org.springframework.beans.factory.annotation.Autowired;
import org.springframework.test.context.ContextConfiguration;
import org.springframework.test.context.junit4.SpringJUnit4ClassRunner;


@RunWith(SpringJUnit4ClassRunner.class)
@ContextConfiguration("helloworld.xml")
public class HelloWorldTest {

 @Autowired Greeter greeter;

 @Test
 public void testHelloWorld(){
   this.greeter.sendGreeting("Hello World");
 }
}


The Greeter interface above is the Gateway component. Now that this component has been introduced there is no dependency to Spring Integration in this test - there is no mention of Message, Message Channel in the code at all.

The Gateway component is also a very simple Java Interface defined this way:

package org.bk.si.helloworld.hw2;

public interface Greeter {
 public void sendGreeting(String message);
}

So now the question is who takes care of creating the messaging and sending the message to a message channel - it is through Spring Integration configuration:

<?xml version="1.0" encoding="UTF-8"?>
<beans xmlns="http://www.springframework.org/schema/beans"
 xmlns:xsi="http://www.w3.org/2001/XMLSchema-instance"
 xmlns:int="http://www.springframework.org/schema/integration"
 xmlns:int-stream="http://www.springframework.org/schema/integration/stream"
 xsi:schemaLocation="http://www.springframework.org/schema/integration http://www.springframework.org/schema/integration/spring-integration-2.1.xsd
  http://www.springframework.org/schema/integration/stream http://www.springframework.org/schema/integration/stream/spring-integration-stream-2.1.xsd
  http://www.springframework.org/schema/beans http://www.springframework.org/schema/beans/spring-beans.xsd">


 <int:channel id="messagesChannel"></int:channel>
 
 <int:gateway service-interface="org.bk.si.helloworld.hw2.Greeter" default-request-channel="messagesChannel"></int:gateway>
 
 <int-stream:stdout-channel-adapter channel="messagesChannel" append-newline="true"/>
 

</beans>


The highlighted line above creates the Gateway component out of the Greeter interface, a proxy is created in the background which handles everything that was being done explicitly earlier - creating the messaging and sending the message to the message channel.


Now to add a little more complexity to the Hello World sample:

Consider the following test:
package org.bk.si.helloworld.hw3;

import org.junit.Test;
import org.junit.runner.RunWith;
import org.springframework.beans.factory.annotation.Autowired;
import org.springframework.test.context.ContextConfiguration;
import org.springframework.test.context.junit4.SpringJUnit4ClassRunner;


@RunWith(SpringJUnit4ClassRunner.class)
@ContextConfiguration("helloworld.xml")
public class HelloWorldTest {

 @Autowired Greeter greeter;

 @Test
 public void testHelloWorld(){
  System.out.println("Started..");
  long start = System.nanoTime();
  for (int i=0;i<10;i++){
   this.greeter.sendMessage(String.format("Hello World %d",i));
  }
  System.out.println("Completed..");
  System.out.println(String.format("Took %f ms", (System.nanoTime()-start)/10e6));
 }
}

This is same as the previous unit test, except that in this case the "Hello World" message is being dispatched 10 times. The supporting Spring Integration configuration file is the following:

<?xml version="1.0" encoding="UTF-8"?>
<beans xmlns="http://www.springframework.org/schema/beans"
 xmlns:xsi="http://www.w3.org/2001/XMLSchema-instance"
 xmlns:int="http://www.springframework.org/schema/integration"
 xmlns:int-stream="http://www.springframework.org/schema/integration/stream"
 xsi:schemaLocation="http://www.springframework.org/schema/integration http://www.springframework.org/schema/integration/spring-integration-2.1.xsd
  http://www.springframework.org/schema/integration/stream http://www.springframework.org/schema/integration/stream/spring-integration-stream-2.1.xsd
  http://www.springframework.org/schema/beans http://www.springframework.org/schema/beans/spring-beans.xsd">


 <int:publish-subscribe-channel id="messagesChannel"/>
 <int:gateway service-interface="org.bk.si.helloworld.hw3.Greeter" default-request-channel="messagesChannel"></int:gateway>
 
 
 <int-stream:stderr-channel-adapter channel="messagesChannel" append-newline="true"/>
 <int-stream:stdout-channel-adapter channel="messagesChannel" append-newline="true"/>
 
</beans>


If I run this test now, the output is along these lines:


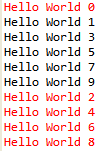
The lines in red are being printed to syserr and in black are being printed to sysout.

So the question is why are some of them going to sysout and some of them going to syserr and why not to both?

The answer is because of the type of channel - "messagesChannel" above is a "Direct Channel" in the Spring Integration terminology and has "Point to point" semantics. The point-to-point semantics basically means that when a message comes into the Messaging Channel, only 1 receiver gets the message - so in this case either the standard out adapter OR the standard err adapter ends up printing the message that is coming into the message channel.

So to print to both adapters, the fix is to simply change the semantics of the channel - instead of a Point to Point channel, make it a Publish-Subscribe channel, which is a channel broadcasting out a message to multiple receivers. The change is very simple using Spring Integration:

<?xml version="1.0" encoding="UTF-8"?>
<beans xmlns="http://www.springframework.org/schema/beans"
 xmlns:xsi="http://www.w3.org/2001/XMLSchema-instance"
 xmlns:int="http://www.springframework.org/schema/integration"
 xmlns:int-stream="http://www.springframework.org/schema/integration/stream"
 xsi:schemaLocation="http://www.springframework.org/schema/integration http://www.springframework.org/schema/integration/spring-integration-2.1.xsd
  http://www.springframework.org/schema/integration/stream http://www.springframework.org/schema/integration/stream/spring-integration-stream-2.1.xsd
  http://www.springframework.org/schema/beans http://www.springframework.org/schema/beans/spring-beans.xsd">


 <int:publish-subscribe-channel id="messagesChannel"/>
 <int:gateway service-interface="org.bk.si.helloworld.hw3.Greeter" default-request-channel="messagesChannel"></int:gateway>
 
 
 <int-stream:stderr-channel-adapter channel="messagesChannel" append-newline="true"/>
 <int-stream:stdout-channel-adapter channel="messagesChannel" append-newline="true"/>
 
</beans>


The output now will be the messages being printed to BOTH sysout and syserr

So this completes the introduction to a Gateway component, Direct Channel and Publish Subscribe channel.


Thursday, July 26, 2012

EclipseLink MOXy as a JAXB provider

EclipseLink MOXy is a JAXB provider and is a compelling alternative to the default JAXB provider built into JDK.

First a simple test to marshal a Java object to XML:

This is the model:

@XmlRootElement(name="MemberDetailsRequest", namespace="http://bk.org/memberservice/")
@XmlAccessorType(XmlAccessType.FIELD)
public class MemberDetailsRequest {

 public MemberDetailsRequest() {
 }

 public MemberDetailsRequest(Long id) {
  this.id = id;
 }

 private Long id;

 public Long getId() {
  return id;
 }

 public void setId(Long id) {
  this.id = id;
 }
}

and the test for marshalling:
package org.bk.memberservice.binding;

import static org.hamcrest.MatcherAssert.assertThat;
import static org.hamcrest.Matchers.containsString;
import static org.hamcrest.Matchers.is;

import java.io.StringWriter;

import javax.xml.bind.JAXBContext;
import javax.xml.bind.Marshaller;

import org.bk.memberservice.message.MemberDetailsRequest;
import org.junit.Test;

public class TestJaxbRequestBinding {

 @Test
 public void testJaxbBinding() throws Exception{
  JAXBContext jaxbContext = JAXBContext.newInstance(MemberDetailsRequest.class);
  assertThat((jaxbContext instanceof org.eclipse.persistence.jaxb.JAXBContext), is(true));
  Marshaller marshaller = jaxbContext.createMarshaller();
  
  MemberDetailsRequest memberDetailsRequest = new MemberDetailsRequest();
  memberDetailsRequest.setId(1L);
  StringWriter writer = new StringWriter();
  
  marshaller.marshal(memberDetailsRequest, writer);
  String marshalledXml = writer.toString();
  assertThat(marshalledXml, containsString("MemberDetailsRequest"));
 }
}


The highlighted line checks to make sure that MOXy's JAXBContext is the one created.

So to use MOXy as the JAXB provider, first step is to get the jar files,

I had a little difficulty finding the MOXy jars to be used in a Maven pom file, this is what worked for me:

<repository>
            <id>EclipseLink Repo</id>
            <url>http://download.eclipse.org/rt/eclipselink/maven.repo</url>
            <name>EclipseLink Repo</name>
        </repository>

  <dependency>
            <groupId>org.eclipse.persistence</groupId>
            <artifactId>org.eclipse.persistence.moxy</artifactId>
            <version>2.4.0</version>
        </dependency>

The next step is to instruct to set MOXy as the JAXB provider. This is done by placing a jaxb.properties along with any of the JAXB model classes. So in this case, I have placed a jaxb.properties into my package holding MemberDetailsRequest class, and the contents are the following:
javax.xml.bind.context.factory = org.eclipse.persistence.jaxb.JAXBContextFactory

and that's it!

Reference:
Blaise Dougan's Blog: http://blog.bdoughan.com/ and his very enthusiastic participation in Stack Overflow

Wednesday, July 18, 2012

Spring-test-mvc, @Configuration and 1 page test

I like how a very concise 1 page end to end controller test for a sample REST service is possible through a combination of @Configuration, Spring Testing Support and Spring-test-mvc.

Here is the test:

package org.bk.webtest;

import static org.hamcrest.Matchers.containsString;
import static org.springframework.test.web.server.request.MockMvcRequestBuilders.*;
import static org.springframework.test.web.server.result.MockMvcResultMatchers.*;
import static org.springframework.test.web.server.setup.MockMvcBuilders.*;

import java.util.Collection;
import java.util.HashMap;
import java.util.Map;

import org.junit.Test;
import org.springframework.context.annotation.ComponentScan;
import org.springframework.context.annotation.Configuration;
import org.springframework.http.MediaType;
import org.springframework.stereotype.Controller;
import org.springframework.test.web.server.MockMvc;
import org.springframework.web.bind.annotation.PathVariable;
import org.springframework.web.bind.annotation.RequestBody;
import org.springframework.web.bind.annotation.RequestMapping;
import org.springframework.web.bind.annotation.RequestMethod;
import org.springframework.web.bind.annotation.ResponseBody;
import org.springframework.web.servlet.config.annotation.EnableWebMvc;

public class WebContextConfigurationTest {
 private final String createJson = "{\"id\":%d,\"first\":\"%s\",\"last\":\"%s\"}";
 private final String membersJson = "[{\"id\":1,\"first\":\"One\",\"last\":\"One\"},{\"id\":2,\"first\":\"Two\",\"last\":\"Two\"},{\"id\":3,\"first\":\"Three\",\"last\":\"Three\"}]";
 private final String updatedMembersJson = "[{\"id\":1,\"first\":\"One\",\"last\":\"OneUpdated\"},{\"id\":2,\"first\":\"Two\",\"last\":\"Two\"},{\"id\":3,\"first\":\"Three\",\"last\":\"Three\"}]";
 
 @Test
 public void testAWebFlow() throws Exception {
  MockMvc mockMvc = annotationConfigSetup(WebContextConfigurationTest.TestConfiguration.class)
   .build();
  mockMvc.perform(post("/members").contentType(MediaType.APPLICATION_JSON).body(String.format(createJson, 1,"One","One").getBytes()))
    .andExpect(status().isOk());
  mockMvc.perform(post("/members").contentType(MediaType.APPLICATION_JSON).body(String.format(createJson, 2,"Two","Two").getBytes()))
   .andExpect(status().isOk());
  mockMvc.perform(post("/members").contentType(MediaType.APPLICATION_JSON).body(String.format(createJson, 3,"Three","Three").getBytes()))
   .andExpect(status().isOk());
  
  
  mockMvc.perform(get("/members").contentType(MediaType.APPLICATION_JSON))
    .andExpect(status().isOk())
    .andExpect(content().string(containsString(membersJson)));
  
  mockMvc.perform(put("/members").contentType(MediaType.APPLICATION_JSON).body(String.format(createJson, 1,"One","OneUpdated").getBytes()))
   .andExpect(status().isOk());
  
  mockMvc.perform(get("/members").contentType(MediaType.APPLICATION_JSON))
   .andExpect(status().isOk())
   .andExpect(content().string(containsString(updatedMembersJson)));
  
  mockMvc.perform(get("/members/1").contentType(MediaType.APPLICATION_JSON))
   .andExpect(status().isOk())
   .andExpect(content().string(String.format(createJson, 1,"One","OneUpdated")));
  
  mockMvc.perform(delete("/members/1").contentType(MediaType.APPLICATION_JSON))
   .andExpect(status().isOk());
  
  
 }

 @Configuration
 @EnableWebMvc
 @ComponentScan(basePackages="org.bk.webtest")
 public static class TestConfiguration{
  
 }
}

@Controller
class MembersController{
 private Map<Integer, Member> memberDB = new HashMap<>();
 @RequestMapping(value = "/members", method = RequestMethod.GET)
    @ResponseBody
    public Collection<Member> list() {
        return this.memberDB.values();
    }
 
 @RequestMapping(value="/members", method=RequestMethod.POST)
 public @ResponseBody Member create(@RequestBody Member member){
  this.memberDB.put(member.getId(), member);
  return member;
 }
 
 @RequestMapping(value="/members", method=RequestMethod.PUT)
 public @ResponseBody Member update(@RequestBody Member member){
  this.memberDB.put(member.getId(), member);
  return member;
 }
 
 @RequestMapping(value="/members/{id}", method=RequestMethod.GET)
 public @ResponseBody Member get(@PathVariable("id") Integer id){
  return this.memberDB.get(id);
 }
 
 @RequestMapping(value="/members/{id}", method=RequestMethod.DELETE)
 public void delete(@PathVariable("id") Integer id){
  this.memberDB.remove(id);
 }
}

class Member{
 private Integer id;
 private String first;
 private String last;
 
 public Integer getId() {
  return id;
 }
 public void setId(Integer id) {
  this.id = id;
 }

 public String getFirst() {
  return first;
 }
 
 public void setFirst(String first) {
  this.first = first;
 }
 public String getLast() {
  return last;
 }
 public void setLast(String last) {
  this.last = last;
 }
}


This is a complete test which performs a test for a REST based controller supporting creating a new entity through Http POST, Updating it through a Http PUT, getting a list or an entity through Http GET, and deleting it through DELETE.

Just the following configures the complete Spring MVC!
@Configuration
 @EnableWebMvc
 @ComponentScan(basePackages="org.bk.webtest")
 public static class TestConfiguration{
  
 }

Tuesday, July 17, 2012

Reference to dynamic proxy in a proxied class

There was an interesting question in Stackoverflow about how a Spring Bean can get a reference to the proxy created by Spring to handle transactions, Spring AOP,  Caching, Async flows etc. A reference to the proxy was required because if there is a call to itself by the proxied bean, this call would completely bypass the proxy.

Consider an InventoryService interface:
public interface InventoryService{
    public Inventory create(Inventory inventory);
    public List<Inventory> list();
    public Inventory findByVin(String vin);
    public Inventory update(Inventory inventory);
    public boolean delete(Long id);
    public Inventory compositeUpdateService(String vin, String newMake);
}

Consider also that there is a default implementation for this service, and assume that the last method compositeUpdateService, internally invokes two methods on the bean itself, like this:
public Inventory compositeUpdateService(String vin, String newMake) {
    logger.info("composite Update Service called");
    Inventory inventory = this.findByVin(vin);
    inventory.setMake(newMake);
    this.update(inventory);
    return inventory;
}

If I now create an aspect to advice any calls to InventoryService with the objective of tracking how long each method call takes, Spring AOP would create a dynamic proxy for the InventoryService bean:

However the calls to compositeUpdateService will record the time only at the level of this method, the calls that compositeUpdateService internally makes to findByVin, update is bypassing the proxy and hence will not be tracked:


A good fix for this is to use the full power of AspectJ - AspectJ would change the bytecode of all the methods of DefaultInventoryService to include the call to the advice.

A workaround that we worked out was to inject a reference to the proxy itself into the bean and instead of calling say this.findByVin and this.update, call proxy.findByVin and proxy.update!

So now how do we cleanly inject in a reference to the proxy into the bean - the solution that I offered was to create an interface to mark beans interested in their own proxies:

public interface ProxyAware<T> {
    void setProxy(T proxy);
}

The interested interface and its implementation would look like this:
public interface InventoryService extends ProxyAware<InventoryService>{
...
}

public class DefaultInventoryService implements InventoryService{ 
    ...

    private InventoryService proxy;
 @Override
 public void setProxy(InventoryService proxy) {
  this.proxy = proxy;
 }
}

and then define a BeanPostProcessor to inject in this proxy!
public class ProxyInjectingBeanPostProcessor implements BeanPostProcessor, Ordered {
 @Override
 public Object postProcessBeforeInitialization(Object bean, String beanName) throws BeansException {
  return bean;
 }

 @Override
 public Object postProcessAfterInitialization(Object bean, String beanName) throws BeansException {
  if (AopUtils.isAopProxy((bean))){
   try {
    Object target = ((Advised)bean).getTargetSource().getTarget();

    if (target instanceof ProxyAware){
     ((ProxyAware) target).setProxy(bean);
    }
   } catch (Exception e) {
    return bean;
   }
  }
  return bean;
 }

 @Override
 public int getOrder() {
  return Integer.MAX_VALUE;
 }
}

Not the cleanest of implementations, but works!

Update:
Tomasz has pointed out a much simpler way to get hold of the proxy in the proxied class, this is by using AopContext.currentProxy() method. Spring AOP has to be instructed to set up this method, it is done through configuration this way:

<aop:aspectj-autoproxy expose-proxy="true"/>

Once this is done, in the proxied class, the reference to the proxy can be obtained by calling AopContext.currentProxy()!

Reference: http://blog.springsource.org/2012/05/23/understanding-proxy-usage-in-spring/

Wednesday, July 11, 2012

Spring MVC Integration Tests - Correction

In a previous blog entry - Spring MVC Integration Tests I had mentioned that one of the issues in using Spring-test-mvc is that any resource required from the WEB-INF folder is not available in the unit tests. This is actually not correct.

Resources under WEB-INF location can also be used with spring-test-mvc, this way:

xmlConfigSetup("/WEB-INF/spring/webmvc-config.xml","classpath:/org/bk/lmt/web/contextcontrollertest.xml")
 .configureWebAppRootDir("src/main/webapp", false).build()
 .perform(post("/contexts").param("name", "context1"))
 .andExpect(status().isOk())
 .andExpect(view().name("redirect:/contexts"));

xmlConfigSetup("/WEB-INF/spring/webmvc-config.xml", "classpath:/org/bk/lmt/web/contextcontrollertest.xml")
 .configureWebAppRootDir("src/main/webapp", false).build()
 .perform(get("/contexts"))
 .andExpect(status().isOk())
 .andExpect(view().name("contexts/list"));

the Web Application path can be specified as shown in the highlighted lines above. This works because the unit test current working directory is typically the root of the project, and if the structure is a typical maven project structure then the web root will be "src/main/webapp" folder which can be resolved from the root of the project.

Saturday, July 7, 2012

Spring Integration - Session 1 - Hello World

The "Hello World" of Spring Integration - consider a simple program to print "Hello World" to the console using Spring Integration and in the process visit a few Enterprise Integration Patterns Concepts

Before jumping into the program itself, a quick review of messaging concepts will be helpful - Messaging is an Integration style where two independent applications communicate with each other through an intermediary - the intermediary is referred to as the "Messaging System". 

Enterprise Integration Patterns describes the common Integration related issues with Messaging based application Integration and their recommended solutions.

For eg. Consider one of the Enterprise Integration Patterns - The Messaging Channel, to quote from the Entprise Integration Patterns Book:

The problem "Messaging Channel" is trying to solve is:

An enterprise has two separate applications that need to communicate, preferably by using Messaging.
How does one application communicate with another using messaging?

The solution is:
Connect the applications using a Message Channel, where one application writes information to the channel and the other one reads that information from the channel. 

All the other Enterprise Integration Patterns are described along the same lines.

The reason to quickly visit Enterprise Integration Patterns is to set the context - Spring Integration aligns very closely with the Enterprise Integration Patterns and is the "Messaging system" that was mentioned earlier.

So now to see the Hello World using Spring Integration:

First a small junit:
@RunWith(SpringJUnit4ClassRunner.class)
@ContextConfiguration("helloworld.xml")
public class HelloWorldTest {
 
 @Autowired
 @Qualifier("messageChannel")
 MessageChannel messageChannel;

 @Test
 public void testHelloWorld() {
  Message<String> helloWorld = new GenericMessage<String>("Hello World");
  messageChannel.send(helloWorld);
 }
}

Here a MessageChannel is being wired into the test, the first application (here the Junit), sends a Message(in this case a string "Hello World") to the Message Channel, something reads the message from the "Message Channel" and writes the message to the system out.

Now, let us see the remaining part of how "something" picks up a message from the Message Channel and writes to the system out:
<?xml version="1.0" encoding="UTF-8"?>
<beans xmlns="http://www.springframework.org/schema/beans"
 xmlns:xsi="http://www.w3.org/2001/XMLSchema-instance"
 xmlns:int="http://www.springframework.org/schema/integration"
 xmlns:int-stream="http://www.springframework.org/schema/integration/stream"
 xsi:schemaLocation="http://www.springframework.org/schema/integration http://www.springframework.org/schema/integration/spring-integration-2.2.xsd
  http://www.springframework.org/schema/integration/stream http://www.springframework.org/schema/integration/stream/spring-integration-stream-2.2.xsd
  http://www.springframework.org/schema/beans http://www.springframework.org/schema/beans/spring-beans.xsd">

 <int:channel id="messageChannel"></int:channel>
 
 <int-stream:stdout-channel-adapter channel="messageChannel" append-newline="true"/>
</beans>

The above is a Spring Integration flow being described using Spring Custom namespaces, here the Integration Namespace. A "Message Channel", imaginatively called the "messageChannel" is created, a "Hello World" "Message" is placed into the "Messsage Channel", from which a "Channel Adapter" gets the message and prints it to the standard out.

This is a small program, but it uses three Enterprise Integration Patterns - the Message ("Hello World", which is the packet of information being sent to the messaging system, the "Message Channel" which was introduced earlier and the new one, the Channel Adapter, here an Outbound Channel Adapter which connects the messaging system to the application(in this case the system out). It further shows how Spring Integration aligns very closely with the Enterprise Integration Patterns terminology with its Spring custom namespace.

This simple program introduces Spring Integration, I will be introducing Spring Integration in more detail using a few more samples in the next few sessions.

References:
1. Spring Integration Reference: http://static.springsource.org/spring-integration/reference/htmlsingle/
2. Enterprise Integration Patterns: http://www.eaipatterns.com/index.html
3. Visio templates for EIP : http://www.eaipatterns.com/downloads.html

Spring Custom Namespaces

Spring Custom Namespaces  provides a good way to simplify the xml files used to describe the bean definitions of a Spring Application Context. It is a fairly old concept, first introduced with Spring 2.0, but deserves being reviewed once in a while.

Consider a case of having to configure a part of the beans for a Spring MVC application without custom namespaces - this would typically look like this:


<bean name="handlerAdapter" class="org.springframework.web.servlet.mvc.method.annotation.RequestMappingHandlerAdapter">
 <property name="webBindingInitializer">
  <bean class="org.springframework.web.bind.support.ConfigurableWebBindingInitializer">
   <property name="conversionService" ref="conversionService"></property>
   <property name="validator">
    <bean class="org.springframework.validation.beanvalidation.LocalValidatorFactoryBean"/>
   </property>
  </bean>
 </property>
 <property name="messageConverters">
  <list>
   <bean class="org.springframework.http.converter.ByteArrayHttpMessageConverter"></bean>
   <bean class="org.springframework.http.converter.StringHttpMessageConverter"></bean>
   <bean class="org.springframework.http.converter.ResourceHttpMessageConverter"></bean>
   <bean class="org.springframework.http.converter.xml.SourceHttpMessageConverter"></bean>
   <bean class="org.springframework.http.converter.xml.XmlAwareFormHttpMessageConverter"></bean>
   <bean class="org.springframework.http.converter.xml.Jaxb2RootElementHttpMessageConverter"></bean>
   <bean class="org.springframework.http.converter.json.MappingJacksonHttpMessageConverter"></bean>
  </list>
 </property>
</bean>

<bean name="handlerMapping" class="org.springframework.web.servlet.mvc.method.annotation.RequestMappingHandlerMapping">
 <property name="useSuffixPatternMatch" value="false"></property>
</bean>

Here it is configuring two beans - a handlerAdapter to handle the MVC controller flow and a handlerMapping to keep the mapping between request URI's and the Controller methods to handle the requests.

The same configuration becomes very concise with a custom namespace, "http://www.springframework.org/schema/mvc" typically given a namspace prefix of "mvc":

<mvc:annotation-driven conversion-service="conversionService"> 
</mvc:annotation-driven> 

This is in essence the advantage of using a Custom namespace - a very concise way to describe the Spring bean definitions

So how does a custom namespace work:

This section in the Spring Reference document describes it much better than I can - http://static.springsource.org/spring/docs/3.1.x/spring-framework-reference/html/extensible-xml.html#extensible-xml-schema . To summarize it, a custom namespace has 4 parts to it:

  • the schema - which describes the structure of the custom namespace - the tag names, attributes, child tags etc.
  • a NamespaceHandler - which creates the bean definition for the xml elements. However typically a better mechanism suggested by Spring document is to extend NameSpaceHandlerSupport and to register a series of BeanDefinitionParser(s) for the different xml elements supported by the Custom namespace(say annotation-driven, interceptors elements of mvc namespace).
  • BeanDefinitionParser - create the bean definition for the specific element - here is where a line like <mvc:annotation-driven/> will be expanded to the broader bean definitions with actual bean class names.
  • Registering the schema, NamespaceHandler - This is for Spring to find the schema for the custom namespaces and to find the NamespaceHandler that will handle the custom namespace. The registration of the schema is done by a file called META-INF/spring.schemas, this is neat way for Spring to find the schema in the classpath rather than downloading the schema over the web. The NamespaceHandler is further specified using a META-INF/spring.handlers file and contains the NamespaceHandler name that will handle the custom namespace, for eg. from the Spring documentation - 
http\://www.mycompany.com/schema/myns=org.springframework.samples.xml.MyNamespaceHandler


Tying it together

This information of how the Custom namespace works internally can be put to good use to understand some of behavior of a few custom namepsace tags. Consider a tag to load up the properties file:
<context:property-placeholder location="classpath*:META-INF/spring/database.properties"/>
So to find how a property-placeholder element works internally, first find the spring.handlers file. Since property-placeholder is in the context namespace, the spring.handlers file will be present in the spring-context.jar file
and the file indicates that the NamespaceHandler is org.springframework.context.config.ContextNamespaceHandler

The ContextNameSpaceHandler registers a BeanDefinition parser called org.springframework.context.config.PropertyPlaceholderBeanDefinitionParser. This BeanDefinitionParser creates a bean definition with a class name of "PropertyPlaceholderConfigurer" and so essentially we could have replaced:
<context:property-placeholder location="classpath*:META-INF/spring/database.properties" local-override="true" properties-ref="localProperties"/>
with but losing conciseness in the process -
<bean class="org.springframework.beans.factory.config.PropertyPlaceholderConfigurer">
 <property name="location" value="classpath*:META-INF/spring/database.properties"></property>
 <property name="localOverride" value="true"></property>
 <property name="properties">
  <ref bean="localProperties"/>
 </property>
</bean>

This however provides a good way to understand some of the nuances of how Spring handles things underlying a custom namespace.


Sunday, July 1, 2012

Spring MVC Integration Tests

An approach to Integration Testing the controllers in Spring MVC is to use the Integration Test support provided by Spring.

With Junit4 this support consists of a custom Junit Runner called the SpringJunit4ClassRunner, and a custom annotation to load up the relevant Spring configuration.

A sample Integration test would be along these lines:

@RunWith(SpringJUnit4ClassRunner.class)
@ContextConfiguration(locations={"classpath:/META-INF/spring/webmvc-config.xml", "contextcontrollertest.xml"})
public class ContextControllerTest {

    @Autowired
    private RequestMappingHandlerAdapter handlerAdapter;

    @Autowired
    private RequestMappingHandlerMapping handlerMapping;
    
    ......
 
 @Test
 public void testContextController() throws Exception{
  MockHttpServletRequest httpRequest = new MockHttpServletRequest("POST","/contexts");
  httpRequest.addParameter("name", "context1");
  
  httpRequest.setAttribute(DispatcherServlet.OUTPUT_FLASH_MAP_ATTRIBUTE,new FlashMap());
  MockHttpServletResponse response = new MockHttpServletResponse();
  Authentication authentication = new UsernamePasswordAuthenticationToken(new CustomUserDetails(..), null);
  SecurityContextHolder.getContext().setAuthentication(authentication);

  Object handler = this.handlerMapping.getHandler(httpRequest).getHandler();
  ModelAndView modelAndView = handlerAdapter.handle(httpRequest, response, handler);
  assertThat(modelAndView.getViewName(), is("redirect:/contexts"));
 }
}


I have used a MockHttpServletRequest to create a dummy POST request to a "/contexts" uri, and added some authentication details for Spring Security related details to be available in the Controller. The ModelAndView returned by the controller is being validated to make sure the returned view name is as expected.

A better way to perform a Controller related integration is using a relatively new Spring project called Spring-test-mvc , which provides a fluent way to test the controller flows. The same tests as above look like the following with Spring-test-mvc:
@Test
public void testContextController() throws Exception{
 Authentication authentication = new UsernamePasswordAuthenticationToken(new CustomUserDetails(..), null);
 SecurityContextHolder.getContext().setAuthentication(authentication);
 
 xmlConfigSetup("classpath:/META-INF/spring/webmvc-config.xml", "classpath:/org/bk/lmt/web/contextcontrollertest.xml").build()
  .perform(post("/contexts").param("name", "context1"))
  .andExpect(status().isOk())
  .andExpect(view().name("redirect:/contexts"));
}

The test has now become much more concise and there is no need to deal directly with a MockHttpServletRequest and MockHttpServletResponse instances and reads very well.

I have a little reservation about the amount of static imports and the number of function calls that are involved here, but again like everything else it is just a matter of getting used to this approach of testing.

One issue that I faced when implementing this controller test is that any resources that are required in the Spring context files from the WEB-INF location is not available in unit tests, so I moved all my Web related application context files from `/WEB-INF/spring` folder to the `META-INF/spring` folder in the classpath. Further, there were some beans that are heavily dependent on WEB-INF resources, for eg, tiles layouts, so I moved out the Tiles related beans to a separate Spring context file which are not imported as part of the Integration tests.
I have posted another blog entry with how spring-test-mvc supports loading web resources.