Showing posts with label angularjs. Show all posts

Saturday, July 19, 2014

Tailing a file - Spring Websocket sample

This is a sample that I have wanted to try for sometime - A Websocket application to tail the contents of a file.


The following is the final view of the web-application:
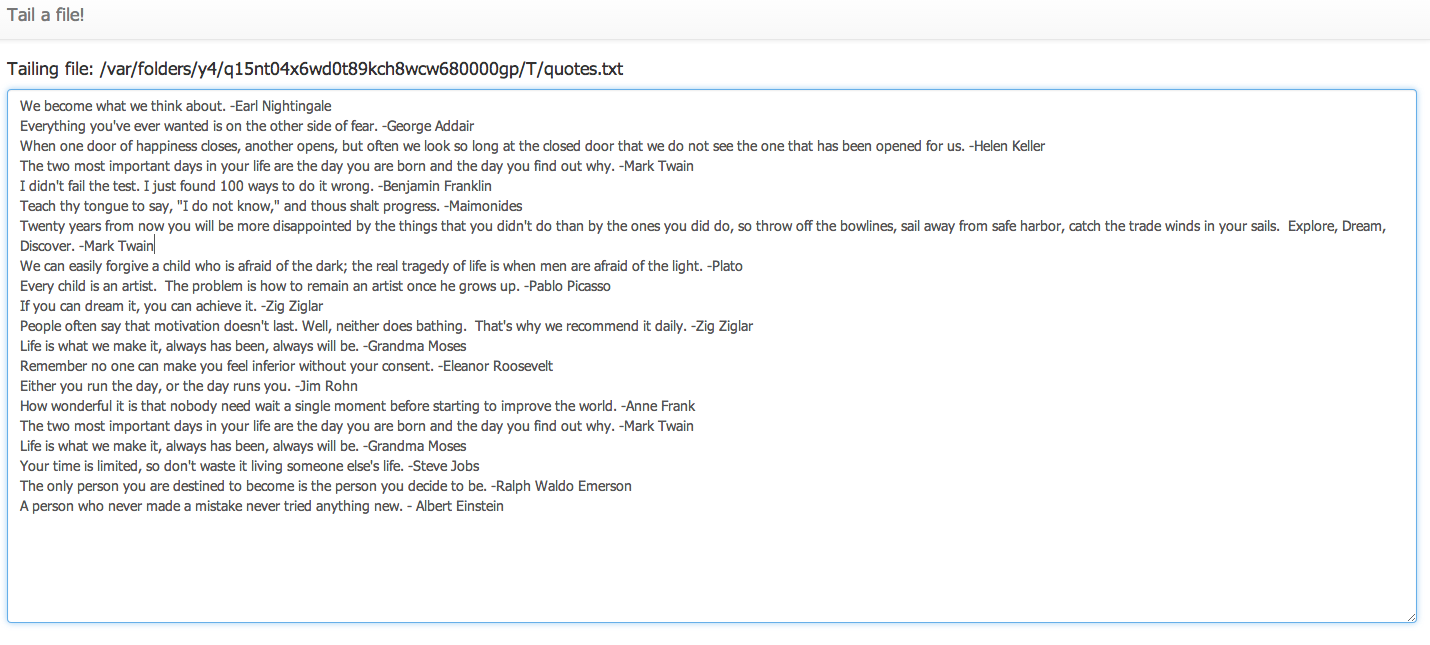


There are a few parts to this application:

Generating a File to tail:


I chose to use a set of 100 random quotes as a source of the file content, every few seconds the application generates a quote and writes this quote to the temporary file. Spring Integration is used for wiring this flow for writing the contents to the file:

<int:channel id="toFileChannel"/>

<int:inbound-channel-adapter ref="randomQuoteGenerator" method="generateQuote" channel="toFileChannel">
	<int:poller fixed-delay="2000"/>
</int:inbound-channel-adapter>

<int:chain input-channel="toFileChannel">
	<int:header-enricher>
		<int:header name="file_name" value="quotes.txt"/>
	</int:header-enricher>
	<int-file:outbound-channel-adapter directory="#{systemProperties['java.io.tmpdir']}" mode="APPEND" />
</int:chain>

Just a quick note, Spring Integration flows can now also be written using a Java Based DSL, and this flow using Java is available here

Tailing the file and sending the content to a broker


The actual tailing of the file itself can be accomplished by OS specific tail command or by using a library like Apache Commons IO. Again in my case I decided to use Spring Integration which provides Inbound channel adapters to tail a file purely using configuration, this flow looks like this:
<int:channel id="toTopicChannel"/>

<int-file:tail-inbound-channel-adapter id="fileInboundChannelAdapter"
				channel="toTopicChannel"
				file="#{systemProperties['java.io.tmpdir']}/quotes.txt"
				delay="2000"
				file-delay="10000"/>

<int:outbound-channel-adapter ref="fileContentRecordingService" method="sendLinesToTopic" channel="toTopicChannel"/>
and its working Java equivalent

There is a reference to a "fileContentRecordingService" above, this is the component which will direct the lines of the file to a place where the Websocket client will subscribe to.

Websocket server configuration

Spring Websocket support makes it super simple to write a Websocket based application, in this instance the entire working configuration is the following:
@Configuration
@EnableWebSocketMessageBroker
public class WebSocketDefaultConfig extends AbstractWebSocketMessageBrokerConfigurer {

	@Override
	public void configureMessageBroker(MessageBrokerRegistry config) {
		//config.enableStompBrokerRelay("/topic/", "/queue/");
		config.enableSimpleBroker("/topic/", "/queue/");
		config.setApplicationDestinationPrefixes("/app");
	}

	@Override
	public void registerStompEndpoints(StompEndpointRegistry registry) {
		registry.addEndpoint("/tailfilesep").withSockJS();
	}
}

This may seem a little over the top, but what these few lines of configuration does is very powerful and the configuration can be better understood by going through the reference here. In brief, it sets up a websocket endpoint at '/tailfileep' uri, this endpoint is enhanced with SockJS support, Stomp is used as a sub-protocol, endpoints `/topic` and `/queue` is configured to a real broker like RabbitMQ or ActiveMQ but in this specific to an in-memory one.

Going back to the "fileContentRecordingService" once more, this component essentially takes the line of the file and sends it this in-memory broker, SimpMessagingTemplate facilitates this wiring:

public class FileContentRecordingService {
	@Autowired
	private SimpMessagingTemplate simpMessagingTemplate;

	public void sendLinesToTopic(String line) {
		this.simpMessagingTemplate.convertAndSend("/topic/tailfiles", line);
	}
}


Websocket UI configuration

The UI is angularjs based, the client controller is set up this way and internally uses the javascript libraries for sockjs and stomp support:

var tailFilesApp = angular.module("tailFilesApp",[]);

tailFilesApp.controller("TailFilesCtrl", function ($scope) {
    function init() {
        $scope.buffer = new CircularBuffer(20);
    }

    $scope.initSockets = function() {
        $scope.socket={};
        $scope.socket.client = new SockJS("/tailfilesep);
        $scope.socket.stomp = Stomp.over($scope.socket.client);
        $scope.socket.stomp.connect({}, function() {
            $scope.socket.stomp.subscribe("/topic/tailfiles", $scope.notify);
        });
        $scope.socket.client.onclose = $scope.reconnect;
    };

    $scope.notify = function(message) {
        $scope.$apply(function() {
            $scope.buffer.add(angular.fromJson(message.body));
        });
    };

    $scope.reconnect = function() {
        setTimeout($scope.initSockets, 10000);
    };

    init();
    $scope.initSockets();
});

The meat of this code is the "notify" function which the callback acting on the messages from the server, in this instance the new lines coming into the file and showing it in a textarea.


This wraps up the entire application to tail a file. A complete working sample without any external dependencies is available at this github location, instructions to start it up is also available at that location.

Conclusion

Spring Websockets provides a concise way to create Websocket based applications, this sample provides a good demonstration of this support. I had presented on this topic recently at my local JUG (IndyJUG) and a deck with the presentation is available here

Sunday, June 15, 2014

Thymeleaf - fragments and angularjs router partial views

One more of the many cool features of thymeleaf is the ability to render fragments of templates - I have found this to be an especially useful feature to use with AngularJs.

AngularJS $routeProvider or AngularUI router can be configured to return partial views for different "paths", using thymeleaf to return these partial views works really well.

Consider a simple CRUD flow, with the AngularUI router views defined this way:

app.config(function ($stateProvider, $urlRouterProvider) {
    $urlRouterProvider.otherwise("list");

    $stateProvider
        .state('list', {
            url:'/list',
            templateUrl: URLS.partialsList,
            controller: 'HotelCtrl'
        })
        .state('edit', {
            url:'/edit/:hotelId',
            templateUrl: URLS.partialsEdit,
            controller: 'HotelEditCtrl'
        })
        .state('create', {
            url:'/create',
            templateUrl: URLS.partialsCreate,
            controller: 'HotelCtrl'
        });
});

The templateUrl above is the partial view rendered when the appropriate state is activated, here these are defined using javascript variables and set using thymeleaf templates this way(to cleanly resolve the context path of the deployed application as the root path):

<script th:inline="javascript">
    /*<![CDATA[*/
    var URLS = {};
    URLS.partialsList = /*[[@{/hotels/partialsList}]]*/ '/hotels/partialsList';
    URLS.partialsEdit = /*[[@{/hotels/partialsEdit}]]*/ '/hotels/partialsEdit';
    URLS.partialsCreate = /*[[@{/hotels/partialsCreate}]]*/ '/hotels/partialsCreate';
    /*]]>*/
</script>

Now, consider one of the fragment definitions, say the one handling the list:

file: templates/hotels/partialList.html

<!DOCTYPE html>
<html xmlns:th="http://www.thymeleaf.org" layout:decorator="layout/sitelayout">
<head>
    <title th:text="#{app.name}">List of Hotels</title>
    <link rel="stylesheet" th:href="@{/webjars/bootstrap/3.1.1/css/bootstrap.min.css}"
          href="http://netdna.bootstrapcdn.com/bootstrap/3.1.1/css/bootstrap.min.css"/>
    <link rel="stylesheet" th:href="@{/webjars/bootstrap/3.1.1/css/bootstrap-theme.css}"
          href="http://netdna.bootstrapcdn.com/bootstrap/3.1.1/css/bootstrap-theme.css"/>
    <link rel="stylesheet" th:href="@{/css/application.css}" href="../../static/css/application.css"/>
</head>
<body>
<div class="container">
    <div class="row">
        <div class="col-xs-12">
            <h1 class="well well-small">Hotels</h1>
        </div>
    </div>
    <div th:fragment="content">
        <div class="row">
            <div class="col-xs-12">
                <table class="table table-bordered table-striped">
                    <thead>
                    <tr>
                        <th>ID</th>
                        <th>Name</th>
                        <th>Address</th>
                        <th>Zip</th>
                        <th>Action</th>
                    </tr>
                    </thead>
                    <tbody>
                    <tr ng-repeat="hotel in hotels">
                        <td>{{hotel.id}}</td>
                        <td>{{hotel.name}}</td>
                        <td>{{hotel.address}}</td>
                        <td>{{hotel.zip}}</td>
                        <td><a ui-sref="edit({ hotelId: hotel.id })">Edit</a> | <a
                                ng-click="deleteHotel(hotel)">Delete</a></td>
                    </tr>
                    </tbody>
                </table>
            </div>
        </div>
        <div class="row">
            <div class="col-xs-12">
                <a ui-sref="create" class="btn btn-default">New Hotel</a>
            </div>
        </div>
    </div>
</div>
</body>
</html>

The great thing about thymeleaf here is that this view can be opened up in a browser and previewed. To return the part of the view, which in this case is the section which starts with "th:fragment="content"", all I have to do is to return the name of the view as "hotels/partialList::content"!

The same approach can be followed for the update and the create views.

One part which I have left open is about how the uri in the UI which is "/hotels/partialsList" maps to "hotels/partialList::content", with Spring MVC this can be easily done through a View Controller, which is essentially a way to return a view name without needing to go through a Controller and can be configured this way:

@Configuration
public class WebConfig extends WebMvcConfigurerAdapter {

 @Override
 public void addViewControllers(ViewControllerRegistry registry) {
  registry.addViewController("/hotels/partialsList").setViewName("hotels/partialsList::content");
  registry.addViewController("/hotels/partialsCreate").setViewName("hotels/partialsCreate::content");
  registry.addViewController("/hotels/partialsEdit").setViewName("hotels/partialsEdit::content");
 }

}

So to summarize, you create a full html view using thymeleaf templates which can be previewed and any rendering issues fixed by opening the view in a browser during development time and then return the fragment of the view at runtime purely by referring to the relevant section of the html page.

A sample which follows this pattern is available at this github location - https://github.com/bijukunjummen/spring-boot-mvc-test


Thursday, May 22, 2014

Spring Rest Controller with angularjs $resource

Angularjs ngResource is an angularjs module for interacting with REST based services. I used it recently for a small project with Spring MVC and wanted to document a configuration that worked well for me.

The controller is run of the mill, it supports CRUD operations on a Hotel entity and supports the following methods:

POST /rest/hotels - creates a Hotel entity
GET /rest/hotels - gets the list of Hotel entities
GET /rest/hotels/:id - retrieves an entity with specified Id
PUT /rest/hotels/:id - updates an entity
DELETE /rest/hotels/:id - deletes an entity with the specified id

This can implemented in the following way using Spring MVC:

@RestController
@RequestMapping("/rest/hotels")
public class RestHotelController {
 private HotelRepository hotelRepository;
 
 @Autowired
 public RestHotelController(HotelRepository hotelRepository) {
  this.hotelRepository = hotelRepository;
 }

 @RequestMapping(method=RequestMethod.POST)
 public Hotel create(@RequestBody @Valid Hotel hotel) {
  return this.hotelRepository.save(hotel);
 }

 @RequestMapping(method=RequestMethod.GET)
 public List<Hotel> list() {
  return this.hotelRepository.findAll();
 }

 @RequestMapping(value="/{id}", method=RequestMethod.GET)
 public Hotel get(@PathVariable("id") long id) {
  return this.hotelRepository.findOne(id);
 }
 
 @RequestMapping(value="/{id}", method=RequestMethod.PUT)
 public Hotel update(@PathVariable("id") long id, @RequestBody @Valid Hotel hotel) {
  return hotelRepository.save(hotel);
 }
 
 @RequestMapping(value="/{id}", method=RequestMethod.DELETE)
 public ResponseEntity<Boolean> delete(@PathVariable("id") long id) {
  this.hotelRepository.delete(id);
  return new ResponseEntity<Boolean>(Boolean.TRUE, HttpStatus.OK);
 }
}

Note the @RestController annotation, this is a new annotation introduced with Spring Framework 4.0, with this annotation specified on the controller, the @ResponseBody annotation on each of the methods can be avoided.

On the angularjs side, the ngResource module can be configured in a factory the following way, to consume this service:

app.factory("Hotel", function ($resource) {
    return $resource("/rest/hotels", {id: "@id"}, {
        update: {
            method: 'PUT'
        }
    });
});

The only change to the default configuration is in specifying the additional "update" action with the Http method of PUT instead of POST. With this change, the REST API can be accessed the following way:

POST /rest/hotels translates to:

var hotel = new Hotel({name:"test",address:"test address", zip:"0001"});
hotel.$save();

Or another variation of this:
Hotel.save({}, {name:"test",address:"test address", zip:"0001"});

GET /rest/hotels translates to :
Hotel.query();

GET /rest/hotels/:id translates to :
Hotel.get({id:1})

PUT /rest/hotels/:id translates to :
var hotel = new Hotel({id:1, name:"test",address:"test address", zip:"0001"});
hotel.$update();

DELETE /rest/hotels/:id translates to:
var hotel = new Hotel({id:1});
hotel.$delete();
OR
Hotel.delete({id:1});

To handle successful and failure outcomes just pass in additional callback handlers:

for eg. with create:
var hotel = new Hotel({name:"test",address:"test address", zip:"0001"});
hotel.$save({},function(response){
  //on success
}, function(failedResponse){
  //on failure
});

A complete CRUD working sample with angularjs and Spring MVC is available at this github location: https://github.com/bijukunjummen/spring-boot-mvc-test/tree/withangular