Thursday, December 21, 2023

Java String Template

The first time you look at a Java String Template, it feels right and wrong simultaneously. 

String first = "John";
String last = "Smith";
String info = STR. "My first name is \{ first } and my last name is \{ last }" ;       

Right because the result of the final statement is with the placeholders correctly evaluated and filled in. It feels wrong because of the strange new "STR." expression and the way the placeholders are escaped "\{ }" 

However now that I have looked at it for some time, the reasoning does make sense and I have gotten used to the new syntax.

So let’s start with the motivation first, I will mostly follow the structure of the well-explained JEP that goes with this feature.


Motivation

It has traditionally been cumbersome to compose a string using data and expressions, taking an example from the JEP, say to compose:

10 plus 20 equals 30

would look something like this:
int x = 10;
int y = 20;
String s = new StringBuilder()
        .append(x)
        .append(" plus ")
        .append(y)
        .append(" equals ")
        .append(x + y)
        .toString();
With String Template such extensive composing is no longer needed and looks something like this:

int x = 10;
int y = 20;
String s = STR. "\{ x } plus \{ y } equals \{ x + y }" ;


Workings

So there are a few parts to it:
  1. the String template \{ x } plus \{ y } equals \{ x + y }, which is intuitive, the placeholder variables and expressions in a String template are escaped using \{ } syntax
  2. brand new expression syntax, STR.<string template>
  3. STR is the “Template Processor”, that returns the final processed string
It is illegal to have a String template without a String Template Processor, if I were to try without having it, the following is the error I get in Intellij:


String Template Processor

String Template Processor is the part that provides special powers, imagine processors that can avoid SQL injection while crafting a SQL statement!

Looking closely first at a raw String Template, itis obtained by using a RAW String Template Processor

String first = "John";
String last = "Smith";
StringTemplate st = RAW. "My first name is \{ first } and my last name is \{ last }" ;


And is composed of two sets of data:

  • fragments, which is [“My first name is” , “and my last name is” , “”] in the template above, the pieces of fixed text around the template placeholders
  • values — which are the resolved placeholders, so in my example they are [“John”, “Smith”]

A Template Processor simply uses the “fragments” and “values” to put the final output together, for eg, I can implement a custom Template Processor that capitalizes the fragments the following way:

StringTemplate.Processor<String, RuntimeException> UPPER =
        StringTemplate.Processor.of((StringTemplate st) -> {
            StringBuilder sb = new StringBuilder();
            Iterator<String> fragIter = st.fragments().iterator();
            for (Object value : st.values()) {
            sb.append(fragIter.next().toUpperCase());
            sb.append(value);
            }
            sb.append(fragIter.next());
            return sb.toString();
        });
You can imagine highly specialized String Template Processors coming up that can handle the scenario of SQL injection attacks for example.

Conclusion

String Template is a welcome addition to the Java ecosystem and simplifies scenarios where a string needs to be composed of various expressions. It is still a preview feature as of Java 21, so its use in production code is not recommended until it is GA, but it is worth checking out to see how it works.

These are the resources that go with this article:

String Template JEP — https://openjdk.org/jeps/430

Saturday, April 29, 2023

EventArc with CloudRun

 Google Cloud EventArc provides a simple way to act on events generated by a variety of Google Cloud Services.


Consider an example.

When a Cloud Build trigger is run, I want to be notified of this event -


Eventarc makes this integration simple


The internals of how it does this is documented well. Based on the source, the event is either received by EventArc directly or via Cloud Audit Logs. EventArc then dispatches the event to the destination via another pub/sub topic that it maintains. 

These underlying details are well hidden though, so as a developer concerned only about consuming the Build Events, I can focus on the payload of the event and ignore the mechanics of how EventArc gets the message from the source to my service.

Sample EventArc listener

Since I am interested in just the events and its payload, all I have to do from an application perspective is to expose an HTTP endpoint responding to a POST message with the content being the event that I am concerned about. Here is such an endpoint in Java using Spring Boot as the framework:

@RestController
public class EventArcMessageController {
    ...
    
    @RequestMapping(value = "/", method = RequestMethod.POST)
    public Mono<ResponseEntity<JsonNode>> receiveMessage(
            @RequestBody JsonNode body, @RequestHeader Map<String, String> headers) {
        LOGGER.info("Received message: {}, headers: {}", JsonUtils.writeValueAsString(body, objectMapper), headers);
        return Mono.just(ResponseEntity.ok(body));
    }
}


The full sample is available here

In this specific instance all the endpoint is doing is to log the message and the headers accompanying the message. As long as the response code is 200, EventArc would consider the handling to be successful. 

EventArc supports over 130 Google Cloud Services, so consuming myriad events from a bunch of services is easy.

EventArc Trigger

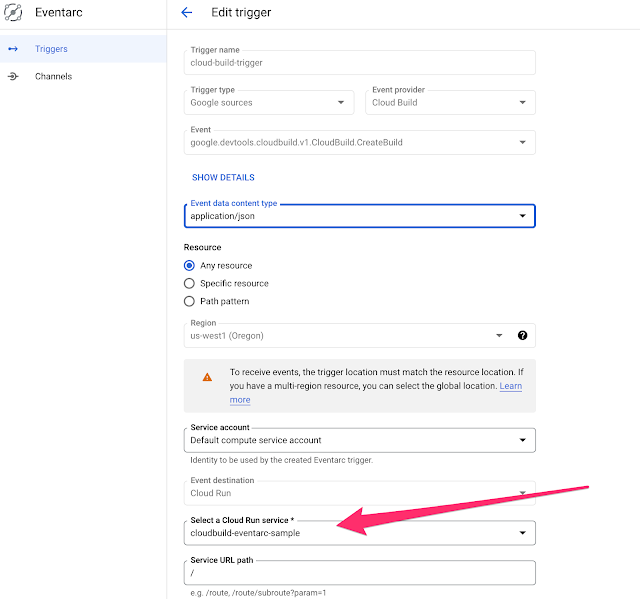
Once I have the EventArc deployed as a Cloud Run service, to integrate this with the Cloud Build Events in EventArc, all I have to do is to create an EventArc trigger. This can be done using the UI:


or using command line:

gcloud eventarc triggers update cloud-build-trigger \
--location=us-west1 \
--destination-run-service=cloudbuild-eventarc-sample \
--destination-run-region=us-west1 \
--destination-run-path="/" \
--event-filters="type=google.cloud.audit.log.v1.written" \
--event-filters="serviceName=cloudbuild.googleapis.com" \
--event-filters="methodName=google.devtools.cloudbuild.v1.CloudBuild.CreateBuild"

and that is it, EventArc handles all the underlying details of the integration.


Conclusion

I have the full java code available here which shows what a full code would look like. EventArc makes it very simple to integrate events from Google Cloud Services with custom applications.


Thursday, December 29, 2022

Bigtable Pagination in Java

 Consider a set of rows stored in Bigtable table called “people”:


My objective is to be able to paginate a few records at a time, say with each page containing 4 records:


Page 1:


Page 2:


Page 3:


High-Level Approach

A high level approach to doing this is to introduce two parameters:

  • Offset — the point from which to retrieve the records.
  • Limit — the number of records to retrieve per page
Limit in all cases is 4 in my example. Offset provides some way to indicate where to retrieve the next set of records from. Bigtable orders the record lexicographically using the key of each row, so one way to indicate offset is by using the key of the last record on a page. Given this, and using a marker offset of empty string for the first page, offset and record for each page looks like this:

Page 1 — offset: “”, limit: 4


Page 2 — offset: “person#id-004”, limit: 4

Page 3 — offset: “person#id-008”, limit: 4


The challenge now is in figuring out how to retrieve a set of records given a prefix, an offset, and a limit.

Retrieving records given a prefix, offset, limit

Bigtable java client provides a “readRows” api, that takes in a Query and returns a list of rows.

import com.google.cloud.bigtable.data.v2.BigtableDataClient
import com.google.cloud.bigtable.data.v2.models.Query
import com.google.cloud.bigtable.data.v2.models.Row

val rows: List<Row> = bigtableDataClient.readRows(query).toList()

Now, Query has a variant that takes in a prefix and returns rows matching the prefix:

import com.google.cloud.bigtable.data.v2.BigtableDataClient
import com.google.cloud.bigtable.data.v2.models.Query
import com.google.cloud.bigtable.data.v2.models.Row

val query: Query = Query.create("people").limit(limit).prefix(keyPrefix)
val rows: List<Row> = bigtableDataClient.readRows(query).toList()        

This works for the first page, however, for subsequent pages, the offset needs to be accounted for.

A way to get this to work is to use a Query that takes in a range:

import com.google.cloud.bigtable.data.v2.BigtableDataClient
import com.google.cloud.bigtable.data.v2.models.Query
import com.google.cloud.bigtable.data.v2.models.Row
import com.google.cloud.bigtable.data.v2.models.Range

val range: Range.ByteStringRange = 
    Range.ByteStringRange
        .unbounded()
        .startOpen(offset)
        .endOpen(end)

val query: Query = Query.create("people")
                    .limit(limit)
                    .range(range)

The problem with this is to figure out what the end of the range should be. This is where a neat utility that the Bigtable Java library provides comes in. This utility given a prefix of “abc”, calculates the end of the range to be “abd”

import com.google.cloud.bigtable.data.v2.models.Range

val range = Range.ByteStringRange.prefix("abc")
Putting this all together, a query that fetches paginated rows at an offset looks like this:

val query: Query =
    Query.create("people")
        .limit(limit)
        .range(Range.ByteStringRange
            .prefix(keyPrefix)
            .startOpen(offset))

val rows: List<Row> = bigtableDataClient.readRows(query).toList()

When returning the result, the final key needs to be returned so that it can be used as the offset for the next page, this can be done in Kotlin by having the following type:

data class Page<T>(val data: List<T>, val nextOffset: String)

Conclusion

I have a full example available here — this pulls in the right library dependencies and has all the mechanics of pagination wrapped into a working sample.

Cloud Run Health Checks — Spring Boot App

 Cloud Run services now can configure startup and liveness probes for a running container.


The startup probe is for determining when a container has cleanly started up and is ready to take traffic. A Liveness probe kicks off once a container has started up, to ensure that the container remains functional — Cloud Run would restart a container if the liveness probe fails.


Implementing Health Check Probes

A Cloud Run service can be described using a manifest file and a sample manifest looks like this:


apiVersion: serving.knative.dev/v1
kind: Service
metadata:
  annotations:
    run.googleapis.com/ingress: all
  name: health-cloudrun-sample
spec:
  template:
    metadata:
      annotations:
        autoscaling.knative.dev/maxScale: '5'
        autoscaling.knative.dev/minScale: '1'
    spec:
      containers:
        image: us-west1-docker.pkg.dev/sample-proj/sample-repo/health-app-image:latest

        startupProbe:
          httpGet:
            httpHeaders:
            - name: HOST
              value: localhost:8080
            path: /actuator/health/readiness
          initialDelaySeconds: 15
          timeoutSeconds: 1
          failureThreshold: 5
          periodSeconds: 10

        livenessProbe:
          httpGet:
            httpHeaders:
            - name: HOST
              value: localhost:8080
            path: /actuator/health/liveness
          timeoutSeconds: 1
          periodSeconds: 10
          failureThreshold: 5

        ports:
        - containerPort: 8080
          name: http1
        resources:
          limits:
            cpu: 1000m
            memory: 512Mi


This manifest can then be used for deployment to Cloud Run the following way:

gcloud run services replace sample-manifest.yaml --region=us-west1

Now, coming back to the manifest, the startup probe is defined this way:

startupProbe:
  httpGet:
    httpHeaders:
    - name: HOST
      value: localhost:8080
    path: /actuator/health/readiness
  initialDelaySeconds: 15
  timeoutSeconds: 1
  failureThreshold: 5
  periodSeconds: 10

It is set to make an http request to a /actuator/health/readiness path. There is an explicit HOST header also provided, this is temporary though as Cloud Run health checks currently have a bug where this header is missing from the health check requests.

The rest of the properties indicate the following:

  • initialDelaySeconds — delay for performing the first probe
  • timeoutSeconds — timeout for the health check request
  • failureThreshold — number of tries before the container is marked as not ready
  • periodSeconds — the delay between probes

Once the startup probe succeeds, Cloud Run would mark the container as being available to handle the traffic.

A livenessProbe follows a similar pattern:

livenessProbe:
  httpGet:
    httpHeaders:
    - name: HOST
      value: localhost:8080
    path: /actuator/health/liveness
  timeoutSeconds: 1
  periodSeconds: 10
  failureThreshold: 5

From a Spring Boot application perspective, all that needs to be done is to enable the Health check endpoints as described here


Conclusion

Start-Up probe ensures that a container receives traffic only when ready and a Liveness probe ensures that the container remains healthy during its operation, else gets restarted by the infrastructure. These health probes are a welcome addition to the already excellent feature set of Cloud Run.


Wednesday, December 28, 2022

Skaffold for Cloud Run and Local Environments

In one of my previous posts, I had explored using Cloud Deploy to deploy to a Cloud Run environment. Cloud Deploy uses a Skaffold file to internally orchestrate the steps required to build an image, adding the coordinates of the image to the manifest files and deploying it to a runtime. This works out great, not so much for local development and testing though. The reason is a lack of local Cloud Run runtime.

A good alternative is to simply use a local distribution of Kubernetes — say a minikube or kind. This will allow Skaffold to be used to its full power — with an ability to provide a quick development loop, debug, etc. I have documented some of the features here. The catch however is that there will now need to be two different sets of details of the environments maintained along with their corresponding sets of manifests — ones targeting Cloud Run, targeting minikube.


Skaffold patching is a way to do this and this post will go into the high-level details of the approach.

Skaffold Profiles and Patches

My original Skaffold configuration looks like this, targeting a Cloud Run environment:

apiVersion: skaffold/v3alpha1
kind: Config
metadata:
  name: clouddeploy-cloudrun-skaffold
manifests:
  kustomize:
    paths:
      - manifests/base
build:
  artifacts:
    - image: clouddeploy-cloudrun-app-image
      jib: { }
profiles:
  - name: dev
    manifests:
      kustomize:
        paths:
          - manifests/overlays/dev
  - name: prod
    manifests:
      kustomize:
        paths:
          - manifests/overlays/prod
deploy:
  cloudrun:
    region: us-west1-a

The “deploy.cloudrun” part indicates that it is targeting a Cloud Run environment.

So now, I want a different behavior in “local” environment, the way to do this in skaffold is to create a Skaffold profile that specifies what is different about this environment:

apiVersion: skaffold/v3alpha1
kind: Config
metadata:
  name: clouddeploy-cloudrun-skaffold
manifests:
  kustomize:
    paths:
      - manifests/base
build:
  artifacts:
    - image: clouddeploy-cloudrun-app-image
      jib: { }
profiles:
  - name: local
    # Something different on local
  - name: dev
    manifests:
      kustomize:
        paths:
          - manifests/overlays/dev
  - name: prod
    manifests:
      kustomize:
        paths:
          - manifests/overlays/prod
deploy:
  cloudrun:
    region: us-west1-a

I have two things different on local,

the deploy environment will be a minikube-based Kubernetes environment
the manifests file will be for this Kubernetes environment.
For the first requirement:

apiVersion: skaffold/v3alpha1
kind: Config
metadata:
  name: clouddeploy-cloudrun-skaffold
manifests:
  kustomize:
    paths:
      - manifests/base
build:
  artifacts:
    - image: clouddeploy-cloudrun-app-image
      jib: { }
profiles:
  - name: local
    patches:
      - op: remove
        path: /deploy/cloudrun
    deploy:
      kubectl: { }
  - name: dev
    manifests:
      kustomize:
        paths:
          - manifests/overlays/dev
  - name: prod
    manifests:
      kustomize:
        paths:
          - manifests/overlays/prod
deploy:
  cloudrun:
    region: us-west1-a

To specify the deploy environment where patches come, here the patch indicates that I want to remove Cloudrun as a deployment environment and add in Kubernetes.

And for the second requirement of generating a Kubernetes manifest, a rawYaml tag is introduced:

apiVersion: skaffold/v3alpha1
kind: Config
metadata:
  name: clouddeploy-cloudrun-skaffold
manifests:
  kustomize:
    paths:
      - manifests/base
build:
  artifacts:
    - image: clouddeploy-cloudrun-app-image
      jib: { }
profiles:
  - name: local
    manifests:
      kustomize: { }
      rawYaml:
        - kube/app.yaml
    patches:
      - op: remove
        path: /deploy/cloudrun
    deploy:
      kubectl: { }
  - name: dev
    manifests:
      kustomize:
        paths:
          - manifests/overlays/dev
  - name: prod
    manifests:
      kustomize:
        paths:
          - manifests/overlays/prod
deploy:
  cloudrun:
    region: us-west1-a

In this way a combination of Skaffold profiles and patches are used for tweaking the local deployment for Minikube.

Activating Profiles

When testing on local the “local” profile can be activated this way with Skaffold — with a -p flag:

skaffold dev -p local

One of the most useful command that I got to use is the “diagnose” command in skaffold which clearly showed what skaffold configuration is active for specific profiles:

skaffold diagnose -p local

which generated this resolved configuration for me:

apiVersion: skaffold/v3
kind: Config
metadata:
  name: clouddeploy-cloudrun-skaffold
build:
  artifacts:
  - image: clouddeploy-cloudrun-app-image
    context: .
    jib: {}
  tagPolicy:
    gitCommit: {}
  local:
    concurrency: 1
manifests:
  rawYaml:
  - /Users/biju/learn/clouddeploy-cloudrun-sample/kube/app.yaml
  kustomize: {}
deploy:
  kubectl: {}
  logs:
    prefix: container

Conclusion

There will likely be better support for Cloud Run on a local environment, for now, a minikube based Kubernetes is a good stand-in. Skaffold with profiles and patches can target this environment on a local box. This allows Skaffold features like quick development loop, debugging, etc to be activated while an application is in the process of being developed.

Wednesday, November 16, 2022

CloudEvent Basics

CloudEvent is a way of describing events in a common way. This specification is starting to be adopted across different event producers across Cloud Providers, which over time will provide these benefits:

  • Consistency: The format of an event looks the same irrespective of the source producing the event, systems which transmit the event and systems consuming the event. 
  • Tooling: Since there is a consistency in format, tooling and libraries can depend on this common format

Cloud Event Sample

One of the ways I have got my head around CloudEvent is to look at samples. Here is a sample Cloud Event published by a Google Cloud Pub/Sub topic, this is in a json format(there are other formats to represent a CloudEvent, for eg, avro or protobuf):
{
  "data": {
    "subscription": "projects/test-project/subscriptions/my-subscription",
    "message": {
      "attributes": {
        "attr1": "attr1-value"
      },
      "data": "dGVzdCBtZXNzYWdlIDM=",
      "messageId": "message-id",
      "publishTime": "2021-02-05T04:06:14.109Z",
      "orderingKey": "ordering-key"
    }
  },
  "datacontenttype": "application/json",
  "id": "3103425958877813",
  "source": "//pubsub.googleapis.com/projects/test-project/topics/my-topic",
  "specversion": "1.0",
  "time": "2021-02-05T04:06:14.109Z",
  "type": "google.cloud.pubsub.topic.v1.messagePublished"
}
Some of the elements in this event are:

  1. “id” which uniquely identifies the event
  2. “source” which identifies the system generating the event
  3. “specversion” identifies the CloudEvent specificiation that this event complies with
  4. “type” defining the type of event produced by the source system
  5. “datacontenttype” which describes the content type of the data
  6. “data”, which is the actual event payload, the structure of this specifically can change based on the “type” of event.
The “id”, “source”, “specversion” and “type” fields are mandatory

Cloud Event Extensions

In certain cases there will be additional attributes that may be needed to be understood across systems which produce and consume messages. A good example is distributed tracing where tracing attributes may need to be present in event data, to support these cases, events can have extension attributes. An example is the following:

{
  "data": {
    "subscription": "projects/test-project/subscriptions/my-subscription",
    "message": {
      "attributes": {
        "attr1": "attr1-value"
      },
      "data": "dGVzdCBtZXNzYWdlIDM=",
      "messageId": "message-id",
      "publishTime": "2021-02-05T04:06:14.109Z",
      "orderingKey": "ordering-key"
    }
  },
  "datacontenttype": "application/json",
  "id": "3103425958877813",
  "source": "//pubsub.googleapis.com/projects/test-project/topics/my-topic",
  "specversion": "1.0",
  "time": "2021-02-05T04:06:14.109Z",
  "type": "google.cloud.pubsub.topic.v1.messagePublished",
  "traceparent": "00-4bf92f3577b34da6a3ce929d0e0e4736-00f067aa0ba902b7-01",
  "tracestate": "rojo=00-4bf92f3577b34da6a3ce929d0e0e4736-00f067aa0ba902b7-01,congo=lZWRzIHRoNhcm5hbCBwbGVhc3VyZS4"
}

where “traceparent” and “tracestate” capture the distribution tracing related attributes. Some of the other extension types are documented here.

Data Attribute

The event payload is contained in the “data” attribute (or can be base 64 encoded into a “data_base64” attribute). The structure of the data attribute is entirely depends on the event type. There is a level of specification that can be specified by the event type using an additional attribute called “dataschema”.

Consider another sample for a log entry data related event in Google Cloud:

{
  "data": {
    "insertId": "1234567",
    "logName": "projects/test-project/logs/cloudaudit.googleapis.com%2Fdata_access",
    "protoPayload": {
      "authenticationInfo": {
        "principalEmail": "robot@test-project.iam.gserviceaccount.com"
      },
      "methodName": "jobservice.jobcompleted",
      "requestMetadata": {
        "callerIp": "2620:15c:0:200:1a75:e914:115b:e970",
        "callerSuppliedUserAgent": "google-cloud-sdk357.0.0 (gzip),gzip(gfe)",
        "destinationAttributes": {
          
        },
        "requestAttributes": {
          
        }
      },
      "resourceName": "projects/test-project/jobs/sample-job",
      "serviceData": {
        "jobCompletedEvent": {
          "eventName": "query_job_completed",
          "job": {
            "jobConfiguration": {
              "query": {
                "createDisposition": "CREATE_IF_NEEDED",
                "defaultDataset": {
                  
                },
                "destinationTable": {
                  "datasetId": "sample-dataset",
                  "projectId": "test-project",
                  "tableId": "sample-table"
                },
                "query": "sample-query",
                "queryPriority": "QUERY_INTERACTIVE",
                "statementType": "SELECT",
                "writeDisposition": "WRITE_TRUNCATE"
              }
            }
          }
        }
      },
      "serviceName": "bigquery.googleapis.com",
      "status": {
        
      }
    },
    "receiveTimestamp": "2021-11-25T21:56:00.653866570Z",
    "resource": {
      "labels": {
        "project_id": "test-project"
      },
      "type": "bigquery_resource"
    },
    "severity": "INFO",
    "timestamp": "2021-11-25T21:56:00.276607Z"
  },
  "datacontenttype": "application/json; charset=utf-8",
  "dataschema": "https://googleapis.github.io/google-cloudevents/jsonschema/google/events/cloud/audit/v1/LogEntryData.json",
  "id": "projects/test-project/logs/cloudaudit.googleapis.com%2Fdata_access1234567123456789",
  "methodName": "jobservice.jobcompleted",
  "recordedTime": "2021-11-25T21:56:00.276607Z",
  "resourceName": "projects/test-project/jobs/sample-job",
  "serviceName": "bigquery.googleapis.com",
  "source": "//cloudaudit.googleapis.com/projects/test-project/logs/data_access",
  "specversion": "1.0",
  "subject": "bigquery.googleapis.com/projects/test-project/jobs/sample-job",
  "time": "2021-11-25T21:56:00.653866570Z",
  "type": "google.cloud.audit.log.v1.written"
}

The “data” field is fairly complicated here, however see how there is a reference to a “dataschema” pointing to this document — https://googleapis.github.io/google-cloudevents/jsonschema/google/events/cloud/audit/v1/LogEntryData.json

which describes the elements in the “data”, using json schema specification

Conclusion

CloudEvents attempts to solve the issue of different event sources using different ways to represent an event, by providing a common specification.

This blog post provides a quick overview of the specification, in a future post I will go over how this is useful for writing eventing systems on Google Cloud.

Saturday, September 24, 2022

Cloud Deploy with Cloud Run

Google Cloud Deploy is a service to continuously deploy to Google Cloud Application runtimes. It has supported Google Kubernetes Engine(GKE) so far, and now is starting to support Cloud Run. This post is about a quick trial of this new and exciting support in Cloud Deploy. 

It may be simpler to explore the entire sample which is available in my github repo herehttps://github.com/bijukunjummen/clouddeploy-cloudrun-sample 


End to end Flow

The sample attempts to do the following:


A Cloud Build based build first builds an image. This image is handed over to Cloud Deploy which deploys to Cloud Run. A "dev" and "prod" target is simulated by the Cloud Run applications having names prefixed with the environment name.

Building an image

There are way too many ways to build a container image, my personal favorite is  the excellent Google jib tool which requires a simple plugin to be in place to create AND publish a container image. Once an image is created, the next task is to get the tagged image name for use with say a Kubernetes deployment manifest. 


Skaffold does a great job of orchestrating these two steps, creating an image and rendering the application runtime manifests with the image locations. Since the deployment is to a Cloud Run environment, the manifest looks something like this:


Now, manifest for each target environment may look a little different, so for eg in my case the application name targeted towards dev environment has a "dev-" prefix and for prod environment has a "prod-" prefix. This is where another tool called Kustomize fits in. Kustomize is fairly intuitive, it expresses the variations for each environment as a patch file, so for eg, in my case where I want to prefix the name of the application in the dev environment with a "dev-", the Kustomize configuration looks something like this:

So now, we have 3 tools:
  1. For building an image - Google Jib
  2. Generating the manifests based on environment - Kustomize
  3. Rending the image name in the manifests - Skaffold
Skaffold does a great job of wiring all the tools together, and looks something like this for my example:


Deploying the Image

In the Google Cloud Environment, Cloud Build is used for calling Skaffold and building the image, I have a cloudbuild.yaml file available with my sample, which shows how skaffold is invoked and the image built.

Let's come to the topic of the post, about deploying this image to Cloud Run using Cloud Deploy. Cloud Deploy uses a configuration file to describe where the image needs to be deployed, which is Cloud Run in this instance and how the deployment needs to be promoted across environments. The environments are referred to as "targets" and look like this in my configuration:

They point to the project and region for the Cloud Run service.

Next is the configuration to describe how the pipeline will take the application through the targets:

This simply shows that application will be first deployed to the "dev" target and then promoted to the "prod" target after approval.

The "profiles" in the each of the stages show the profile that will be activated in skaffold, which simply determines which overlay of kustomize will be used to create the manifest.

That covers the entire Cloud Deploy configuration. The next step once the configuration file is ready is to create the deployment pipeline, which is done using a command which looks like this:

gcloud deploy apply --file=clouddeploy.yaml --region=us-west1

and registers the pipeline with Cloud Deploy service.


So just to quickly recap, I now have the image built by Cloud Build, the manifests generated using skaffold, kustomize, and a pipeline registered with Cloud Deploy, the next step is to trigger the pipeline for the image and the artifacts, which is done through another command, which is hooked up to Cloud Build:
gcloud deploy releases create release-$SHORT_SHA --delivery-pipeline clouddeploy-cloudrun-sample --region us-west1 --build-artifacts artifacts.json

This would trigger the deploy to the different Cloud Run targets - "dev" in my case to start with:


Once deployed, I have a shiny Cloud Run app all ready to accept requests!


This can now be promoted to my "prod" target with a manual approval process:


Conclusion

Cloud Deploy's support for Cloud Run works great, it takes a familiar tooling with Skaffold typically meant for Kubernetes manifests and uses it cleverly for Cloud Run deployment flows. I look forward to more capabilities in Cloud Deploy with support for Blue/Green, Canary deployment models.